


• If the system status indicator (the indicator in the ThinkPad logo or the indicator in the center of the power
button) does not blink three times when an ac power source is connected, check the power cord of the ac
power adapter for correct continuity and installation.
• If the computer does not charge during operation, go to “Checking the built-in battery packs and
operational charging” on page 27.
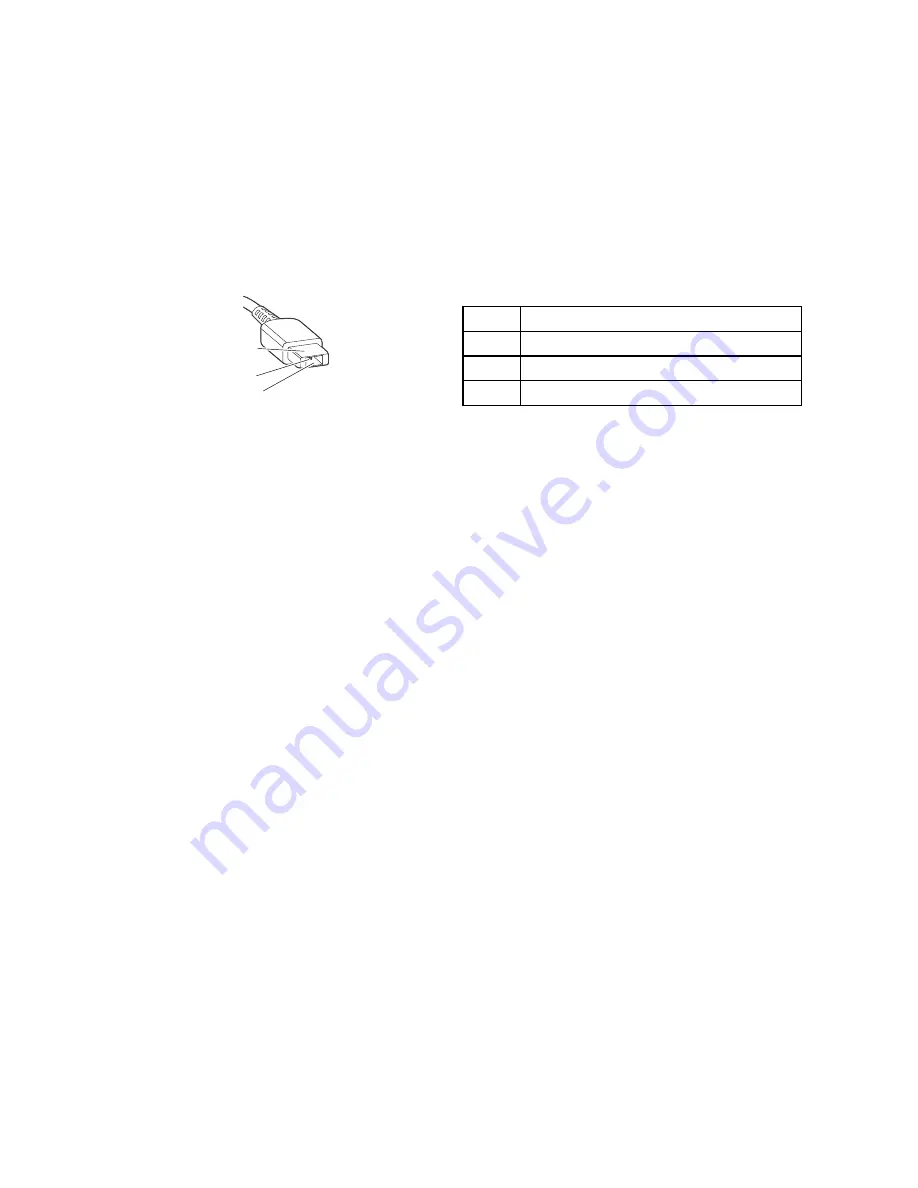
To check the ac power adapter, do the following:
1. Unplug the ac power adapter cable from the computer.
2. Measure the output voltage at the plug of the ac power adapter cable.
Pin
Voltage (V dc)
1
+20
2
0
3
Ground
(20V)
1
3
2
Note:
Output voltage of pin 2 of the ac power adapter might differ from the one you are servicing.
3. If the voltage is not correct, replace the ac power adapter.
4. If the voltage is acceptable, replace the system board.
Note:
Noise from the ac power adapter does not always indicate a defect.
Checking the built-in battery packs and operational charging
This system supports only batteries specially designed for this specific system and manufactured by Lenovo
or an authorized builder. The system does not support unauthorized batteries or batteries designed for other
systems. If an unauthorized battery or a battery designed for another systems is installed, the system will
not charge.
Attention:
Lenovo has no responsibility for the performance or safety of unauthorized batteries, and
provides no warranties for failures or damage arising out of their use.
The battery status icon in the Windows notification area displays the battery status and the percentage of
battery power remaining.
To check for detailed battery status information, do the following:
• For Windows 7: Open the Power Manager program and click the
Battery
tab.
• For Windows 8: Open the Lenovo Support program and click
Battery Health
, or open the Lenovo
Settings program and click
Power
.
To check whether the battery packs charge properly during operation, do the following:
1. Discharge the battery packs until the remaining battery power is less than 50%.
2. Connect the computer to ac power to charge the battery packs. If the battery status icon in the
Windows notification area indicates that the batteries are not charging, remove the battery packs and
let them return to room temperature.
3. Reinstall the battery packs. If the batteries are still not charging, replace the battery packs.
4. Check the battery status icon again. If the same error still exists, replace the system board.
Chapter 3
.
General checkout
27
Summary of Contents for Thinkpad X230s
Page 1: ...Hardware Maintenance Manual ThinkPad X230s ...
Page 6: ...iv Hardware Maintenance Manual ...
Page 11: ...DANGER DANGER DANGER DANGER DANGER Chapter 1 Safety information 5 ...
Page 12: ...6 Hardware Maintenance Manual ...
Page 13: ...PERIGO PERIGO PERIGO PERIGO PERIGO Chapter 1 Safety information 7 ...
Page 14: ...PERIGO PERIGO PERIGO DANGER DANGER 8 Hardware Maintenance Manual ...
Page 15: ...DANGER DANGER DANGER DANGER DANGER DANGER Chapter 1 Safety information 9 ...
Page 16: ...VORSICHT VORSICHT VORSICHT VORSICHT 10 Hardware Maintenance Manual ...
Page 17: ...VORSICHT VORSICHT VORSICHT VORSICHT Chapter 1 Safety information 11 ...
Page 18: ...12 Hardware Maintenance Manual ...
Page 19: ...Chapter 1 Safety information 13 ...
Page 20: ...14 Hardware Maintenance Manual ...
Page 21: ...Chapter 1 Safety information 15 ...
Page 22: ...16 Hardware Maintenance Manual ...
Page 23: ...Chapter 1 Safety information 17 ...
Page 24: ...18 Hardware Maintenance Manual ...
Page 28: ...22 Hardware Maintenance Manual ...
Page 46: ...40 Hardware Maintenance Manual ...
Page 50: ...44 Hardware Maintenance Manual ...
Page 58: ...52 Hardware Maintenance Manual ...
Page 62: ...56 Hardware Maintenance Manual ...
Page 71: ...4 5 6 7 7 7 7 Chapter 9 Removing or replacing a FRU 65 ...
Page 89: ...2 Removal steps of the LCD panel and LCD cable 1 1 Chapter 9 Removing or replacing a FRU 83 ...
Page 92: ...2 3 3 4 4 4 4 86 Hardware Maintenance Manual ...
Page 98: ...92 Hardware Maintenance Manual ...
Page 99: ......
Page 100: ...Part Number 0C10860_01 Printed in China 1P P N 0C10860_01 1P0C10860_01 ...


