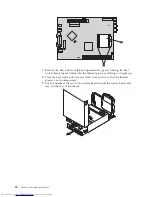
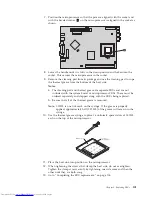
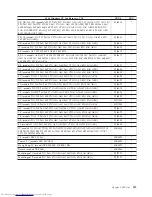
10.
To
remove
the
microprocessor
1
from
the
failing
system
board,
lift
the
small
handle
2
on
the
microprocessor
socket
to
its
maximum
vertical
position.
Carefully
lift
the
microprocessor
off
the
socket.
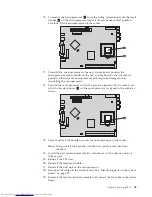
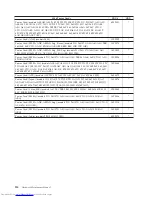
11.
To
install
the
microprocessor
on
the
new
system
board,
position
the
microprocessor
socket
handle
on
the
new
system
board
to
the
full
vertical
position.
Otherwise
the
microprocessor
pins
might
be
damaged
when
reinstalling
the
microprocessor.
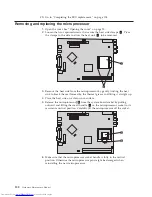
12.
Position
the
microprocessor
so
that
the
pins
are
aligned
with
the
socket
and
with
the
beveled
corner
1
on
the
microprocessor
is
aligned
in
the
socket
as
shown.
13.
Lower
and
lock
the
handle
to
secure
the
microprocessor
in
the
socket.
Note:
Do
not
install
the
heatsink
until
the
new
system
board
has
been
installed.
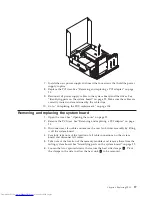
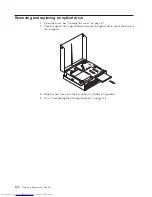
14.
Install
the
new
system
board
and
tray
into
the
rear
of
the
chassis
until
it
is
fully
seated.
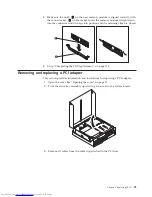
15.
Reinstall
the
PCI
riser.
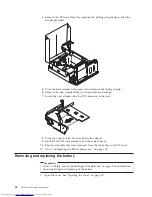
16.
Reinstall
the
memory
modules.
17.
Reinstall
the
heat
sink
on
the
microprocessor.
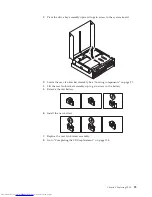
18.
Reconnect
all
cables
to
the
system
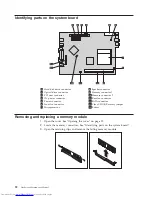
board.
See
“Identifying
parts
on
the
system
board”
on
page
92.
19.
Reinstall
the
rear
fan
bracket
assembly
and
connect
the
fan
cable
to
the
system
board.
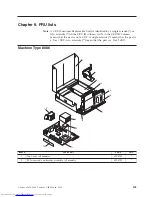
Chapter
8.
Replacing
FRUs
99
Summary of Contents for ThinkCentre 8086
Page 1: ...Hardware Maintenance Manual Types 8086 8087 8088 8089 Types 8090 8094 ...
Page 2: ......
Page 3: ...Hardware Maintenance Manual Types 8086 8087 8088 8089 Types 8090 8094 ...
Page 18: ...12 Hardware Maintenance Manual ...
Page 19: ...Chapter 2 Safety information 13 ...
Page 20: ... 18 kg 37 lbs 32 kg 70 5 lbs 55 kg 121 2 lbs 1 2 14 Hardware Maintenance Manual ...
Page 24: ...18 Hardware Maintenance Manual ...
Page 25: ...1 2 Chapter 2 Safety information 19 ...
Page 26: ...20 Hardware Maintenance Manual ...
Page 27: ...Chapter 2 Safety information 21 ...
Page 28: ...1 2 22 Hardware Maintenance Manual ...
Page 35: ...Chapter 2 Safety information 29 ...
Page 36: ...30 Hardware Maintenance Manual ...
Page 37: ...1 2 Chapter 2 Safety information 31 ...
Page 41: ...Chapter 2 Safety information 35 ...
Page 42: ...1 2 36 Hardware Maintenance Manual ...
Page 43: ...Chapter 2 Safety information 37 ...
Page 52: ...46 Hardware Maintenance Manual ...
Page 154: ...148 Hardware Maintenance Manual ...
Page 160: ...154 Hardware Maintenance Manual ...
Page 163: ......
Page 164: ...Part Number 19R2387 Printed in USA 1P P N 19R2387 ...