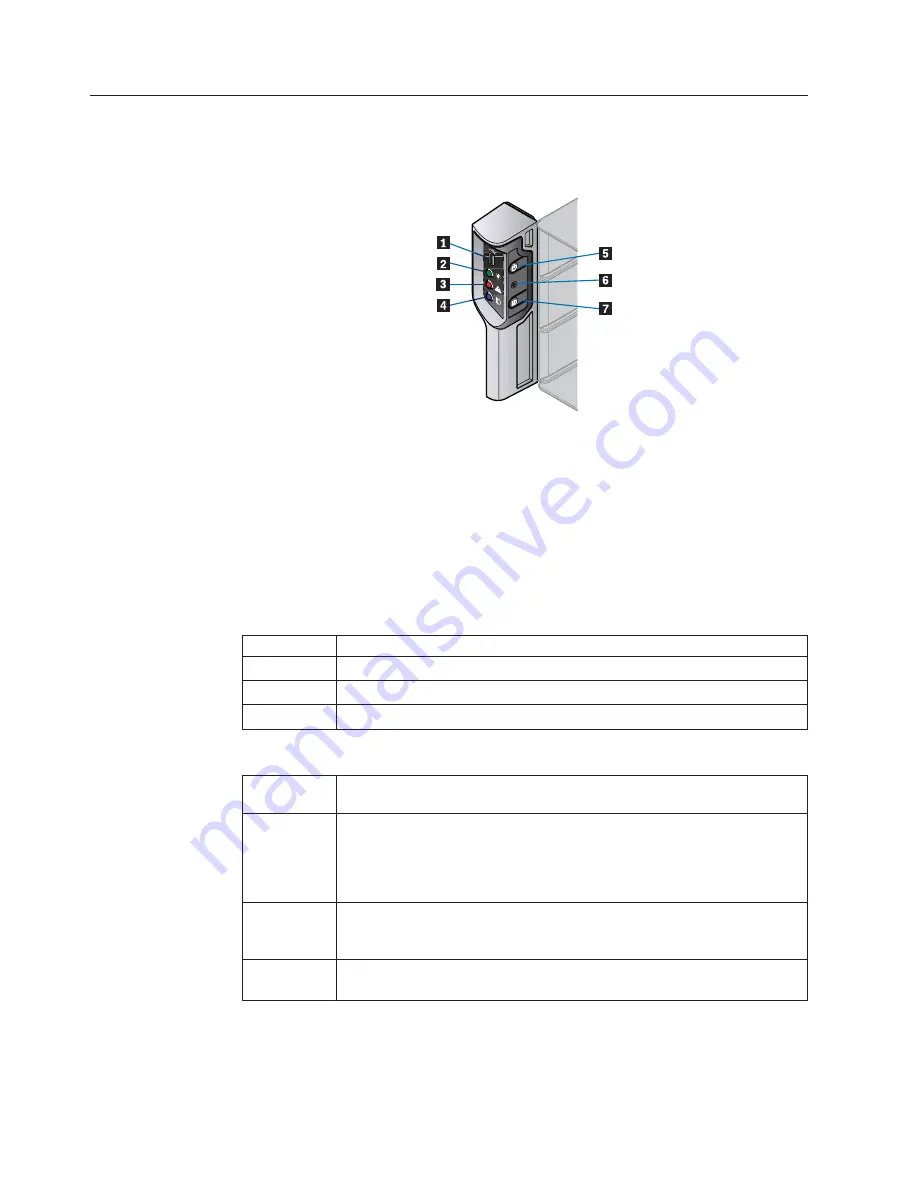
Front
operator's
panel
LEDs
and
switches
The
front
operator’s
panel
LED
fault
and
status
conditions
are
defined
in
Table
4.
Functions
of
the
push-button
switches
are
defined
in
Table
5.
1
USB
port
2
Power
active
LED
3
Unit
fault
LED
4
ID
LED
5
On/off
switch
6
Reset
button
(recessed)
7
ID
LED
activation
switch
Table
4.
Front
operator's
panel
LED
states
LED
Status
Power
active
Constant
green:
good
or
positive
indication
Unit
fault
Constant
amber:
fault
present
Enclosure
ID
Blue:
only
when
activated
Table
5.
Front
operator's
panel
switch
functions
Push-button
switch
Definition
On/Off
Function
of
this
button
is
dependent
on
the
enclosure
status.
Enclosure
connected
to
power
source
but
not
operating.
Press
button
to
activate
and
commence
boot
process.
Enclosure
operating
:
Depress
button
for
<4
seconds
to
turn
off
the
enclosure.
System
reset
Resets
the
enclosure
hardware
and
firmware.
This
button
is
recessed
and
is
activated
with
a
ball-point
pen
or
similar
implement.
Enclosure
ID
Each
press
of
this
button
causes
the
state
of
the
blue
ID
LED
on
the
Front
Operator's
Panel
and
rear
panel
to
change.
Figure
18.
Front
operator’s
panel
components
20
User
Guide
Summary of Contents for Secure Managed Client Storage Array
Page 1: ... Secure Managed Client Storage Array User Guide Machine Type 8332 ...
Page 2: ......
Page 3: ...Secure Managed Client Storage Array User Guide ...
Page 6: ...iv User Guide ...
Page 8: ...vi User Guide ...
Page 10: ...2 User Guide ...
Page 20: ...12 User Guide ...
Page 26: ...18 User Guide ...
Page 40: ...32 User Guide ...
Page 43: ......
Page 44: ...Part Number 45K1342 Printed in USA 1P P N 45K1342 ...


