
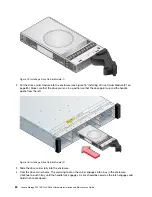


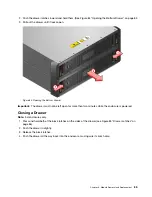


Figure 97. Removing an ESM
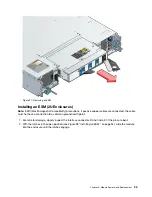
Installing an ESM (2U Enclosures)
Note:
EMC (Electromagnetic Compatibility) precautions: if passive copper cables are connected, the cable
must not have a connection to a common ground/earth point.
1. Examine for damage, closely inspect the interface connector. Do not install it if the pins are bent.
2. With the latches in the open position (see Figure 98 “Installing an ESM ” on page 94), slide the module
into the enclosure until the latches engage.
.
Module Removal and Replacement
93
Summary of Contents for D1212
Page 6: ...iv Lenovo Storage D1212 D1224 D3284Hardware Installation and Maintenance Guide ...
Page 20: ...xviii Lenovo Storage D1212 D1224 D3284Hardware Installation and Maintenance Guide ...
Page 26: ...6 Lenovo Storage D1212 D1224 D3284Hardware Installation and Maintenance Guide ...
Page 52: ...32 Lenovo Storage D1212 D1224 D3284Hardware Installation and Maintenance Guide ...
Page 55: ...Figure 37 Unpacking the 2U12 and 2U24 Enclosure Systems Chapter 3 Installation 35 ...
Page 70: ...50 Lenovo Storage D1212 D1224 D3284Hardware Installation and Maintenance Guide ...
Page 136: ...116 Lenovo Storage D1212 D1224 D3284Hardware Installation and Maintenance Guide ...
Page 142: ...122 Lenovo Storage D1212 D1224 D3284Hardware Installation and Maintenance Guide ...
Page 152: ...132 Lenovo Storage D1212 D1224 D3284Hardware Installation and Maintenance Guide ...
Page 153: ......
Page 154: ......


