


Completing
the
parts
replacement
After
completing
all
parts
replacements,
you
need
to
reinstall
the
computer
cover
and
reconnect
any
cables,
such
as
the
power
cords.
Depending
on
the
parts
replaced,
you
might
need
to
confirm
the
updated
information
in
the
Setup
Utility
program.
Refer
to
Chapter
4,
“Using
the
Setup
Utility,”
on
page
57.
To
replace
the
cover
and
connect
cables
to
your
computer:
1.
Ensure
that
all
components
have
been
reassembled
correctly
and
no
tools
or
loose
screws
are
left
inside
your
computer.
See
“Locating
components”
on
page
10
for
the
location
of
various
components.
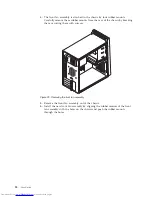
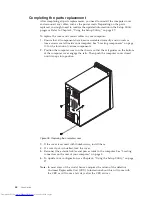
2.
Position
the
computer
cover
on
the
chassis
so
that
the
rail
guides
on
the
bottom
of
the
computer
cover
engage
the
rails.
Then
push
the
computer
cover
closed
until
it
snaps
into
position.
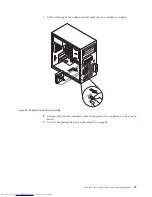
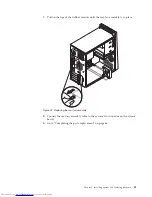
3.
If
the
cover
is
secured
with
thumbscrews,
install
them.
4.
If
a
cover
lock
is
installed,
lock
the
cover.
5.
Reconnect
the
external
cables
and
power
cords
to
the
computer.
See
“Locating
connectors
on
the
rear
of
your
computer”
on
page
8.
6.
To
update
your
configuration,
see
Chapter
4,
“Using
the
Setup
Utility,”
on
page
57.
Note:
In
most
areas
of
the
world,
Lenovo
requires
the
return
of
the
defective
Customer
Replaceable
Unit
(CRU).
Information
about
this
will
come
with
the
CRU
or
will
come
a
few
days
after
the
CRU
arrives.
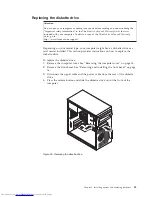
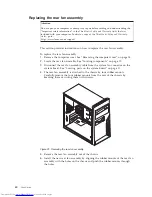
Figure
35.
Replacing
the
computer
cover
44
User
Guide
Summary of Contents for 7268D1U
Page 1: ......
Page 2: ......
Page 3: ...ThinkCentre User Guide ...
Page 6: ...iv User Guide ...
Page 8: ...vi User Guide ...
Page 20: ...12 User Guide ...
Page 56: ...48 User Guide ...
Page 64: ...56 User Guide ...
Page 72: ...64 User Guide ...
Page 78: ...11 Reconnect the mouse cable to the computer 12 Turn your computer back on 70 User Guide ...
Page 88: ...80 User Guide ...
Page 89: ......
Page 90: ...Part Number 53Y6337 Printed in USA 1P P N 53Y6337 ...


