


This
section
provides
instructions
on
how
to
replace
the
heat
sink
and
fan
assembly.
CAUTION:
The
heat
sink
and
fan
assembly
might
be
very
hot.
Turn
off
the
computer
and
wait
three
to
five
minutes
to
let
the
computer
cool
before
removing
the
computer
cover.
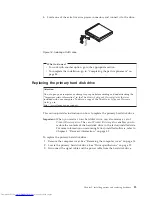
To
replace
the
heat
sink
and
fan
assembly:
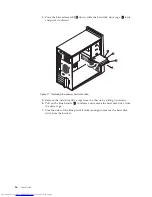
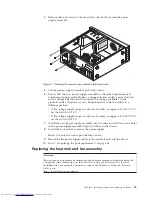
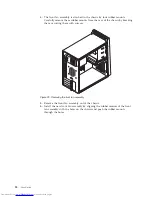
1.
Remove
the
computer
cover.
See
“Removing
the
computer
cover”
on
page
14.
2.
Lay
the
computer
on
its
side
for
easier
access
to
the
system
board.
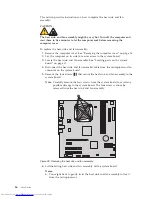
3.
Locate
the
heat
sink
and
fan
assembly.
See
“Locating
parts
on
the
system
board”
on
page
11.
4.
Disconnect
the
heat
sink
and
fan
assembly
cable
from
the
microprocessor
fan
connector
on
the
system
board.
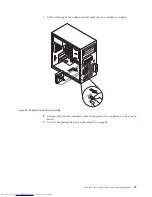
5.
Remove
the
four
screws
1
that
secure
the
heat
sink
and
fan
assembly
to
the
system
board.
Note:
Carefully
remove
the
four
screws
from
the
system
board
to
avoid
any
possible
damage
to
the
system
board.
The
four
screws
cannot
be
removed
from
the
heat
sink
and
fan
assembly.
6.
Lift
the
failing
heat
sink
and
fan
assembly
off
the
system
board.
Notes:
a.
You
might
have
to
gently
twist
the
heat
sink
and
fan
assembly
to
free
it
from
the
microprocessor.
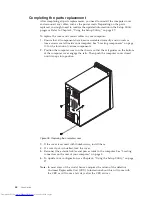
Figure
28.
Removing
the
heat
sink
and
fan
assembly
36
User
Guide
Summary of Contents for 7268D1U
Page 1: ......
Page 2: ......
Page 3: ...ThinkCentre User Guide ...
Page 6: ...iv User Guide ...
Page 8: ...vi User Guide ...
Page 20: ...12 User Guide ...
Page 56: ...48 User Guide ...
Page 64: ...56 User Guide ...
Page 72: ...64 User Guide ...
Page 78: ...11 Reconnect the mouse cable to the computer 12 Turn your computer back on 70 User Guide ...
Page 88: ...80 User Guide ...
Page 89: ......
Page 90: ...Part Number 53Y6337 Printed in USA 1P P N 53Y6337 ...


