background image

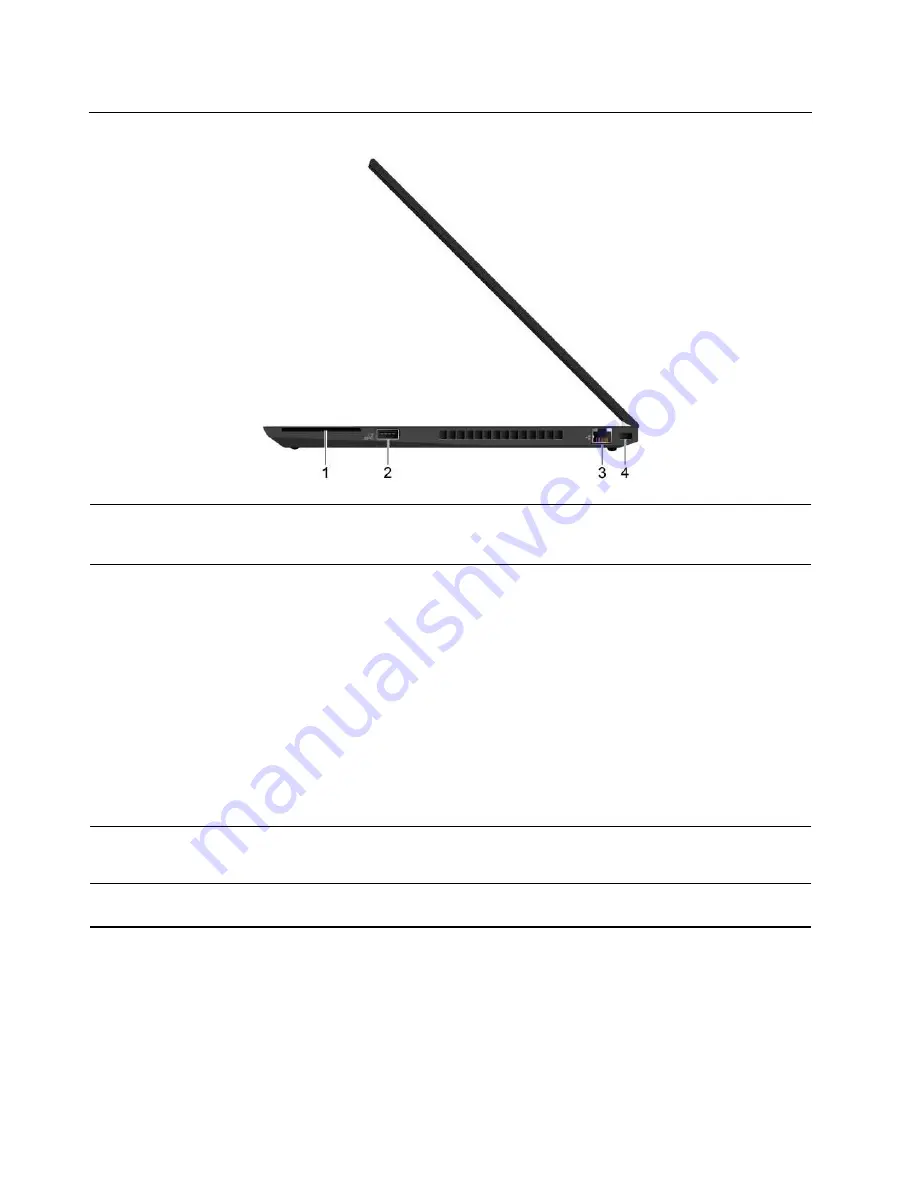
Right

1. Smart-card slot*

Use smart cards for authentication, data storage, and application processing. 
Within large organizations, you might also use smart cards for strong security 
authentication of single sign-on (SSO).

2. Always On USB 3.2 connector 
Gen 1

With the Always On USB feature enabled, the Always On USB 3.2 connector Gen 
1 can charge a USB-compatible device when the computer is on, off, in sleep 
mode, or in hibernation mode.

Notes: 

•  By default, 

Always On USB 

is enabled and 

Charge in Battery Mode 

is 

disabled in UEFI BIOS.

•  When the computer is off or in hibernation mode, and 

Charge in Battery Mode 

is disabled in UEFI BIOS, ensure that you have connected the computer to ac 
power.

To enable the Always On USB feature, do the following: 

1.  Enter the UEFI BIOS menu. See “Enter the UEFI BIOS menu” on page 49.

2.  Click 

Config 

➙ 

USB 

➙ 

Always On USB 

to enable the Always On USB 

feature.

3. Ethernet connector

Connect to a local area network (LAN). When the green indicator is on, the 
computer is connected to a LAN. When the yellow indicator blinks, data is being 
transmitted.

4. Security-lock slot

Lock your computer to a desk, table, or other fixtures through a compatible 
security cable lock. See “Lock the computer” on page 43.

* for selected models

8

T14 Gen 1, T15 Gen 1, P14s Gen 1, and P15s Gen 1 User Guide

Summary of Contents for 20S0

Page 1: ...T14 Gen 1 T15 Gen 1 P14s Gen 1 and P15s Gen 1 User Guide ...

Page 2: ...tant safety information on page 87 Safety and Warranty Guide Setup Guide First Edition April 2020 Copyright Lenovo 2020 LIMITED AND RESTRICTED RIGHTS NOTICE If data or software is delivered pursuant to a General Services Administration GSA contract use reproduction or disclosure is subject to restrictions set forth in Contract No GS 35F 05925 ...

Page 3: ...nnect to a Bluetooth enabled device 33 Set up an NFC connection for selected Intel models 33 Use a microSD card or smart card for selected models 34 Use the RFID feature for selected Intel models 35 Airplane mode 35 Chapter 4 Accessories 37 Purchase options 37 Docking station 37 Front view 38 Rear view 39 Attach a docking station 40 Detach a docking station 41 Connect multiple external displays 42...

Page 4: ...Gen 1 board 77 Chapter 8 Help and support 79 Frequently asked questions 79 Error messages 80 Beep errors 81 Self help resources 82 Call Lenovo 83 Before you contact Lenovo 83 Lenovo Customer Support Center 84 Purchase additional services 85 Appendix A Important safety information 87 Appendix B Accessibility and ergonomic information 101 Appendix C Supplemental information about the Linux operating...

Page 5: ...might not be applicable to your computer Documentation content is subject to change without notice Lenovo makes constant improvements on the documentation of your computer including this User Guide To get the latest documentation go to https pcsupport lenovo com Microsoft makes periodic feature changes to the Windows operating system through Windows Update As a result some information in this docu...

Page 6: ...iv T14 Gen 1 T15 Gen 1 P14s Gen 1 and P15s Gen 1 User Guide ...

Page 7: ...ction might not work 2 Camera with IR function Log in to your computer with face authentication See Use face authentication for selected models on page 47 Take pictures or record videos by clicking Camera from the Start menu The indicator next to the camera is on when the camera is in use If you use other apps that support photographing video chatting and video conference the camera starts automat...

Page 8: ...at support photographing video chatting and video conference the camera starts automatically when you enable the camera required feature from the app 6 Multi touch screen Enable you to use your computer with simple touch gestures See Use the multi touch screen for selected models on page 25 for selected models 2 T14 Gen 1 T15 Gen 1 P14s Gen 1 and P15s Gen 1 User Guide ...

Page 9: ...Base T14 Gen 1 for models without FRID and P14s Gen 1 T14 Gen 1 for models with RFID T15 Gen 1 and P15s Gen 1 Chapter 1 Meet your computer 3 ...

Page 10: ...rints See Use the fingerprint reader for selected models on page 46 4 Trackpad Perform finger touch and all the functions of a traditional mouse See Use the trackpad on page 23 5 NFC label for selected Intel models Your computer supports Near Field Communication NFC You can share information with another NFC enabled device See Set up an NFC connection for selected Intel models on page 33 6 TrackPo...

Page 11: ...Left Intel models AMD models Chapter 1 Meet your computer 5 ...

Page 12: ...tionality To purchase USB C accessories go to https www lenovo com accessories Supply power to another computer using P to P 2 0 charging function See Use P to P 2 0 charging function on page 31 Note When the battery power is below 10 the connected USB C accessories might not work correctly 3 Thunderbolt 3 connector USB C for Intel models Charge your computer Charge USB C compatible devices with t...

Page 13: ...e a qualified HDMI 2 0 cable instead of an HDMI 1 4 cable Change the HDMI standard of the HDMI connector from 2 0 to 1 4 To change the HDMI standard enter the UEFI BIOS menu see Enter the UEFI BIOS menu on page 49 and then configure HDMI Mode Select in the Config menu 7 Audio connector Connect headphones with a 3 5 mm 0 14 inch and 4 pole plug to listen to the sound from the computer Connect a hea...

Page 14: ...er is off or in hibernation mode and Charge in Battery Mode is disabled in UEFI BIOS ensure that you have connected the computer to ac power To enable the Always On USB feature do the following 1 Enter the UEFI BIOS menu See Enter the UEFI BIOS menu on page 49 2 Click Config USB Always On USB to enable the Always On USB feature 3 Ethernet connector Connect to a local area network LAN When the gree...

Page 15: ...computer if you accidentally spill liquid on the keyboard 3 Emergency reset hole If the computer stops responding and you cannot turn it off by pressing the power button reset your computer 1 Disconnect your computer from ac power 2 Insert a straightened paper clip into the hole to cut off power supply temporarily 3 Connect your computer to ac power and then turn on your computer Chapter 1 Meet yo...

Page 16: ...r in the ThinkPad logo on the computer lid shows the system status of your computer Blinking for three times The computer is initially connected to power On The computer is on Off The computer is off or in hibernation mode Blinking rapidly The computer is entering sleep or hibernation mode Blinking slowly The computer is in sleep mode for selected models 10 T14 Gen 1 T15 Gen 1 P14s Gen 1 and P15s ...

Page 17: ...on board memory module Note Depending on the system configuration memory speeds might vary Storage device M 2 solid state drive Hybrid solid state drive with Intel Optane memory for selected Intel models Display Brightness control Color display with Thin Film Transistor TFT technology Color display with In Plane Switching IPS or Twisted Nematic TN technology Display size T14 Gen 1 and P14s Gen 1 3...

Page 18: ...e authentication Fingerprint reader Password RFID Security lock slot ThinkShutter Trusted Platform Module TPM Wireless features Bluetooth Global Positioning System GPS satellite receiver available on models with wireless WAN NFC Wireless LAN Wireless WAN Others Camera Microphones for selected models Statement on USB transfer rate Depending on many factors such as the processing capability of the h...

Page 19: ...USB device Data rate Gbit s 3 2 Gen 1 3 1 Gen 1 5 3 2 Gen 2 3 1 Gen 2 10 3 2 Gen 2 2 20 Chapter 1 Meet your computer 13 ...

Page 20: ...14 T14 Gen 1 T15 Gen 1 P14s Gen 1 and P15s Gen 1 User Guide ...

Page 21: ... of the Administrator type With an Administrator account you can create additional user accounts or change account types by doing the following 1 Open the Start menu and select Settings Accounts Family other users 2 Follow the on screen instructions Microsoft account You can also log in to the Windows operating system with a Microsoft account To create a Microsoft account go to the Microsoft sign ...

Page 22: ...play all opened apps and switch among them 9 Windows notification area Display notifications and status of some features 10 Battery status icon Display power status and change battery or power settings When your computer is not connected to ac power the icon changes to 11 Network icon Connect to an available wireless network and display the network status When connected to a wired network the icon...

Page 23: ...on for which the computer is licensed Instead the Product ID is recorded in the computer firmware Whenever a Windows 10 product is installed the installation program checks the computer firmware for a valid matching Product ID to complete the activation In some cases an earlier Windows version might be preinstalled under the terms of the Windows 10 Pro license downgrade rights Connect to networks ...

Page 24: ...ou maintain your computer with automated updates and fixes configure hardware settings and get personalized support Access Lenovo Vantage Open the Start menu and click Lenovo Vantage You also can type Lenovo Vantage in the search box To download the latest version of Lenovo Vantage go to Microsoft Store and search by the app name Key features Lenovo Vantage enables you to Know the device status ea...

Page 25: ...e for cleaning Access Lenovo Quick Clean To access Lenovo Quick Clean do one of the following Open the Start menu and click Lenovo Quick Clean Type Lenovo Quick Clean in the search box Press Fn and the right Shift key at the same time To download the latest version of Lenovo Quick Clean go to https pcsupport lenovo com Interact with your computer Your computer provides you various ways to navigate...

Page 26: ...se When the key indicator is on you can type uppercase letters 3 F1 F12 function keys Invoke the special function printed as an icon on each key or standard function To choose whether to invoke the special function or standard function 1 Go to Control Panel and view by Large icons or Small icons 2 Click Keyboard or Lenovo Keyboard Manager and select the option of your preference 4 Numeric keypad I...

Page 27: ...are muted Darken the computer display Brighten the computer display Manage external displays Enable or disable the built in wireless features Open or collapse the notification center Answer incoming calls This function only works with some apps such as Skype for Business 2016 and Microsoft Teams 1 0 By default the function works with Skype for Business 2016 You can change the default setting on Le...

Page 28: ...D If your computer supports the PrivacyGuard feature press Fn D to enable or disable the feature For more information see Use privacy protection for selected models on page 27 Fn Left arrow key Equal the Home key Fn Right arrow key Equal the End key Use the TrackPoint pointing device The TrackPoint pointing device enables you to perform all the functions of a traditional mouse such as pointing cli...

Page 29: ... pointing device The TrackPoint pointing device is active by default To disable the device 1 Open the Start menu and then click Settings Devices Mouse 2 Follow the on screen instructions to disable TrackPoint Replace the pointing stick nonslip cap Note Ensure that the new cap has grooves a Use the trackpad The entire trackpad surface is sensitive to finger touch and movement You can use the trackp...

Page 30: ...ckpad with two fingers to perform the right click action Use the touch gestures Tap Tap anywhere on the trackpad with one finger to select or open an item Two finger tap Tap anywhere on the trackpad with two fingers to display a shortcut menu Two finger scroll Put two fingers on the trackpad and move them in the vertical or horizontal direction This action enables you to scroll through the documen...

Page 31: ...Some gestures are only available when you are using certain apps If the trackpad surface is stained with oil turn off the computer first Then gently wipe the trackpad surface with a soft and lint free cloth moistened with lukewarm water or computer cleaner For more gestures see the help information of the pointing device Disable the trackpad The trackpad is active by default To disable the device ...

Page 32: ...ding on the app Tap twice quickly Open an app or item from the desktop Tap and hold Open a shortcut menu Slide Scroll through items such as lists pages and photos Drag an item to the location you want Move an object Move two fingers closer together Zoom out Move two fingers farther apart Zoom in 26 T14 Gen 1 T15 Gen 1 P14s Gen 1 and P15s Gen 1 User Guide ...

Page 33: ...creen which might damage the touch panel or cause it to malfunction Do not use fingernails gloved fingers or inanimate objects for input on the screen Regularly calibrate the accuracy of the finger input to avoid a discrepancy Use privacy protection for selected models Use the PrivacyGuard feature Depending on the model your computer might support the PrivacyGuard feature When the feature is enabl...

Page 34: ...le PrivacyAlert automatically enables PrivacyGuard to prevent peeking eyes When the person leaves the icon disappears and the PrivacyGuard feature is disabled automatically Use the Intelligent Cooling feature The Intelligent Cooling feature enables your computer to work in the following three modes Quiet mode the quietest fan noise Balanced mode balanced performance and fan noise Performance mode ...

Page 35: ... area on the desktop and then click Display settings Detect For Intel models do not connect external displays to the USB C 3 2 Gen 1 connector 1 and the HDMI connector 2 at the same time Otherwise only the external display connected to the USB C 3 2 Gen 1 connector 1 will work by default You can change the priority between the USB C 3 2 Gen 1 connector and the HDMI connector from the UEFI BIOS men...

Page 36: ... an external display Extend these displays Extend the video output from your computer display to an external display You can drag and move items between the two displays Show only on 1 Display the video output only on your computer screen Show only on 2 Display the video output only on an external display If you show programs using DirectDraw or Direct3D in full screen mode only the main display s...

Page 37: ...ecommended battery temperature range for charging the battery is between 10 C 50 F and 35 C 95 F Notes To maximize the life of the battery once the battery is fully charged it must discharge to below 95 before it will be allowed to recharge again To extend your battery s lifespan we may optimize its full charge capacity based on your usage After prolonged periods of limited use full battery capaci...

Page 38: ...omputers to each other with a USB C to USB C cable Connect one computer to ac power In this situation ac power works as the power supply and both computers get charged Note The actual charging speed using the Lenovo unique P to P 2 0 charging function varies depending on many factors such as the remaining battery power of the computers the wattage of the ac power adapter and whether you are using ...

Page 39: ... 10 meters 33 feet at most from the computer 1 Turn on Bluetooth on the computer Click the action center icon in the Windows notification area Enable the Bluetooth feature Open the Start menu and then click Settings Devices Bluetooth other devices Turn on the Bluetooth switch 2 Click Add Bluetooth or other device Bluetooth 3 Select a Bluetooth device and then follow the on screen instructions Your...

Page 40: ...the following information Supported microSD card Note Your computer does not support the content protection for recordable media CPRM feature for the microSD card Secure Digital SD card Secure Digital eXtended Capacity SDXC card Secure Digital High Capacity SDHC card Supported smart card Supported smart card specifications 85 60 mm 3 37 inches x 53 98 mm 2 13 inches Attention Smart cards with slit...

Page 41: ...the card safely for future use Use the RFID feature for selected Intel models Depending on the model your computer might come with an integrated Radio Frequency Identification RFID reader With the RFID technology you can log in to an RFID enabled system using a granted RFID object such as an ID badge To log in to the system place your identification card above the area a Airplane mode When the Air...

Page 42: ...36 T14 Gen 1 T15 Gen 1 P14s Gen 1 and P15s Gen 1 User Guide ...

Page 43: ... of your computer Options include memory modules storage devices network cards port replicators or docking stations batteries power adapters keyboards mice and more To shop at Lenovo go to https www lenovo com accessories Docking station You can use the following docking stations to extend the capacity of your computer ThinkPad Basic Docking Station ThinkPad Pro Docking Station ThinkPad Ultra Dock...

Page 44: ...t Lenovo sales to purchase a system lock with the option part number 4XE0Q56388 2 Key lock indicator This indicator turns on when the system lock key is in the locked position 3 Docking status indicator This indicator turns on when your computer is successfully connected to the docking station 4 Power button Press the power button to turn on or turn off the computer attached to the docking station...

Page 45: ... Pro Docking Station ThinkPad Ultra Docking Station 1 Audio connector 2 ac power connector 3 DisplayPort connector 4 VGA connector 5 USB 2 0 connector 6 Always On USB 3 2 connector Gen 1 7 USB 3 2 connector Gen 1 8 Ethernet connector 9 Security lock slot 10 USB C connector 11 HDMI connector 12 Always On USB 3 2 connector Gen 2 13 USB 3 2 connector Gen 2 Chapter 4 Accessories 39 ...

Page 46: ...d step 7 in the following instruction If you do not connect the docking station to ac power the computer attached runs on battery power 1 Connect the docking station to ac power 2 Disconnect the cables and devices from the left side of the computer 3 Turn the system lock key to the unlocked position 4 Align the top left corner of the computer with the guide post of the docking station Attach your ...

Page 47: ...m lock key to the locked position Attention When the computer is attached to a docking station always hold the whole assembly when you need to move your computer Otherwise the docking station might drop down Detach a docking station Note The ThinkPad Basic Docking Station does not ship with a system lock installed If you do not purchase and install a system lock skip step 1 in the following instru...

Page 48: ...sure that the multiple displays work correctly observe the following guidelines and connect the external displays to the appropriate connectors Docking station Supported external displays Video connectors ThinkPad Basic Docking Station Up to two DisplayPort VGA ThinkPad Pro Docking Station Up to two DisplayPort x2 ThinkPad Ultra Docking Station Up to three DisplayPort x2 HDMI VGA 42 T14 Gen 1 T15 ...

Page 49: ...ce and security feature Cable locks for your product are available from Lenovo at https smartfind lenovo com Use passwords This section introduces types of passwords in UEFI Unified Extensible Firmware Interface BIOS Basic Input Output System and how to set change and remove a password Password types You can set a power on password supervisor password system management password or hard disk passwo...

Page 50: ...ing steps 2 Select Security Password System Management Password Access Control 3 Follow the on screen instructions If you have set both the supervisor password and the system management password the supervisor password overrides the system management password If you have set both the system management password and the power on password the system management password overrides the power on password...

Page 51: ... have been saved window press Enter 6 Press F10 to save changes and exit the UEFI BIOS menu If you have not set a supervisor password contact a Lenovo authorized service provider to have the power on password removed What to do if you forget your system management password If you forget your system management password do the following to remove the system management password If you have set a supe...

Page 52: ...solid state drive 1 Restart the computer When the logo screen is displayed press F10 to enter the Lenovo diagnostics window 2 On the TOOLS tab select SYSTEM INFORMATION STORAGE using the arrow keys 3 Locate the Device Type section to check the information Use the fingerprint reader for selected models If your computer comes with a fingerprint reader you can use it to enroll your fingerprints After...

Page 53: ...tructions to create a Personal Identification Number PIN 4 Locate the Windows Hello section and click Set up under Face Recognition Then click Get Started 5 Enter the PIN you have set earlier The camera preview starts 6 Follow the on screen instructions to complete the setup 7 Click Improve Recognition to improve the image so that Windows Hello can recognize you in different light conditions or wh...

Page 54: ...48 T14 Gen 1 T15 Gen 1 P14s Gen 1 and P15s Gen 1 User Guide ...

Page 55: ...IOS menu However you cannot change the system configurations that are protected by the supervisor password Navigate in the UEFI BIOS interface Attention The default configurations are already optimized for you in boldface Improper change of the configurations might cause unexpected results You can navigate in the UEFI BIOS interface by pressing the following keys F1 Display the General Help screen...

Page 56: ...s the recovery information of the Windows 10 operating system Ensure that you read and follow the on screen recovery instructions The data on your computer might be deleted during the recovery process To avoid data loss make a backup copy of all the data that you want to keep Restore system files and settings to an earlier point 1 Go to Control Panel and view by Large icons or Small icons 2 Click ...

Page 57: ...cautionary measure you can contact Lenovo Customer Support Center and purchase one from Lenovo For a list of the Lenovo Support phone numbers for your country or region go to https pcsupport lenovo com supportphonelist Create a recovery USB drive Attention The creation process deletes anything stored on the USB drive To avoid data loss make a backup copy of all the data that you want to keep 1 Ens...

Page 58: ...or TPM 2 0 is set to Active d Press F10 to save the settings and exit 3 For computer models that are installed with hybrid solid state drive with Intel Optane memory enter the UEFI BIOS menu and select Config Storage Controller mode Ensure that RST mode is selected 4 Connect the drive that contains the operating system installation program to the computer 5 Restart the computer When the logo scree...

Page 59: ... and install the latest driver by one of the following methods Open Lenovo Vantage to check the available update packages Select the update packages you want and then follow the on screen instructions to download and install the packages Go to https pcsupport lenovo com and select the entry for your computer Then follow the on screen instructions to download and install necessary drivers and softw...

Page 60: ...54 T14 Gen 1 T15 Gen 1 P14s Gen 1 and P15s Gen 1 User Guide ...

Page 61: ...e defective part that is replaced by the CRU When return is required 1 return instructions a prepaid shipping label and a container will be included with the replacement CRU and 2 you might be charged for the replacement CRU if Lenovo does not receive the defective CRU within thirty 30 days of your receipt of the replacement CRU For full details see the Lenovo Limited Warranty documentation at htt...

Page 62: ... automatically Wait three to five minutes to let the computer cool Replace a CRU Follow the replacement procedure to replace a CRU Base cover assembly T14 Gen 1 and P14s Gen 1 Prerequisite Before you start read Appendix A Important safety information on page 87 and print the following instructions Note Do not remove the base cover assembly when your computer is connected to ac power Otherwise ther...

Page 63: ... in ascending alphabetical order a to k 1 and remove the base cover assembly 2 7 Install the new base cover assembly in ascending alphabetical order a to i Ensure that the latches of the base cover assembly are secured under the base cover assembly Chapter 7 CRU replacement 57 ...

Page 64: ...nt safety information on page 87 and print the following instructions Note Do not remove the base cover assembly when your computer is connected to ac power Otherwise there might be a risk of short circuits Replacement procedure 1 Disable the built in battery See Disable Fast Startup and the built in battery on page 55 2 Turn off the computer and disconnect the computer from ac power and all conne...

Page 65: ... in ascending alphabetical order a to h 1 and remove the base cover assembly 2 7 Install the new base cover assembly in ascending alphabetical order a to k Ensure that the latches of the base cover assembly are secured under the base cover assembly Chapter 7 CRU replacement 59 ...

Page 66: ...ion Do not touch the contact edge of the memory module Otherwise the memory module might get damaged Replacement procedure To replace a memory module do the following 1 Disable the built in battery See Disable Fast Startup and the built in battery on page 55 2 Turn off the computer and disconnect the computer from ac power and all connected cables Then close the computer display 3 Remove the nano ...

Page 67: ...emory module downward until it snaps into place 2 Ensure that the memory module is firmly installed in the memory slot and cannot be moved easily 7 Reinstall the base cover assembly and the nano SIM card tray 8 Connect the ac power adapter and all disconnected cables to the computer M 2 solid state drive Prerequisite Before you start read Appendix A Important safety information on page 87 and prin...

Page 68: ...the M 2 solid state drive on a soft material such as cloth to absorb physical shocks Replacement procedure for the long M 2 solid state drive 1 Disable the built in battery See Disable Fast Startup and the built in battery on page 55 2 Turn off the computer and disconnect the computer from ac power and all connected cables Then close the computer display 3 Remove the nano SIM card tray if your com...

Page 69: ...ase cover assembly 8 Connect the ac power adapter and all disconnected cables to the computer Replacement procedure for the short M 2 solid state drive Note A Mylar film might cover the M 2 solid state drive To access the M 2 solid state drive open the film first 1 Disable the built in battery See Disable Fast Startup and the built in battery on page 55 2 Turn off the computer and disconnect the c...

Page 70: ...tall the base cover assembly and the nano SIM card tray 7 Connect the ac power adapter and all disconnected cables to the computer Coin cell battery Prerequisite Before you start read Appendix A Important safety information on page 87 and print the following instructions Replacement procedure 1 Disable the built in battery See Disable Fast Startup and the built in battery on page 55 2 Turn off the...

Page 71: ...ano SIM card tray 8 Connect the ac power adapter and all disconnected cables to the computer 9 Reset the system date and time in the UEFI BIOS menu See Set the system date and time on page 50 Wireless WAN card for selected models The following information is only for the computer with user installable modules Ensure that you use only a Lenovo authorized wireless module specifically tested for this...

Page 72: ...k for selected models on page 17 4 Remove the base cover assembly See Base cover assembly T14 Gen 1 and P14s Gen 1 on page 56 or Base cover assembly T15 Gen 1 and P15s Gen 1 on page 58 5 Remove the wireless WAN card Note A Mylar film might cover the wireless WAN card To access the wireless WAN card open the film first a Hold the cable connector with your fingers and gently disconnect each cable fr...

Page 73: ...all the base cover assembly and the nano SIM card tray 8 Connect the ac power adapter and all disconnected cables to the computer Wireless WAN card with four antenna cables for selected Intel models 1 Disable the built in battery See Disable Fast Startup and the built in battery on page 55 2 Turn off the computer and disconnect the computer from ac power and all connected cables Then close the com...

Page 74: ...ontact edge of the new wireless WAN card with the key in the slot Then carefully insert the card into the slot at an angle of about 20 degrees 1 Pivot the card downward 2 b Install the screw to secure the wireless WAN card in place 3 Connect the antenna cables to the card 4 Ensure that you connect the orange cable to the main connector on the card the blue cable to the auxiliary connector on the c...

Page 75: ...sure that you do not press or hold the keys while sliding the keyboard frame Otherwise the keyboard frame cannot be moved Your keyboard might look different from the illustrations in this topic 1 Disable the built in battery See Disable Fast Startup and the built in battery on page 55 2 Turn off the computer and disconnect the computer from ac power and all connected cables 3 For T15 Gen 1 and P15...

Page 76: ...lot between the TrackPoint buttons and the trackpad 1 Slightly pivot the tool downward 2 to release the left and right TrackPoint buttons Then remove the two Trackpoint buttons 3 5 Loosen the screws that secure the keyboard 70 T14 Gen 1 T15 Gen 1 P14s Gen 1 and P15s Gen 1 User Guide ...

Page 77: ...tool in the direction as shown to release the keyboard 1 Push the keyboard in the direction as shown by arrows 2 to release the latches from the keyboard bezel 8 Pivot the keyboard slightly upward as shown by arrow 1 Then turn over the keyboard as shown by arrow 2 Chapter 7 CRU replacement 71 ...

Page 78: ...he keyboard on the palm rest as shown and detach the connectors Then remove the keyboard 10 Attach the connectors and turn over the keyboard as shown 72 T14 Gen 1 T15 Gen 1 P14s Gen 1 and P15s Gen 1 User Guide ...

Page 79: ...Ensure that the top edge of the keyboard the edge that is close to the display is under the keyboard bezel 12 Slide the keyboard in the direction as shown by the arrows Ensure that the latches are secured under the keyboard frame Chapter 7 CRU replacement 73 ...

Page 80: ...ghten the screws to secure the keyboard 14 Take the new TrackPoint buttons out of the new keyboard package Install the TrackPoint buttons as shown 74 T14 Gen 1 T15 Gen 1 P14s Gen 1 and P15s Gen 1 User Guide ...

Page 81: ...ry See Disable Fast Startup and the built in battery on page 55 2 Turn off the computer and disconnect the computer from ac power and all connected cables Then close the computer display 3 Remove the nano SIM card tray if your computer comes with one See Connect to a cellular network for selected models on page 17 4 Remove the base cover assembly See Base cover assembly T14 Gen 1 and P14s Gen 1 on...

Page 82: ...sembly in place 1 and then install the screws to secure the speaker assembly 2 8 Attach the connector of the speaker assembly 9 Reinstall the base cover assembly and the nano SIM card tray 10 Connect the ac power adapter and all disconnected cables to the computer 76 T14 Gen 1 T15 Gen 1 P14s Gen 1 and P15s Gen 1 User Guide ...

Page 83: ...nected cables Then close the computer display 3 Remove the nano SIM card tray if your computer comes with one See Connect to a cellular network for selected models on page 17 4 Remove the base cover assembly See Base cover assembly T14 Gen 1 and P14s Gen 1 on page 56 or Base cover assembly T15 Gen 1 and P15s Gen 1 on page 58 5 Detach the connector of the Always On USB 3 2 connector Gen 1 board her...

Page 84: ...d install the screws to secure the board 3 8 Attach the connector of the board 9 Reinstall the base cover assembly and the nano SIM card tray 10 Connect the ac power adapter and all disconnected cables to the computer 78 T14 Gen 1 T15 Gen 1 P14s Gen 1 and P15s Gen 1 User Guide ...

Page 85: ...power and restart the computer What do I do if I spill liquid on the computer 1 Carefully unplug the ac power adapter and turn off the computer immediately The more quickly you stop the current from passing through the computer the more likely you will reduce damage from short circuits Attention Although you might lose some data or work by turning off the computer immediately leaving the computer ...

Page 86: ...ufficient storage space after POST The non volatile system UEFI variable storage is used by the UEFI BIOS and by the operating system or programs This error occurs when the operating system or programs store large amounts of data in the variable storage All data needed for POST such as UEFI BIOS setup settings chipset or platform configuration data are stored in a separate UEFI variable storage Pr...

Page 87: ...e proper diagnostic app and install it on your smartphone 3 Run the diagnostic app and place the smartphone near the computer 4 Press Fn on your computer to emit the beep again The diagnostic app decodes the beep error and shows possible solutions on the smartphone Note Do not attempt to service a product yourself unless instructed to do so by the Customer Support Center or product documentation O...

Page 88: ...d Warranty Guide Setup Guide This User Guide Regulatory Notice Go to https pcsupport lenovo com Then follow the on screen instructions to filter out the documentation you want Lenovo Support Web site with the latest support information of the following Drivers and software Diagnostic solutions Product and service warranty Product and parts details Knowledge base and frequently asked questions http...

Page 89: ...rror code What operating system are you using Which version Which software applications were running at the time of the problem Can the problem be reproduced If so how 2 Record the system information Product name Machine type and serial number The following illustration shows where to find the machine type and serial number of your computer Note Depending on the country or region of delivery the l...

Page 90: ...enovo hardware under warranty trained service personnel are available to provide the applicable level of service Engineering change management Occasionally there might be changes that are required after a product has been sold Lenovo or your reseller if authorized by Lenovo will make selected Engineering Changes ECs that apply to your hardware available Services not covered Replacement or use of p...

Page 91: ...vices During and after the warranty period you can purchase additional services from Lenovo at https www lenovo com services Service availability and service name might vary by country or region Chapter 8 Help and support 85 ...

Page 92: ...86 T14 Gen 1 T15 Gen 1 P14s Gen 1 and P15s Gen 1 User Guide ...

Page 93: ...includes references to power adapters and batteries In addition some products such as speakers and monitors ship with external power adapters If you have such a product this information applies to your product In addition computer products contain a coin sized internal battery that provides power to the system clock even when the computer is unplugged so the battery safety information applies to a...

Page 94: ... from your computer Protect the cables from being damaged Applying strong force to cables may damage or break them Route communication lines or the cables of an ac power adapter a mouse a keyboard a printer or any other electronic device so that they cannot be walked on tripped over pinched by your computer or other objects or in any way subject to treatment that could interfere with the operation...

Page 95: ...t from your product You might also hear sounds like popping cracking or hissing These might merely mean that an internal electronic component has failed in a safe and controlled manner Or they might indicate a potential safety issue Do not take risks or attempt to diagnose the situation yourself Contact the Customer Support Center for further guidance For a list of Service and Support phone number...

Page 96: ...stomer installation are referred to as Customer Replaceable Units or CRUs Lenovo provides documentation with instructions when it is appropriate for customers to install options or replace CRUs You must closely follow all instructions when installing or replacing parts The Off state of a power indicator does not necessarily mean that voltage levels inside a product are zero Before you remove the c...

Page 97: ...gradual corrosion of power cord terminals and or the connector terminals on a power adapter which can eventually result in overheating Ensure that all power cord connectors are securely and completely plugged into receptacles Do not use any power adapter that shows corrosion at the ac input pins or shows signs of overheating such as deformed plastic at the ac input pins or anywhere on the power ad...

Page 98: ...n electrician for more information if you have questions about power loads and branch circuit ratings Be sure that the power outlet you are using is properly wired easily accessible and located close to the equipment Do not fully extend power cords in a way that will stress the cords Be sure that the power outlet provides the correct voltage and current for the product you are installing Carefully...

Page 99: ... temperature charged to approximately 30 to 50 of capacity We recommend that the batteries be charged about once per year to prevent overdischarge Do not put the battery in trash that is disposed of in landfills When disposing of the battery comply with local ordinances or regulations Notice for built in rechargeable battery DANGER Do not attempt to remove or replace the built in rechargeable batt...

Page 100: ...ery is swallowed or placed inside any part of the body seek medical care immediately Do not Throw or immerse into water Heat to more than 100 C 212 F Repair or disassemble Leave in an extremely low air pressure environment Leave in an extremely high temperature environment Crush puncture cut or incinerate Dispose of the battery as required by local ordinances or regulations The following statement...

Page 101: ... computer or charge the battery near flammable materials or in explosive environments Ventilation slots fans and or heat sinks are provided with the product for safety comfort and reliable operation These features might inadvertently become blocked by placing the product on a bed sofa carpet or other flexible surface Never block cover or disable these features When the ac power adapter is connecte...

Page 102: ... parts enclosures are fastened into place Never use the computer when internal parts and circuits are exposed DANGER Connect and disconnect cables as described in the following procedures when installing moving or opening covers on this product or attached devices To connect 1 Turn everything OFF 2 First attach all cables to devices 3 Attach signal cables to connectors 4 Attach power cords to outl...

Page 103: ...connectors do not comply with specifications of EN 50332 2 The headphone output connector of your computer complies with EN 50332 2 Sub clause 7 This specification limits the computer s maximum wide band true RMS output voltage to 150 mV To help protect against hearing loss ensure that the headphones or earphones you use also comply with EN 50332 2 Clause 7 limits for a wide band characteristic vo...

Page 104: ... or CRU touch the static protective package containing the part to a metal expansion slot cover or other unpainted metal surface on the computer for at least two seconds This reduces static electricity in the package and your body When possible remove the static sensitive part from the static protective packaging and install the part without setting it down When this is not possible place the stat...

Page 105: ...the latches to keep the display open or closed Avoid directly exposing your computer and peripherals to the air from an appliance that can produce negative ions Wherever possible ground your computer to facilitate safe electrostatic discharge Clean your computer It is a good practice to clean your computer periodically to protect the surfaces and ensure trouble free operation Clean the computer co...

Page 106: ...100 T14 Gen 1 T15 Gen 1 P14s Gen 1 and P15s Gen 1 User Guide ...

Page 107: ...k Turn on or turn off Mouse Keys Left Alt Left Shift PrtScn or PrtSc Turn on or turn off High Contrast For more information go to https windows microsoft com and then search using any of the following keywords keyboard shortcuts key combinations shortcut keys Ease of Access Center Ease of Access Center on the Windows operating system enables you to configure your computers to suit their physical a...

Page 108: ...o use Speech Recognition 1 Go to Control Panel and view by Category 2 Click Ease of Access Speech Recognition 3 Follow the on screen instructions Screen reader technologies Screen reader technologies are primarily focused on software program interfaces help systems and various online documents For additional information about screen readers see the following Use PDFs with screen readers https www ...

Page 109: ...ugh a screen reader Each image in the documentation also includes adequate alternative text so that visually impaired users can understand the image when they use a screen reader Ergonomic information Good ergonomic practice is important to get the most from your personal computer and to avoid discomfort Arrange your workplace and the equipment you use to suit your individual needs and the kind of...

Page 110: ...possible to observe the best ergonomic practices when you are using your computer while on the move or in a casual setting Regardless of the setting try to observe as many of the tips as possible Sitting properly and using adequate lighting for example helps you maintain desirable levels of comfort and performance If your work area is not in an office setting ensure to take special note of employi...

Page 111: ...ory usr share doc lenovo doc If you cannot view the LLW either from the Web site or from your computer contact your local Lenovo office or reseller to obtain a printed version of the LLW Access Linux distributions Linux is an open source operating system and popular Linux distributions include Ubuntu and Fedora To learn more about the Ubuntu operating system go to https www ubuntu com To learn mor...

Page 112: ...106 T14 Gen 1 T15 Gen 1 P14s Gen 1 and P15s Gen 1 User Guide ...

Page 113: ...ntains integrated wireless cards that operate within the guidelines identified by radio frequency RF safety standards and recommendations therefore Lenovo believes that this product is safe for use by consumers These standards and recommendations reflect the consensus of the worldwide scientific community and result from deliberations of panels and committees of scientists who continually review a...

Page 114: ...t https support lenovo com European Union compliance with the Radio Equipment Directive This product is in conformity with all the requirements and essential norms that apply to EU Council Radio Equipment Directive 2014 53 EU on the approximation of the laws of the Member States relating to radio equipment The full text of the system EU declaration of conformity is available at https www lenovo co...

Page 115: ...ipo o dispositivo debe aceptar cualquier interferencia incluyendo la que pueda causar su operación no deseada Singapore Korea 무선설비 전파 혼신 사용주파수 2400 2483 5 5725 5825 무선제품해당 해당 무선설비가 전파혼신 가능성이 있으므로 인명안전과 관련된 서비스는 할 수 없음 SAR 정보 본 장치는 전파 노출에 대한 가이드라인을 충족합니다 본 장치는 무선 송수신기 입니다 본 장치는 국제 가이드라인으로 권장되는 전파 노출에 대한 제한을 초과하지 않도록 설계되었습니다 장치 액세서리 및 최신 부품을 사용할 경우 SAR 값이 달라질 수 있 습니다 SAR 값은 국가 보고 및 테스트 요구 사항과 네트워크 대...

Page 116: ...e of sale or any distributor that sells electrical and electronic equipment of the same nature and function as the used EEE or WEEE For additional WEEE information go to https www lenovo com recycling WEEE information for Hungary Lenovo as a producer bears the cost incurred in connection with the fulfillment of Lenovo s obligations under Hungary Law No 197 2014 VIII 1 subsections 1 5 of section 12...

Page 117: ...a Lenovo notebook computer and need to dispose of a battery contact the proper person in Lenovo sales service or marketing and follow that person s instructions You also can refer to the instructions at https www lenovo com jp ja environment recycle battery If you use a Lenovo notebook computer at home and need to dispose of a battery you must comply with local ordinances and regulations You also ...

Page 118: ...e to the potential presence of hazardous substances Before placing electrical and electronic equipment EEE in the waste collection stream or in waste collection facilities the end user of equipment containing batteries and or accumulators must remove those batteries and accumulators for separate collection Dispose of lithium batteries and battery packs from Lenovo products A coin cell type lithium...

Page 119: ...es cords and so on meets the requirements of Directive 2011 65 EU on the restriction of the use of certain hazardous substances in electrical and electronic equipment RoHS recast or RoHS 2 For more information about Lenovo worldwide compliance on RoHS go to https www lenovo com rohs communication Turkish RoHS The Lenovo product meets the requirements of the Republic of Turkey Directive on the Rest...

Page 120: ...aste Management Rules Mainland China RoHS The information in the following table is applicable to products manufactured on or after January 1 2015 for sale in the People s Republic of China 114 T14 Gen 1 T15 Gen 1 P14s Gen 1 and P15s Gen 1 User Guide ...

Page 121: ...imits for a Class B digital device pursuant to Part 15 of the FCC Rules These limits are designed to provide reasonable protection against harmful interference in a residential installation This equipment generates uses and can radiate radio frequency energy and if not installed and used in accordance with the instructions may cause harmful interference to radio communications However there is no ...

Page 122: ... Lenovo United States Incorporated 7001 Development Drive Morrisville NC 27560 Email FCC lenovo com FCC ID and IC Certification information You can find the FCC and IC Certification information through one of the following methods Through an electronic label screen E label screen preinstalled on your computer To view the E label screen see Regulatory labels on page 118 On a physical label attached...

Page 123: ...t ohne Zustimmung der Lenovo verändert bzw wenn Erweiterungskomponenten von Fremdherstellern ohne Empfehlung der Lenovo gesteckt eingebaut werden Zulassungsbescheinigung laut dem Deutschen Gesetz über die elektromagnetische Verträglichkeit von Betriebsmitteln EMVG vom 20 Juli 2007 früher Gesetz über die elektromagnetische Verträglichkeit von Geräten bzw der EU Richtlinie 2014 30 EU der EU Richtlin...

Page 124: ...methods On a physical label attached to the outside of your computer shipping carton On a physical label attached to your computer Through an electronic label screen E label screen preinstalled on your computer To access the E label screen do one of the following Restart the computer When the logo screen is displayed press F9 The E label screen is displayed Restart the computer When the logo scree...

Page 125: ...arry Bay Hong Kong Страна производства Китай Наименование и местонахождение уполномоченного изготовителем лица ООО Леново Восточная Европа Азия 143401 Московская область г Красногорск бульвар Строителей дом 4 корпус 1 помещение VII тел 7 495 645 83 38 факс 7 495 645 78 77 Импортер Наименование адрес импортера и информация для связи с ним указаны на этикетке на упаковке продукции Согласно ГОСТ 2 60...

Page 126: ...ed to the product the product packaging or displayed electronically on the E label screen or the power settings interface By using ENERGY STAR compliant products and taking advantage of the power management features of your computer you reduce the consumption of electricity Reduced electrical consumption contributes to potential financial savings a cleaner environment and the reduction of greenhou...

Page 127: ...ht to improve and or modify the products and software programs described in the manuals included with your computer and the content of the manual at any time without additional notice The software interface and function and hardware configuration described in the manuals included with your computer might not match exactly the actual configuration of the computer that you purchase For the configura...

Page 128: ... STAR and the ENERGY STAR mark are registered trademarks owned by the U S Environmental Protextion Agency Fedora is a registered trademark of Red Hat Inc Intel Intel Optane and Thunderbolt are trademarks of Intel Corporation or its subsidiaries in the U S and or other countries Linux is the registered trademark of Linus Torvalds in the U S and other countries MicroSaver Cleat MiniSaver and T Bar a...

Page 129: ......

Page 130: ......

Reviews: