background image

Page 57

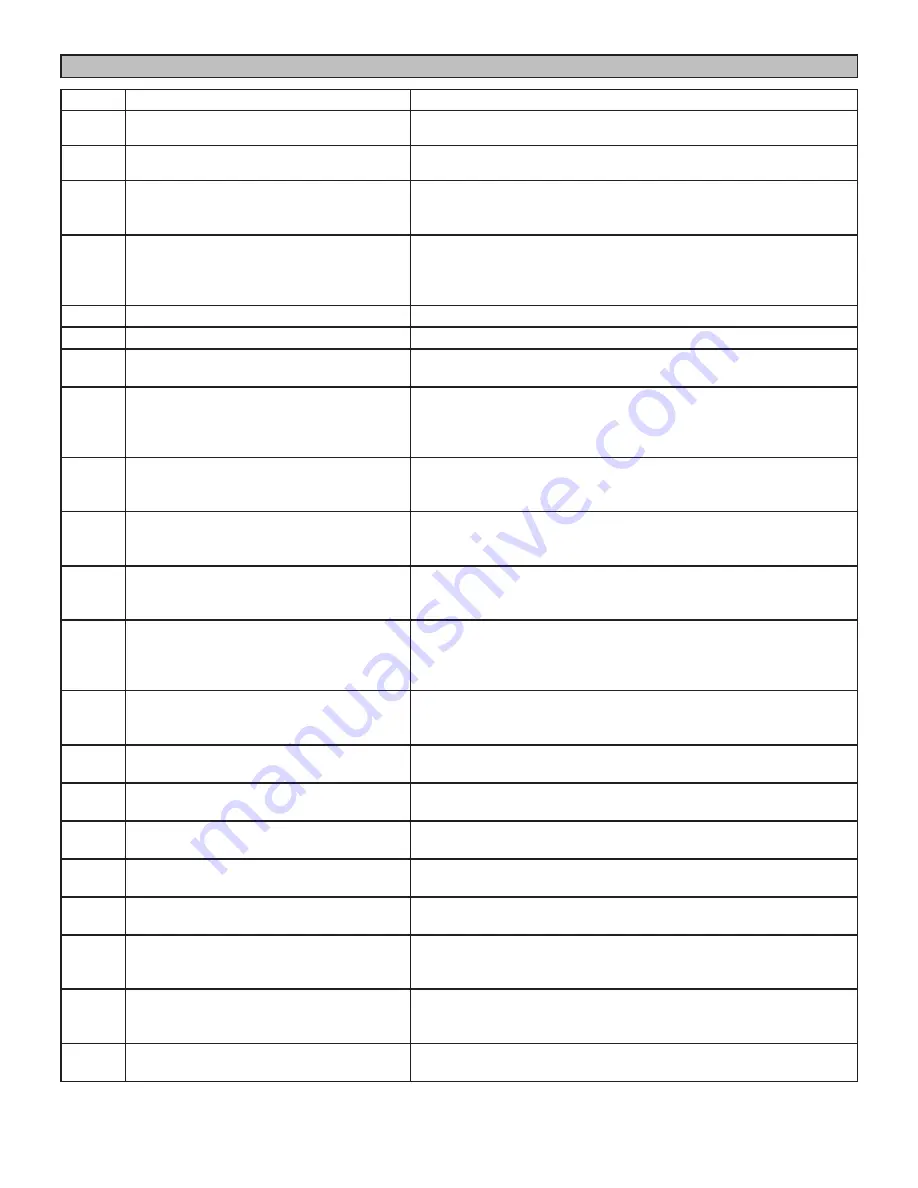
Integrated Control Diagnostic Codes

Code

Diagnostic Codes/Status of Equipment

Action Required to Clear and Recover

E200

Hard lockout - Rollout circuit open or previously 

open.

Correct unit cause of rollout trip or replace flame rollout switch and test furnace 

operation.

E201

Indoor blower communication failure - Unable to 

communicate with blower motor.

Indoor blower communication failure including power outage.

E202

Indoor blower motor mis-match - Indoor 

motor horsepower does not match unit 

capacity.

Incorrect furnace size code selected. Check unit size codes on 

configuration guide or in installation instructions.

E203

Appliance capacity / size is NOT 

programmed. Invalid unit codes refer to 

configuration flow chart in installation 

instructions.

No furnace size code selected. Check unit size codes on configuration 

guide or in installation instructions.

E204

Gas valve mis-wired.

Check operation of gas valve.

E205

Gas valve control relay contact shorted.

Check operation of gas valve.

E207

Hot surface ignitor sensed open - Refer to 

troubleshooting in installation instruction.

Measure resistance of Hot Surface Ignitor, replace if open or not within 

specification.

E223

Low pressure switch failed open - Refer to 

troubleshooting in installation instruction.

Check inches of water column pressure during operation of low pressure 

switch on heat call, measure inches of water column of operating 

pressure, inspect vent and combustion air inducer for correct operation 

and restriction.

E224

Low pressure switch failed closed - Refer to 

troubleshooting in installation instruction.

Check low pressure switch for closed contacts, measure inches of water 

column of operating pressure, inspect vent and combustion air inducer 

for correct operation and restriction.

E225

High pressure switch failed open - Refer to 

troubleshooting in installation instruction.

Check inches of water column pressure of high pressure switch on heat 

call, measure inches of water column of operating pressure, inspect vent 

and combustion air inducer for correct operation and restriction.

E226

High pressure switch failed closed - Refer to 

troubleshooting in installation  instruction.

Check high pressure switch for closed contacts, measure inches of 

water column of operating pressure, inspect vent and combustion air 

inducer for correct operation and restriction.

E227

Low pressure switch open during trial for 

ignition or run mode. Refer to troubleshooting 

in installation instruction.

Check inches of water column pressure during operation of low pressure 

switch on heat call, measure inches of water column of operating 

pressure, inspect vent and combustion air inducer for correct operation 

and restriction.

E228

Unable to perform successful pressure switch 

calibration.

Retry after 300 seconds. Error counter cleared when exiting lockout, 

unable to perform pressure switch calibration. Check vent system and 

pressure switch wiring connections.

E240

Low flame current - Run mode - Refer to 

troubleshooting in installation instruction.

Check micro amperes of flame sensor, clean or replace sensor. Measure 

voltage of neutral to ground for good unit ground.

E241

Flame sensed out of sequence - Flame still 

present.

Shut off gas, check for gas valve leak.

E250

Limit switch circuit open - Refer to 

troubleshooting in installation instruction.

Check why limit is tripping, overfired, low air flow.

E252

Discharge air temperature too high (gas heat 

only).

Check temperature rise, air flow and input rate.

E270

Soft lockout - Exceeded maximum number of 

retries. No flame current sensed.

Check for gas flow, ignitor lighting burner, flame sensor current.

E271

Soft lockout - Exceeded maximum number of 

retries. Last retry failed due to the pressure 

switch opening.

See E 223.

E272

Soft lockout - Exceeded maximum number 

of recycles. Last recycle due to the pressure 

switch opening.

See E 223 and E 225.

E273

Soft lockout - Exceeded maximum number of 

recycles. Last recycle due to flame failure.

See E 240.

Summary of Contents for SLP98UHV SERIES

Page 1: ...e 7500 thermostat may be used as well as other non communicating thermostats In all cases setup is critical to ensure proper system operation Field wiring for both communicating and non communicating...

Page 2: ...Either Side 16 406 14 3 4 375 2 OPTIONAL SIDE RETURN AIR FILTER KIT Either Side 5 8 16 1 3 1 4 83 23 3 4 603 25 635 D 1 1 2 38 Front Panel COMBUSTION AIR INTAKE 2 51 Either Side 1 7 8 48 CONDENSATE TR...

Page 3: ...cludes variable capacity integrated control transformer circuit breaker and door switch VARIABLE SPEED BLOWER MOTOR BAG ASSEMBLIES shipping location COLD END HEADER BOX PRESSURE SWITCHES VARIABLE SPEE...

Page 4: ...ll LP applications Safety Information WARNING Improper installation adjustment alteration service or maintenance can cause property damage personal injury or loss of life Installation and service must...

Page 5: ...n to 55 F 13 C dry bulb for cases where a night setback thermostat is used Return air temperature must not exceed 85 F 29 C dry bulb In Canada all electrical wiring and grounding for the unit must be...

Page 6: ...space keep insulation away from the furnace When the furnace is installed in an unconditioned space consider provisions required to prevent freezing of condensate drain system Please consult the manuf...

Page 7: ...r Filter 1 1 2 FIGURE 6 SLP98UHV applications which include side return air and a condensate trap installed on the same side of the cabinet trap can be installed remotely within 5 feet require either...

Page 8: ...e rigid leg The rigid leg is equipped with a shipping bolt and a flat white plastic washer rather than the rubber mounting grommet used with a flexible mounting leg See figure 9 The bolt and washer mu...

Page 9: ...plications The SLP98UHV furnace can be installed in horizontal applications with either right or left hand air discharge Refer to figure 11 for clearances in horizontal applications Horizontal Applica...

Page 10: ...KE PIPE EXHAUST PIPE FIGURE 13 Return Air Horizontal Applications Return air must be brought in through the end of a fur nace installed in the horizontal position The furnace is equipped with a remova...

Page 11: ...eal If a filter is installed size the return air duct to fit the filter frame Pipe Fittings Specifications All pipe fittings primer and solvent cement must conform with American National Standard Inst...

Page 12: ...exhaust accelerator 2Concentric kits 71M80 and 44W92 include 1 1 2 outdoor accelerator when used with 045 and 070 input models 3 Flush mount kits 51W11 and 51W12 includes 1 1 2 in outdoor exhaust acc...

Page 13: ...P98UHV furnace may be installed only in direct vent applications The SLP98UHV is designed for combustion air intake through an inlet in the unit s top cap Intake air piping is independent of exhaust p...

Page 14: ...there are no sags or low spots 12 ma x of straight pip e Exhaust Pipe 12 Min Horizontal Gas Furnace FIGURE 16 NOTE The exhaust collar on all models is sized to ac commodate 2 Schedule 40 vent pipe In...

Page 15: ...070 090 110 135 1 66 44 N A N A 115 68 N A N A 137 118 93 89 2 61 39 110 63 132 113 88 84 3 56 34 105 58 127 108 83 79 4 51 29 100 53 122 103 78 74 5 46 24 95 48 117 96 73 69 6 41 19 90 43 112 93 68 6...

Page 16: ...2 2 Exhaust Intake Exhaust Intake 2 2 2 2 2 or FIGURE 18 TRANSITION SIDE VIEW 2 2 2 2 or TYPICAL EXHAUST AND INTAKE PIPE CONNECTIONS IN HORIZONTAL AIR APPLICATIONS RIGHT HAND DISCHARGE SHOWN 3 2 45 M...

Page 17: ...randa porch deck or balcony 12 7 feet 2 1m 3 feet 9m within a height 15 feet 4 5m above the meter regulator assembly 3 feet 9m 6 inches 152mm for appliances 10 000 pliances 10 000 Btuh 3kw and 50 000...

Page 18: ...aust outlet not be located within 6 feet 1 8m of an outdoor AC unit because the condensate can damage the painted coating NOTE See table 6 for maximum allowed exhaust pipe length without insulation in...

Page 19: ...emperature table provided in the current edition of the ASHRAE Fundamentals Handbook 2 Poly Propylene vent pipe PP by Duravent and Centrotherm NOTE Concentric terminations are the equivalent of 5 and...

Page 20: ...ation requirement of intake and exhaust pipe DOES NOT apply 3 On roof terminations the intake piping should terminate straight down using two 90 elbows See figure 22 4 Exhaust piping must terminate st...

Page 21: ...AL STRAP Clamp and sheet metal strap must be field installed to support the weight of the termination kit FLASHING Not Furnished CLAMP FIELD PROVIDED REDUCER MAY BE REQUIRED TO ADAPT LARGER VENT PIPE...

Page 22: ...12 305 mm Min 16 405 mm Max 6 152 mm Max 6 152 mm Min 24 610 mm Max 9 227 mm Min 12 305 mm Min 20 508 mm Max 6 152 mm Max Intake Elbow WALL SUPPORT B A D E B D E A ALTERNATE TERMINATIONS TEE FORTY FI...

Page 23: ...er box Use Teflon tape or appropriate pipe dope NOTE Cold end header box drain plugs are factory installed Check the unused plug for tightness to prevent leakage 3 Install the cap over the clean out o...

Page 24: ...condensate trap and line Heating cable kit is available from Lennox in various lengths 6 ft 1 8m kit no 26K68 and 24 ft 7 3m kit no 26K69 Unit shown in upflow position with remote trap 5 max T o Drain...

Page 25: ...densate drain outlet must be vented to relieve pressure in order for the furnace pressure switch to operate properly Furnace with Evaporator Coil Using a Common Drain 1 min to 2 Max above condensatedr...

Page 26: ...ction In Unit Condensate Drain Connection In Unit Vent To Drain Condensate Drain Connection In Unit Optional Condensate Drain Connection OptionalDrainPipingFromTrap DrainTrapAssembly Furnished DrainTr...

Page 27: ...feet 2 44 to 3 05m using suitable hangers or straps Install a drip leg in vertical pipe runs to serve as a trap for sediment or condensate 5 A 1 8 N P T plugged tap or pressure post is located on the...

Page 28: ...ON PIPE ONLY TO BE ROUTED INSIDE OF CABINET FIGURE 41 GROUND JOINT UNION DRIP LEG MANUAL MAIN SHUT OFF VALVE GROUND JOINT UNION DRIP LEG MANUAL MAIN SHUT OFF VALVE GROUND JOINT UNION DRIP LEG MANUAL M...

Page 29: ...he main burner has operated for 5 minutes test for leaks of flue gases at the draft hood relief opening Use the flame of a match or candle 6 After determining that each appliance connected to the comm...

Page 30: ...le 12 shows DIP switch and on board link settings for non communicating thermostat applications Typical wiring schematic is shown in figure 46 1 The power supply wiring must meet Class I restrictions...

Page 31: ...rate capacity mode using a two stage thermostat The SL P98UHV will automatically adjust firing rate based upon thermostat cycle times The icomfort Wi Fi thermostat must be used in commu nicating appli...

Page 32: ...TAT icomfort ENABLED OUTDOOR AIR CONDITIONING OR HEAT PUMP UNIT OPTIONAL OUTDOOR AIR SENSOR OPTIONAL DISCHARGE AIR SENSOR CLIP Y1 TO Y2 FOR TWO STAGE OPERATION Indoor Unit Controller Outdoor Unit icom...

Page 33: ...DY IN THE SYSTEM FOR OTHER FUNCTIONS BUILT INTO ALL icomfort OUTDOOR UNITS icomfort ENABLED SLP98UHV FURNACE HEPA BYPASS FILTER X2680 HEPA INTERLOCK KIT PASS INDOOR BLOWER MOTOR COMMON WIRE THROUGH CU...

Page 34: ...set second stage heat ON delay OFF 7 minutes ON 12 minutes ON Intact Intact Intact S1 T STAT CONTROL TERM STRIP OUTDOOR UNIT 1 Heat 2 Cool NOTE Use DIP switch 3 to set second stage heat ON delay OFF 7...

Page 35: ...itch 1 W915 Y1 to Y2 Two Stage Cooling W914 DS to R cation or Harmony III W951 O to R Heat Pumps 2 Heat 2 Cool OFF Cut Intact Intact S1 T STAT CONTROL TERM STRIP OUTDOOR UNIT 2 Heat 2 Cool with t stat...

Page 36: ...2 stage gas heat control DIP Switch 1 OFF Intact Intact Cut L7742U T STAT CONTROL TERM STRIP HEAT PUMP 67M41 Y H L Y2 D B L Y2 T T outdoor sensor Dual Fuel Two Stage Heat Pump ComfortSense 7000 L7742U...

Page 37: ...Page 37 TYPICAL SLP98UHV WIRING DIAGRAM FIGURE 46...

Page 38: ...IDIFICATION SIGNAL W2 HEAT DEMAND FROM 2ND STAGE T STAT W1 HEAT DEMAND FROM 1ST STAGE T STAT R CLASS 2 VOLTAGE TO THERMOSTAT G MANUAL FAN FROM T STAT C THERMOSTAT SIGNAL GROUND CONNECTED TO TRANSFORME...

Page 39: ...he unit is varied to maximize comfort Conventional two stage mode is the factory default set ting See table 13 Switch 3 Second Stage Heat On Delay If a single stage thermostat is used the integrated c...

Page 40: ...mping Blower speed ramping may be used to enhance dehu midification performance The switches are factory set at option A which has the greatest effect on blower motor performance Table 18 provides the...

Page 41: ...ill operate in second stage cooling only Diagnostic LED Figure 47 The seven segment diagnostic LED displays operating status target airflow error codes and other information The table beginning on Pag...

Page 42: ...1038 1123 1209 Default Heat CFM 621 660 737 814 891 968 1045 1122 Decrease 7 5 Heat CFM 581 616 687 757 828 899 970 1041 Decrease 15 Heat CFM 540 572 637 701 766 830 895 959 COOLING BLOWER PERFORMANCE...

Page 43: ...85 1241 1397 1553 Default Heat CFM 497 571 718 865 1012 1159 1306 1453 Decrease 7 5 Heat CFM 439 507 644 781 917 1054 1191 1328 Decrease 15 Heat CFM 380 443 570 697 823 950 1076 1203 COOLING BLOWER PE...

Page 44: ...69 1426 1582 1738 1895 Default Heat CFM 808 881 1026 1172 1317 1463 1608 1754 Decrease 7 5 Heat CFM 748 817 956 1095 1235 1374 1513 1652 Decrease 15 Heat CFM 687 753 886 1019 1152 1284 1417 1550 COOLI...

Page 45: ...on a call for de humidification Dehumidification call 2 On On On Demand 0 VAC High 70 PRECISION MODE operates independent of a Y1 demand Normal Operation 1 On On On Acceptable 24 VAC High 100 Dehumidi...

Page 46: ...High 70 Thermostat will keep outdoor unit energized after cooling temperature setpoint has been reached in order to maintain room humidity setpoint ROOM THERMOSTAT CALLS FOR FIRST AND SECOND STAGE CO...

Page 47: ...er to stop At this point the trap should be primed with sufficient water to ensure proper condensate drain operation BEFORE PLACING THE UNIT INTO OPERATION smell all around the furnace area for gas Be...

Page 48: ...Pressure Measurement A threaded plug on the inlet side of the gas valve provides access to the supply pressure tap Remove the thread ed plug install a field provided barbed fitting and connect a mano...

Page 49: ...Installed Gas Valve MANIFOLD PRESSURE MEASUREMENT Figure 49 Negative Port Positive Port Gas Valve Measuring Device Field Installed Operating Signal Delta P Measurement Black Tubing Red and Black Tubi...

Page 50: ...070 4 7 7 2 5 7 8 2 090 110 135 High Altitude Information NOTE In Canada certification for installations at eleva tions over 4500 feet 1372 m is the jurisdiction of local authorities SLP98UHV units re...

Page 51: ...e there is no blockage 2 Are pressure switches closed Obstructed exhaust pipe will cause unit to shut off at pressure switches Check termination for blockages 3 Reset manual flame rollout switches on...

Page 52: ...the thermostat has a first stage heating demand 5 If second stage heat is required the thermostat second stage heat contacts close and send a signal to the integrated control The integrated control ei...

Page 53: ...be primed with water Inspect the rubber hoses connected to the pressure switches for cracks or loose connections replace as necessary Remove the rubber hoses from the cold end header box and inspect...

Page 54: ...onnect the 2 pin plug from the gas valve 3 Remove the burner box cover 4 Disconnect the gas supply line from the gas valve Remove gas valve manifold assembly 5 Mark and disconnect sensor wire from the...

Page 55: ...ce agency or gas supplier Cabinet Parts Outer access panel Blower access panel Top cap Control Panel Parts Transformer Integrated control Door interlock switch Circuit breaker Blower Parts Blower whee...

Page 56: ...horizontal bars will display Steps to follow if the damper control module is displaying the soft disable code Confirm proper wiring between all devices thermostat damper control module indoor and out...

Page 57: ...water column pressure of high pressure switch on heat call measure inches of water column of operating pressure inspect vent and combustion air inducer for correct operation and restriction E226 High...

Page 58: ...filter and ductwork To clear replace filter if needed or repair add ductwork E312 Restricted air flow in cooling or continuous fan mode is lower than cfm setting Restricted airflow Indoor blower is r...

Page 59: ...symbol is displayed on the 7 segment LED Release button This mode allows the user to select a unit size code number that matches the furnace model size and capacity Solid P starts blinking on 7 Segmen...

Page 60: ...rial Wait For Ignition Stabilization Delay Post Purge 20Seconds Soft Lockout Error Code Flashes YES NO NO YES Call For Heat Ends NO YES YES NO C A L L F O R 1 S T S T A G E H E A T 3A 2 1 1 OR Call Fo...

Page 61: ...Closes Within 10 Seconds NO Error Code Flashes NO YES Wait 5 Minutes 3A 2 1 2 1 System will always light at 70 even if 2nd stage call for heat is in place If the high pressure switch does not close w...

Page 62: ...Closes Within 10 Seconds NO Error Code Flashes NO YES Wait 5 Minutes 3A 2 1 2 1 System will always light at 70 even if 2nd stage call for heat is in place If the high pressure switch does not close w...

Page 63: ...20 Seconds Soft Lockout Error Code Flashes YES NO NO YES Call For Heat Ends NO YES YES NO C A L L F O R H E A T 3B 1 4 Move to Mid Firing Rate and High Firing Rate after 2nd and 3rd Stage Delays base...

Page 64: ...gize and Low Cooling mode High Cooling mode High Cooling mode Per Ramping Profile NO NO YES NO 5 1 2 1 2 2 2 1 Indoor Blower On After 2 second delay Energize Indoor Blower Per Ramping Profile Energize...

Page 65: ...S NO YES Go to Call for Cooling 6 1 4 5 1 Call for Continuous Blower Indoor Blower On Maintain Indoor Blower at set speed Maintain Indoor Blower at set speed OR Maintain Indoor Blower at set speed Ind...

Page 66: ...ng at a minimum height of eight 8 feet above grade directly in line with the exhaust vent terminal for the horizontally vented gas fueled heating appliance or equipment The sign shall read in print si...

Page 67: ...province of Saskatchewan Lennox approves the following termination for use in Sas katchewan Canada C 12 D B A 2 51MM Vent Pipe 3 76MM Vent Pipe 12 305 mm Min 12 305 mm Min 6 152 mm Min 24 610 mm Max 6...

Reviews: