iComfort Wi-Fi
®
7-Day Programmable Communicating Thermostat
Page 33
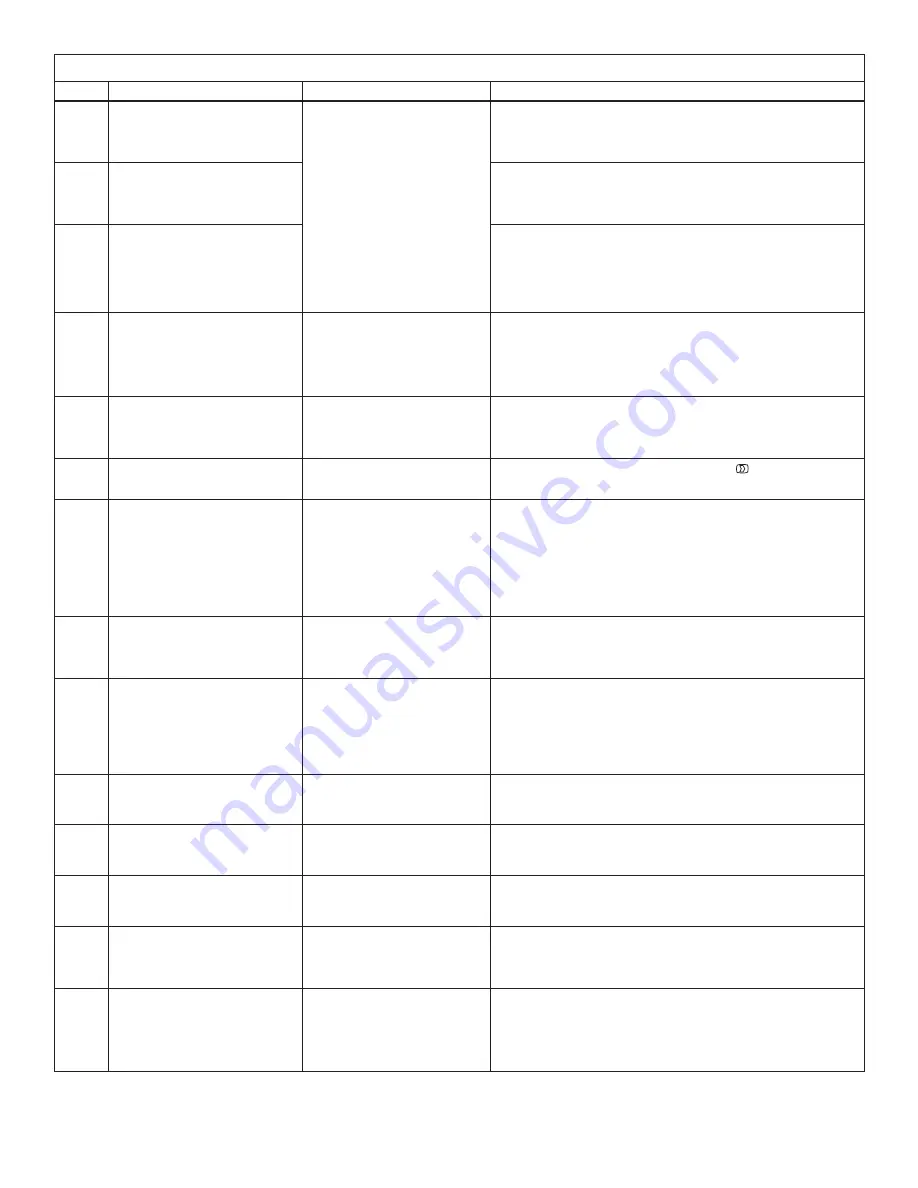
Table 11. Troubleshooting Tips
Bold
text indicates a button, or text display on the thermostat.
No.
Issue / Problem
Possible Cause
Corrective Action / Comments
1a
When the thermostat is first started and
is stuck on the splash screen.
Thermostat is possibility incorrectly
wired and cannot find an iComfort-
enabled indoor unit.
- Stuck splash screen due to incorrect wiring will occur on thermostats with
firmware version 2.00 or 2.02.
- Thermostat did not find an Indoor Unit. Make sure there is an iComfort
indoor unit on the system. Check R, i+, i- and C connections, ohm wires
and cycle power. Replace indoor unit control board if there is no response.
1b
When the thermostat is first started and
is stuck on a blank screen.
- Stuck splash screen due to incorrect wiring will occur on thermostats with
firmware version 2.01.
- Thermostat did not find an Indoor Unit. Make sure there is an iComfort
indoor unit on the system. Check R, i+, i- and C connections, ohm wires
and cycle power. Replace indoor unit control board if there is no response.
1c
Screen turns blue and the following
message appears “
Thermostat is un
able to establish communication to
the indoor unit or other devices.
Probable cause is a miss wire
Please verify all the wiring and con
nections and restart the system
“.
- Blue screen with notification text that could be due to incorrect wiring will
occur on thermostats with firmware version 2.10.
- Thermostat did not find an Indoor Unit. Make sure there is an iComfort
indoor unit on the system. Check R, i+, i- and C connections, ohm wires
and cycle power. Replace indoor unit control board if there is no response.
2
- No electric heat operation.
- The thermostat
system setting
does not offer a
emergency heat
choice on an HP system.
- The thermostat does not offer any
“heat
”
choice on an AC system with
air handler with electric heat.
Electric heat was not manually con
figured configured at the Air Handler
Control (AHC) before the iComfort
Wi-Fi
®
system discovery process at
initial power-up.
- Manually configure to discover the electric heat section(s) on the air hand
ling (see Page 38 or CBX32MV or CBX40UHV manual for details).
- Re-setup the iComfort system by selecting the
setup
button in the Installer
program and press
start
to begin
system discovery
; then reconfigure the
system.
3
Thermostat Displays System Waiting
message and the furnace does re
spond to a heating demand (no red
critical alert icon or alert messages
are displayed on the thermostat).
The furnace is in “watchguard”
mode (moderate alert) and will not
display the red critical alert icon nor
be displayed in the homeowner alert
button.
- Go to the installer program
alert
button to view all alerts and details about
those alerts.
- If the furnace is in “watchguard” mode, the furnace can be reset from the
Home screen by setting the thermostat
system settings
to
off
for 20 sec,
then back to
heat
. Then initiate a new heat demand.
4
Outdoor temperature is not displayed
on the thermostat.
Outdoor Temp Display must be en
abled to display the outdoor temper
ature on the home screen.
On the home screen, press the right arrow
then press the display settings button. Click on outdoor temp display button
to toggle ON.
5
A humidifier was added to the system
as non-communicating equipment
and the thermostat does not provide
the ability to adjust the RH set point.
Humidification Control Mode is set
for “Display only” which will not al
low the iComfort system to control
the humidifier.
- In the installer program, select the
equipment
button. Select “System”
from the device list using the up/down arrows and press the
edit
button.
Use up/down arrows to select
Humidification Control Mode
from the list.
Select the desired humidifier control mode:
Basic
,
Precision
, or
Dew
Point
. (Basic is the most popular) and press the
save
button. Follow the
red instructions then exit the system.
- If
Humidification Control Mode
is not offered as a menu item choice, the
Humidifier must be added to the iComfort system using the
Add or Re
move Non-communicating equipment
screen under the thermostat
installer program in the
setup
button.
6
The non-communicating outdoor unit
is part of the system, but the thermo
stat does not display the outdoor unit.
The outdoor unit was not added as
a non-communicating unit during ini
tial system setup.
In the thermostat installer program select the setup button and follow the on
screen instructions until you reach the Add or Remove Non-communicating
equipment screen; press yes. Select Outdoor Unit Type
from the menu and
press the edit button. Select 1 Stage AC Unit or 2 Stage AC Unit and press
save. Follow the red instructions then exit the system.
7
High Balance Point and Low Balance
Point are not listed as a menu item to
adjust the set point on the thermostat
of the heat pump system.
Balance Point Control must be en
abled to display as the High Balance
Point and Low Balance Point in the
menu and provide the ability for the
installer to adjust the set point.
- In the installer program select the
equipment
button, then scroll down to
system device to
System
and press
edit
.
Scroll down the menu item
choices to
Balance Point Control
and press
edit
. Select
enable
and
press
save
.
High Balance Point
and
Low Balance Point
are now listed;
adjust the balance point settings and press
save
.
- If
Balance Point Control
is not shown as a menu item choice, the system
does not have/recognize an outdoor sensor or the system is not a heat
pump.
8
iComfort thermostat does not show a
choice for Dew Point Control Humidi
fication mode (only Basic and Preci
sion choices).
Dew Point Control will only be dis
played if the system has an outdoor
sensor.
- Add an outdoor sensor to the system and connect to the outdoor sensor
terminals on the indoor unit.
- iComfort system is not able to read the outdoor temperature sensor in the
iComfort outdoor unit, check outdoor sensor.
9
The iComfort does not display an
alert code message, but the furnace
or unit control displays a diagnostic
code.
The red Critical Alert icon and
homeowner alert button do not dis
play non-critical alerts.
Go to the installer program alert button to view all alerts and details about
those alerts.
10
The iComfort thermostat does not dis
play the Model # and or Serial # in
door or outdoor unit.
The iComfort control was replaced
with a replacement control before
the iComfort system was initially
setup or configured.
- Replacement iComfort controls do not have the Model # or Serial # loaded
in the control.
- The Model # and Serial # cannot be added to the control.
- System will still operate normally.
11
A non-communicating 2-stage out
door unit was added to the system
but the unit only runs in 2nd stage.
The “W915 2 Stage Compr” clip
pable option link on the furnace or
air handler control must be cut when
used with a non-communicating
2-stage outdoor unit.
Cut the “W915 2 Stage Compr” option link on the furnace or air handler con
trol.
12
Transfer the Model #, Serial # and
system settings to a replacement
control.
The iComfort system is capable of
copying settings from the previous
configuration to the new compatible
device (control) found.
Reconfigure the system using the installer program and select the setup
button. The system will go through the system discovery process. The ther
mostat will display missing devices (old control) and found compatible
devices (new control). Press the next button to accept the new device and
copy the settings. Thermostat will display Settings were copied after suc
cessfully copying the information to the new control. See section title “
Recon
figuring a system
” in this manual.
table continued on next page


