iComfort Wi-Fi
®
7-Day Programmable Communicating Thermostat
Page 17
EDIT AND TEST AIRFLOW PER ZONE
Adjustment to all air flows can be made either at the System
Devices > System
screen
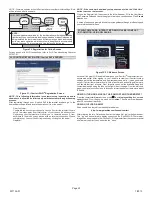
or using the Edit and Test Airflow per Zone screen as illustrated in figure
20.The following procedure is to adjust individual zone airflow (CFM) for Blower
Circulation, Cooling and Heating airflow (see figure 20).
The
Maximum Airflow
for the selected mode on the left is displayed at the
top right of the screen.
The
Assigned Airflow
(the sum of the selected airflow for each zone) is
displayed at the top right of the screen.
NOTE - The airflow per zone (in red) must be selected and verified before
continuing.
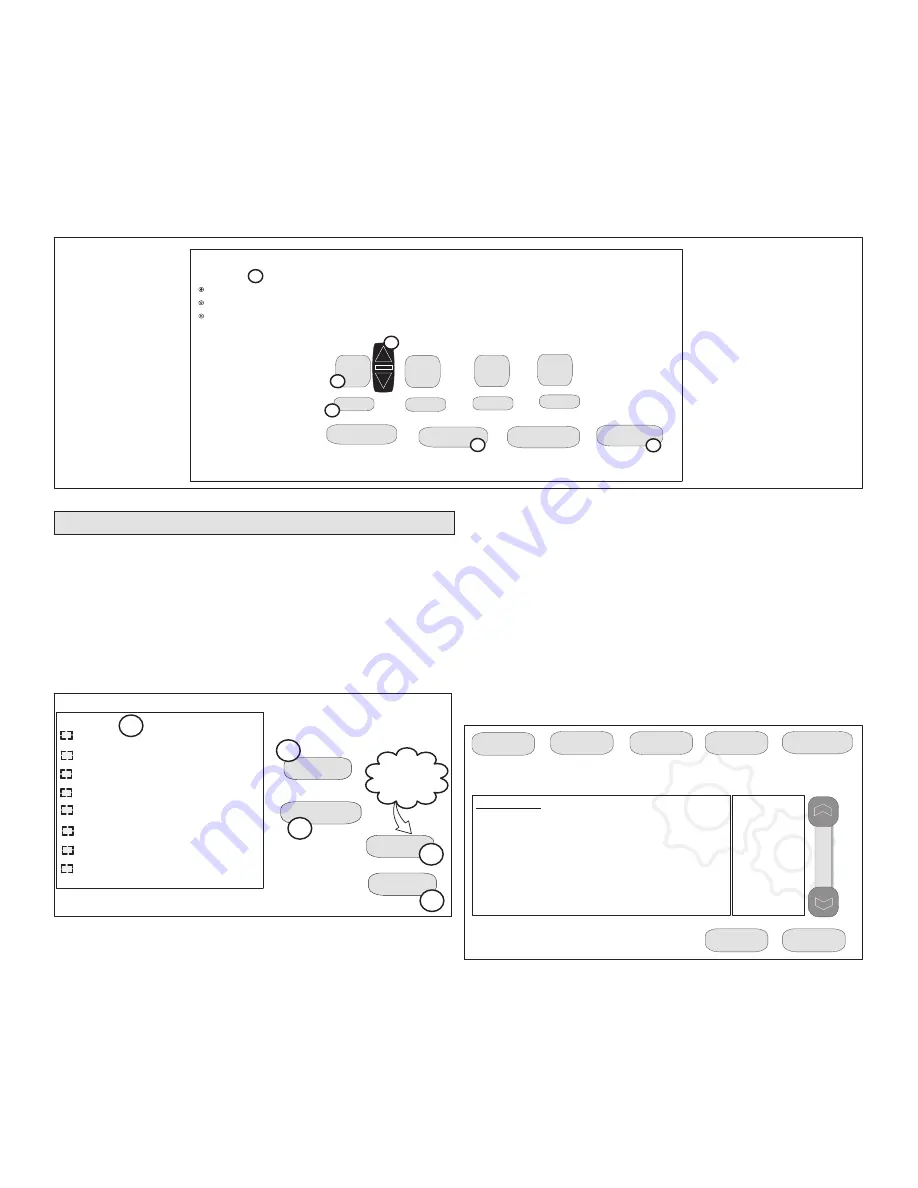
1. Select the desired radio button option -
Blower Circulation Airflow
,
Cooling
Airflow
or
Heating Airflow
(
A
).
2. Adjust airflow for a specific zone by pressing on the desired zone (
B
). Total
maximum airflow for all zones in this example is a combined1250 CFM.
Minimum CFM per zone is
50
and maximum is
1250
.
3. Adjust airflow by using the up or down arrow to change the CFM (
C
).
4. Press
start
(
D
) to begin operation for that specific zone.
5. Repeat procedure to configure all applicable zones.
6. Press
save
(
E
).
7. Press
next
(
F
).
Continue to next section on testing and diagnostics.
9:39 am Aug 15, 2012
select one
Blower Circulation Airflow
Cooling Airflow
Heating Airflow
Edit and Test Airflow per Zone
Maximum Airflow 1250 CFM
Assigned Airflow 1250 CFM
Zone 1
50
400
400
150
stop all
save
cancel
next
B
E
F
all airflows must be selected and verified
A
start
start
start
Zone 2
Zone 3
Zone 4
start
C
D
Figure 20. Editing Zone CFM
USING THE TESTS / DIAGNOSTICS FEATURES
TO SELECT TESTS TO RUN
Use the following procedure to run test for various heating and cooling stage
operations.
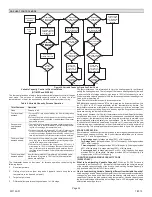
1. Select a specific tests (
1
) to run or use the
select all
(
2
) button to run all
configurations.. Use the
deselect all
(
3
) button to un-check desired test.
2. Press the
start
button (
4
) to run all selected tests or press
skip tests
(
5
) to
end the test procedure.
3. After the tests are completed or you have selected skip test select the exit
button to end.
Blower
HP Heat - 1
st
Stage
HP Heat - 2
nd
Stage
Defrost Now
Cooling - 1
st
Stage
Cooling - 2
nd
Stage
Gas Heat - 1
st
Stage
Gas Heat - 2
nd
Stage
select all
select test to run
deselect all
skip tests
start
Only appears if
test item is
selected
Ö
1
2
3
4
5
Figure 21. Selecting Tests
NOTE - Test mode lasts for 30 minutes (with the temperature updating every 30
seconds) except for the defrost test, which lasts 30 seconds. Tests feature provides
the technician time to manually verify the equipment operation.
The
tests
feature is available after
setup
has been completed once. After you press
next
in the final
setup
screen, the “select tests to run” screen (figure 21) will appear.
(If you want you may skip tests; press
skip tests
.)
To run all of the tests, press
select all
. All boxes in the list of tests will be checked.
Or, touch box(es) next to test(s) to run certain tests.
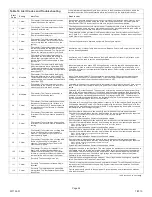
After the tests have been started, the screen will describe which test is running and
shows a diagnostic summary of each test (see figure 22). After reviewing the results
and concluding that no further tests are needed, press
next
to proceed to next test.
The technician must verify that the test procedure is producing the desired result at
the equipment.
After pressing
next
after the final test, the “Testing finished” screen will appear
(figure 23). At this point, use the
EXIT
button (if you have completed the required
setup), or use
diagnostics
button (to analyze the system), or use
equipment
button (if you wish to make any changes to device details).
9:39 am Aug 15, 2012
Heating Rate
Blower CFM Demand
Blower Off Delay
Blower On Delay
Indoor Blower RPM
Indoor Blower Power
Flame Current
Flame Sense
Outdoor Temperature
current test: Blower
Check Blower Operation
%
1400CFM
Off
Off
0
0.0000%
0.000mA
No Flame
63ºF
next
cancel
setup
tests
equipment
alerts
diagnostics
Figure 22. Typical Tests Results Screens


