background image

Page 25

High Altitude Information

NOTE − In Canada, certification for installations at eleva-
tions over 4500 feet (1372 m) is the jurisdiction of local au-
thorities.

Manifold pressure for all units fueled by natural gas at all
altitudes is  3.5" w.c. Manifold pressure for all units fueled
by L.P./propane gas at all altitudes is 10.0" w.c.

NOTE − A natural to L.P. propane gas changeover kit is
necessary to convert this unit. L.P. conversion kit 25W20
is used with all units installed at altitudes up to 7,500 feet.
L.P. conversion kit 25W21 is used with all units installed at
altitudes from 7,501 to 10,000 feet above sea level. Refer
to the changeover kit installation instruction for the
conversion procedure.
NOTE − Units fueled by natural gas and installed at alti-
tudes of 7501−10,000 feet above sea level require installa-
tion of a high altitude orifice kit (59M17).

The combustion air pressure switch is factory−set and re-
quires no adjustment. The factory−installed pressure
switch is acceptable for use in units installed at altitudes up
to 10,000 feet above sea level.

Other Unit Adjustments

Primary and Secondary Limits

The primary limit is located on the heating compartment
vestibule panel. The secondary limit is located in the blower
compartment, attached to the back side of the blower.
These limits are factory set and require no adjustment.

Flame Rollout Switches (Two)

These manually reset switches are located on the burner
box. If tripped, check for adequate combustion air before
resetting.

Pressure Switch

The pressure switch is located in the heating compartment
adjacent to the combustion air inducer. This switch checks
for proper combustion air inducer operation before allow-
ing ignition trial. The switch is factory−set and requires no
adjustment.

Temperature Rise

Place the unit into operation with a heating demand. After
supply and return air temperatures have stabilized, check
the temperature rise. If necessary, adjust the blower speed
to maintain the temperature rise within the range shown on
the unit nameplate. Increase the blower speed to decrease
the temperature. Decrease the blower speed to increase
the temperature rise. Failure to do adjust the temperature
rise may cause erratic limit operation.

Fan Control

There is no cooling mode fan on delay; however, there is a
cooling fan off delay of 45 seconds. This delay is not adjust-
able.
The heating mode fan on time of 45 seconds is not adjust-
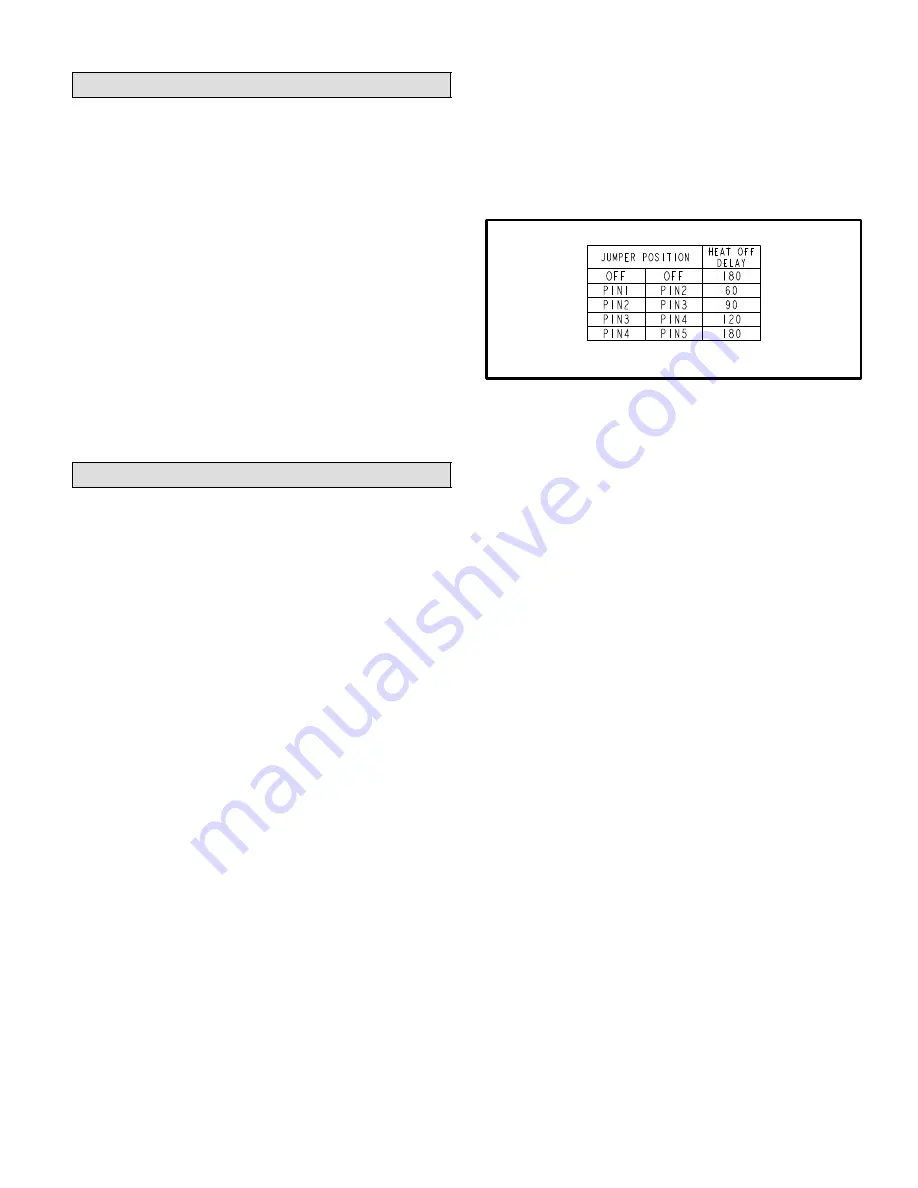
able. The heating mode fan off delay(amount of time that
the blower operates after the heat demand has been satis-
fied) may be adjusted by changing the jumper position

across the five pins  on the integrated control. The unit is
shipped with a factory fan off setting of 90 seconds. The fan
off delay affects comfort and is adjustable to satisfy individ-
ual applications. Adjust the fan off delay to achieve a supply
air temperature between 90° and 110°F at the exact mo-
ment that the blower is de−energized. Longer off delay set-
tings provide lower return air temperatures; shorter set-
tings provide higher return air temperatures. See figure 25.

FAN-OFF TIME ADJUSTMENT

To adjust fan−off timing, reposition jumper across pins to

achieve desired setting.

FIGURE 25

Thermostat Heat Anticipation

Set the heat anticipator setting (if adjustable) according to
the amp draw listed on the wiring diagram that is attached
to the unit.

Electrical

 1 − Check all wiring for loose connections.
 2 − Check for the correct voltage at the furnace (furnace

operating).

 3 − Check amp-draw on the blower motor.

Motor Nameplate__________Actual__________

NOTE − Do not secure the electrical conduit directly to the
air ducts or structure.

Blower Speeds

NOTE − CFM readings are taken external to unit with a dry
evaporator coil and without accessories. See blower per-
formace data beginning on  Page 26.


Turn off electrical power to furnace.


Remove blower access panel.


Disconnect existing speed tap at control board speed
terminal.

NOTE − Termination of any unused motor leads must be
connected to the park terminals on the control board.


Refer to blower speed selection chart on unit wiring dia-
gram for desired heating or cooling speed.


Connect selected speed tap at control board speed
terminal.


Resecure blower access panel.


Turn on electrical power to furnace.

Electronic Ignition

The integrated ignition control has an added feature of an
internal Watchguard control. The feature serves as an au-
tomatic reset device for ignition control lockout caused by
ignition failure. After one hour of continuous thermostat de-
mand for heat, the Watchguard will break and remake ther-
mostat demand to the furnace and automatically reset the
control to begin the ignition sequence.

Summary of Contents for G40DF Series

Page 1: ...Blower Performance 26 Service 28 Planned Service 30 Repair Parts List 30 Ignition Control Board Diagnostic Codes 31 Troubleshooting 32 G40DF X Start Up Performance Check List 35 WHAT TO DO IF YOU SMEL...

Page 2: ...7 8 124 Right 2 1 4 57 Left 40 1016 3 3 4 95 5 8 16 AIR FLOW 5 8 16 3 4 19 19 1 2 495 5 8 16 B 5 8 16 5 8 16 Supply Air Supply Air Model No A B C D in mm in mm in mm in mm G40DF X 24A 045 G40DF X 36A...

Page 3: ...Flue Collector Box Gasket Combustion Air Inducer Gasket Manifold Burner Gas Valve Flame Rollout Switches Flame Sensor Primary Limit Igniter Heat Exchanger Igniter Bracket Combustion Air Pressure Swit...

Page 4: ...d other applicable local codes Adequate clearance must be made around the air open ings into the vestibule area In order to ensure proper unit operation combustion and ventilation air supply must be p...

Page 5: ...rating plate D One hundred percent 100 outdoor air must be pro vided for combustion air requirements during construc tion Temporary ducting may supply outdoor air to the furnace Do not connect duct d...

Page 6: ...B149 installation codes CAUTION Do not install the furnace in a corrosive or contami nated atmosphere Meet all combustion and ventila tion air requirements as well as all local codes All gas fired ap...

Page 7: ...communicate di rectly or by ducts with the outdoors or spaces crawl or at tic that freely communicate with the outdoors or indirectly through vertical ducts Each opening shall have a minimum free are...

Page 8: ...pply flue and air intake connections and sufficient installation and servicing clearances See table 1 for correct floor opening size 2 Flange warm air plenum and lower the plenum into the opening 3 Se...

Page 9: ...re 8 5 Make certain that an adequate seal is made SECURE FROM INSIDE CABINET HEMMED EDGE FIBERGLASS SEALING STRIP Field Provided CABINET SIDE PANEL PLENUM Side View FIGURE 8 Setting Equipment WARNING...

Page 10: ...m filter sizes A filter must be in place any time the unit is operating TABLE 3 Furnace Cabinet Size Return Air Filter Size inches 14 1 2 14 X 25 X 1 1 17 1 2 16 X 25 X 1 1 21 20 X 25 X 1 1 24 1 2 24...

Page 11: ...or dedicated gas vent Unlined masonry chimneys are prohibited See figures 11 and 12 for com mon venting A chimney with one or more sides exposed to the outside of the structure is considered to be an...

Page 12: ...ney passageway must be checked periodically to ensure that it is clear and free of obstructions Do not install a manual damper barometric draft regulator or flue restrictor between the furnace and the...

Page 13: ...fastened by screws or other approved means 12 When the vent connector used for Category I ap pliances must be located in or pass through a crawl space or other areas which may be cold that portion of...

Page 14: ...22 339 5 22 65 30 130 39 219 49 330 10 29 59 40 121 51 206 64 315 15 35 53 48 112 61 195 76 301 20 0 0 97 0 202 0 349 0 540 2 10 75 14 149 18 250 20 377 5 21 71 29 143 38 242 47 367 10 28 64 38 133 50...

Page 15: ...225 115 337 5 51 63 75 128 102 216 144 326 10 NR NR 95 116 128 201 182 308 15 NR NR NR NR 158 186 220 290 20 0 35 96 54 200 78 346 114 537 2 37 74 56 148 78 248 113 375 5 50 68 73 140 100 239 141 363...

Page 16: ...1 21 50 33 89 47 142 64 220 2 22 53 35 96 49 153 66 235 3 24 55 36 102 51 163 68 248 20 1 21 54 33 99 46 157 62 246 2 22 57 34 105 48 167 64 259 3 23 60 35 110 50 176 66 271 30 1 20 62 31 113 45 181...

Page 17: ...rat ing and the other appliances which are not operating re main connected to the common venting system If the venting system has been installed improperly you must correct the system as indicated in...

Page 18: ...ng must be resistant to the actions of liquified petro leum gases NOTE Install a 1 8 inch NPT plugged tap in the field piping upstream of the gas supply connection to the unit The tap must be accessib...

Page 19: ...sting pressure of gas lines gas valve must be disconnected and isolated See figure 15 Gas valves can be damaged if subjected to pressures greater than 1 2 psig 3 48 kPa 14 inches w c MANUAL MAIN SHUT...

Page 20: ...correctly and is properly grounded One line voltage EAC terminal is provided on the fur nace control board Any electronic air cleaner rated up to one amp can be connected to this terminal with the ne...

Page 21: ...TERMINAL DESIGNATIONS HUM LINE XFMR EAC COOL HEAT PARK FLAME NEUTRALS Humidifier 120VAC Input 120VAC Transformer 120VAC Electronic Air Cleaner 120VAC Blower Cooling Speed 120VAC Blower Heating Speed 1...

Page 22: ...Page 22 G40DF X Typical Schematic Wiring Diagram FIGURE 21...

Page 23: ...ersonal injury or death Gas Valve Operation Figures 22 23 and 24 1 STOP Read the safety information at the beginning of this section 2 Set the thermostat to the lowest setting 3 Turn off all electrica...

Page 24: ...uence then restarts at step 1 Gas Pressure Adjustment Gas Flow Approximate 1 Operate unit at least 15 minutes before checking gas flow Determine the time in seconds for one revolu tions of gas through...

Page 25: ...an Control There is no cooling mode fan on delay however there is a cooling fan off delay of 45 seconds This delay is not adjust able The heating mode fan on time of 45 seconds is not adjust able The...

Page 26: ...m Watts cfm Watts 0 00 1475 616 1345 554 1150 495 990 415 0 05 1450 606 1320 543 1140 481 985 407 0 10 1425 595 1300 532 1125 466 975 398 0 15 1395 585 1275 521 1115 452 970 390 0 20 1375 574 1255 510...

Page 27: ...g Air Volume Watts at Different Blower Speeds High Medium High Medium Low Low cfm Watts cfm Watts cfm Watts cfm Watts 00 2475 1276 2280 987 1995 845 1690 698 10 2390 1248 2235 955 1990 829 1675 690 2...

Page 28: ...ective covering in front of the fur nace during cleaning Cleaning the heat exchanger requires a steel spring snake a reversible drill and a vacuum cleaner The steel spring snake may be constructed usi...

Page 29: ...place all screws may cause leaks 16 To clean the burner run a vacuum cleaner with a soft brush attachment over the face of burners Inspect in side the burners and crossovers for any blockage Clean the...

Page 30: ...nace until the items can be repaired or replaced Instruct the homeowners to pay attention to their furnace Situations can arise between annual furnace in spections that may result in unsafe operation...

Page 31: ...Pressure switch closed prior to activation of combustion air inducer ALTERNATING SLOW FLASH ALTERNATING SLOW FLASH Watchguard burners failed to ignite or lost flame 5 times during single heating dema...

Page 32: ...VE OFF COMBUSTION AIR INDUCER ON INDOOR BLOWER ON HEATING SPEED LED 1 SLOW FLASH LED 2 OFF GAS VALVE OFF COMBUSTION AIR INDUCER OFF INDOOR BLOWER OFF WITH DELAY LED 1 OFF LED 2 SLOW FLASH Sequence hol...

Page 33: ...LE HEAT DEMAND WATCHGUARD MODE GAS VALVE OFF COMBUSTION AIR INDUCER OFF INDOOR BLOWER OFF WITH DELAY LEDs SIGNAL WATCHGUARD FAILURE CODE IS 60 MINUTE RESET PERIOD COMPLETE YES 4 SECONDS YES HAS CONTRO...

Page 34: ...TCH CLOSED LED SLOW FLASH RATE REMAINS UNCHANGED THROUGHOUT COOLING CYCLE THERMOSTAT CALLS FOR COOLING COMPRESSOR CONTACTOR AND SYSTEM FAN ENERGIZED WITH 2 SECOND DELAY COOLING SPEED EAC TERM ENERGIZE...

Page 35: ...WITH COMB AIR INDUCER SYSTEM FAN REMAINS ON HEATING SPEED SYSTEM FAN REMAINS ON HEATING SPEED HUM TERM DE ENERGIZES WITH COMB AIR INDUCER G40DF X Start Up Performance Check List Filter Clean Secure El...

Reviews: