background image

Page 17

II- PLACEMENT AND INSTALLATION

Make sure unit is installed in accordance with installation
instructions and applicable codes.

III- START‐UP

A- Heating Start‐Up

WARNING

Shock and burn hazard.

EL180DFE  units are equipped with a hot surface
ignition system. Do not attempt to light manually.

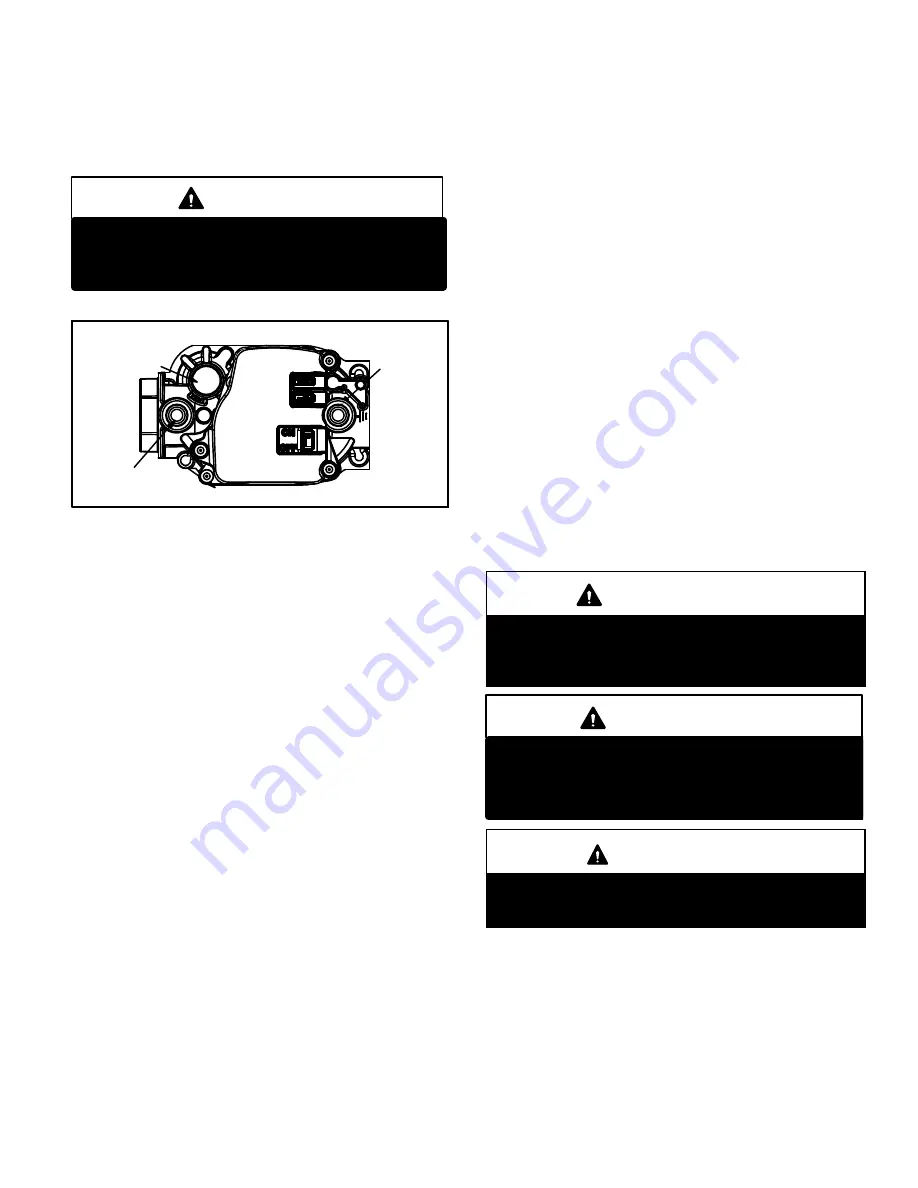
Gas Valve Operation

FIGURE 18

GAS VALVE SHOWN IN ON POSITION

MANIFOLD

PRESSURE

OUTLET

PORT

INLET

PRESSURE

PORT

MANIFOLD

PRESSURE

ADJUSTMENT

SCREW

 1 -

STOP

! Read the safety information at the beginning of

this section.

 2 - Set the thermostat to the lowest setting.

 3 - Turn off all electrical power to the unit.

 4 - This furnace is equipped with an ignition device which

automatically lights the burners. Do 

not

 try to light the

burners by hand.

 5 - Remove the heating compartment access panel.

 6 - Move  gas  valve  switch  to 

OFF position

. Do not

force. See figure 18.

 7 - Wait five minutes to clear out any gas. If you then smell

gas, STOP! Immediately call your gas supplier from a
neighbor's phone. Follow the gas supplier's instruc­
tions. If you do not smell gas go to next step.

 8 - Move gas valve switch to 

ON position

. Do not force.

See figure 18.

 9 - Replace the heating compartment access panel.

10- Turn on all electrical power to to the unit.

11- Set the thermostat to desired setting.

NOTE - When unit is initially started, steps 1 through 11
may need to be repeated to purge air from gas line.

12- If the appliance will not operate, follow the instructions

“Turning Off Gas to Unit” and call the gas supplier.

Turning Off Gas to Unit

 1 - Set the thermostat to the lowest setting.

 2 - Turn off all electrical power to the unit if service is to be

performed.

 3 - Remove the  heating compartment access panel.

 4 - Move  gas  valve  switch  to 

OFF position

. Do not

force. See figure 18.

 5 - Replace the heating compartment access panel.

B- Safety or Emergency Shutdown

Disconnect main power to unit. Close manual and main gas
valves.

C- Extended Period Shutdown

Turn off thermostat or set to “UNOCCUPIED” mode. Close
all gas valves (both internal and external to unit) to guaran­
tee no gas leaks into combustion chamber. Turn off power
to unit. All access panels and covers must be in place and
secured.

IV-HEATING SYSTEM SERVICE CHECKS

A- C.S.A. Certification

All units are C.S.A. design certified without modifications.
Refer to the EL180DFE Installation Instruction.

B- Gas Piping

Gas supply piping should not allow more than 0.5”W.C. drop
in pressure between gas meter and unit. Supply gas pipe
must not be smaller than unit gas connection.

Compounds used on gas piping threaded joints should be
resistant to action of liquefied petroleum gases.

C- Testing Gas Piping

CAUTION

If a flexible gas connector is required or allowed by
the authority that has jurisdiction, black iron pipe
shall be installed at the gas valve and extend outside
the furnace cabinet.

IMPORTANT

In case emergency shutdown is required, turn off
the main shut‐off valve and disconnect the main
power to unit.  These controls should be properly
labeled by the installer.

WARNING

Do not over torque (800 in-lbs) or under torque (350
in-lbs) when attaching the gas piping to the gas
valve.

When pressure testing gas lines, the gas valve must be dis­
connected and isolated. Gas valves can be damaged if
subjected to more than 0.5 psig (14” W.C.). See figure 19

If

the pressure is equal to or greater than 0.5 psig (14”W.C.),
close the manual shut-off valve before pressure testing to
isolate furnace from gas supply.

Summary of Contents for EL180DF045E36A

Page 1: ...ute code WARNING Improper installation adjustment alteration service or maintenance can cause property damage person al injury or loss of life Installation and service must be performed by a licensed professional HVAC in staller or equivalent service agency or the gas sup plier TABLE OF CONTENTS Specifications Page 2 Blower Data Page 3 Parts Identification Page 5 I Unit Components Page 6 II Instal...

Page 2: ...mounting are not furnished and must be field provided 1 Annual Fuel Utilization Efficiency based on DOE test procedures and according to FTC labeling regulations Isolated combustion system rating for non weatherized furnaces OPTIONAL ACCESSORIES MUST BE ORDERED EXTRA A Width Models B Width Models C Width Models CABINET ACCESSORIES Downflow Combustible Flooring Base 11M59 11M60 11M61 FILTERS 1 Down...

Page 3: ...5 170 1225 135 1185 125 1110 105 0 10 1430 290 1275 175 1190 145 1155 135 1005 95 0 20 1400 295 1230 190 1125 160 1110 150 900 100 0 30 1360 310 1205 205 1085 160 1055 155 845 115 0 40 1310 325 1155 210 1050 175 1000 165 790 115 0 50 1280 335 1110 220 985 185 950 180 705 130 0 60 1250 350 1060 235 935 195 865 185 645 135 0 70 1220 355 1000 245 865 205 815 195 590 140 0 80 1165 365 935 250 795 210 ...

Page 4: ... 2095 405 1875 295 1700 225 1635 180 0 10 2385 630 2100 415 1830 310 1610 240 1505 190 0 20 2325 650 2010 440 1760 330 1570 255 1375 195 0 30 2280 675 1940 460 1705 340 1500 260 1320 210 0 40 2235 690 1895 475 1635 365 1440 285 1265 225 0 50 2165 710 1845 490 1595 380 1380 300 1200 235 0 60 2125 735 1800 510 1545 390 1320 310 1170 250 0 70 2090 740 1755 530 1510 405 1285 325 1100 260 0 80 2035 760...

Page 5: ...ustion air inducer Gas Valve Burner Box includes sensor ignitor and rollout switches Combustion Air Inducer Heat Exchanger Flue Chase Blower Assembly Secondary Limit Access Panel Control Box includes integrated control transformer inter lock switch and circuit breaker ...

Page 6: ...rface ignition control system consisting of an in tegrated control figure 3 with control terminal designa tions in tables 1 2 and 3 flame sensor and ignitor figure 6 The integrated control and ignitor work in combination to ensure furnace ignition and ignitor durability The inte grated control controls all major furnace operations The integrated control also features a RED LED for trouble shooting...

Page 7: ...re Switch In 11 Rollout Switch In 12 Gas Valve Out TABLE 3 1 4 QUICK CONNECT TERMINALS 120HUM Humidifier 120VAC LINE 120VAC XFMR Transformer 120VAC CIRC Indoor blower 120VAC EAC Indoor air quality accessory 120VAC NEUTRALS Common 120VAC HUM24 Humidifier 24VAC 3 16 QUICK CONNECT TERMINALS COOL Cooling tap 24VAC HEAT Heating tap 24VAC FAN Continuous blower 24 VAC PARK no power Park terminal for spee...

Page 8: ... etc To clear error codes depress and hold button longer than 5 seconds TABLE 5 03 Integrated Control RED LED Flash Code2 Diagnostic Codes Status of Furnace Off No power to control or board fault detected Heartbeat1 Normal Operation Idle Continuous Fan Cool Continuous Rapid Flash Call For Heat Burner Operation 1 Reverse Line Voltage Polarity 2 Improper Earth Ground 3 Burner failed to light or lost...

Page 9: ...ith a fac tory fan off setting of 90 seconds For customized comfort monitor the supply air temperature once the heat demand is satisfied Note the supply air temperature at the instant the blower is de energized Adjust the fan off delay to achieve a supply air temperature between 90 110 at the instant the blower is de ener gized Longer delay times allow for lower air temperature shorter delay times...

Page 10: ...xchanger the limit will open If the limit is open the integrated control energizes the supply air blower and closes the gas valve The limit auto matically resets when unit temperature returns to normal The switch must reset within three minutes or SureLight control will go into Watchguard for one hour The switch is factory set and cannot be adjusted The switch may have a different setpoint for eac...

Page 11: ...hermostat contacts to cycle system 7 When main burners are in operation for two minutes take reading TABLE 6 Flame Signal in Microamps Normal Low Drop Out 1 5 0 5 1 4 0 4 FIGURE 7 Measuring Flame Signal upflow furnace shown Flame Sensor Flame Sensor Wire Integrated Control Remove Sensor Wire from Integrated Control and Connect Alligator Clip to Flame Sensor Lead Flame Sensor Terminal Remove Sensor...

Page 12: ...the only test needed If the reading on the meter is not correct 0 or infinity then a second test is needed Test 2 Check ignitor for correct resistance Seperate the 2 pin jack plug near the manifold and check resistance of ignitor at the plug Reading should be between 39 and 70 ohms If the reading is correct then the problem is with the wiring between the jack plug and the control If reading is not...

Page 13: ...ressure Switch S18 EL180DFE series units are equipped with a combustion air pressure switch located on the combustion air inducer ori fice bracket The switch is connected to the combustion air inducer housing by means of a flexible silicone hose It mon itors negative air pressure in the combustion air inducer housing The switch is a single pole single throw proving switch elec trically connected t...

Page 14: ...and motor is not operating properly replace motor The motor is not field re pairable If replacing the indoor blower motor or blower wheel is nec essary placement is critical The blower wheel must be cen tered in the blower housing as shown in figure 10 When re placing the indoor blower motor the set screw must be aligned and tightened with the motor shaft as shown in figure 11 13 Secondary Limit C...

Page 15: ...us fan 1 2 3 4 or 5 on input plug P49 If 24 volts is not present problem may be up stream of plug P49 Proceed to test 4 Multi Meter set to VAC 12 0 12 0 24 Multi Meter set to VAC Check for 24 volts across terminals 24 COM and FAN ter minals on the integrated control If voltage is present prob lem is with the harness If voltage is not present problem may be may be with the integrated control Check ...

Page 16: ...l read approxim ately the same resistance within an ohm 3 Check to see if the blower wheel spins freely FIGURE 16 Motor Test TABLE 9 Scale Measurement range in words ohms 2 M two megohm two million ohms 0 2 000 000 200 K two hundred kilo ohm two hundred thousand ohms 0 200 000 20 K twenty kilo ohm twenty thousand ohms 0 20 000 2 K two kilo ohm two thousand ohms 0 2 000 200 two hundred ohms 0 200 M...

Page 17: ...s to be performed 3 Remove the heating compartment access panel 4 Move gas valve switch to OFF position Do not force See figure 18 5 Replace the heating compartment access panel B Safety or Emergency Shutdown Disconnect main power to unit Close manual and main gas valves C Extended Period Shutdown Turn off thermostat or set to UNOCCUPIED mode Close all gas valves both internal and external to unit...

Page 18: ...to a test gauge to measure supply pressure 2 Start unit and allow 5 minutes for unit to reach steady state 3 After allowing unit to stabilize for 5 minutes record supply pressure and compare to value given in table 12 Manifold Pressure Measurement 1 Remove the threaded plug from the outlet side of the gas valve and install a field provided barbed fitting Connect to a test gauge to measure manifold...

Page 19: ... 10 0 11 0 13 0 TABLE 13 Pressure Switch and Gas Conversion Kits at all Altitudes Model Input Size High Altitude Pressure Switch Kit High Altitude Natural Gas Burner Orifice Kit Natural Gas to LP Propane Burner Orifice Kit LP Propane to Natural Gas Burner Orifice Kit 0 4500 ft 4501 7500 ft 7501 10 000 ft 7501 10 000 ft 0 7500 ft 7501 10 000 ft 0 7500 ft 045 No Change No Change 80W51 73W37 11K49 11...

Page 20: ...nergized 0 75 5 Indoor Blower Energized Less than 2 10 CHECK VOLTAGE BETWEEN LINE NEUTRAL AND LOW VOLTAGE C TERMINAL FIGURE 20 CHECK VOLTAGE BETWEEN LINE HOT AND LINE NEUTRAL FIGURE 21 V TYPICAL OPERATING CHARACTERISTICS A Blower Operation and Adjustment NOTE The following is a generalized procedure and does not apply to all thermostat controls 1 Blower operation is dependent on thermostat control...

Page 21: ... trol See figure NO TAG The heating tap is connected to the HEAT terminal and the cooling tap is connected to the COOL terminal The continuous blower tap is connected to the FAN terminal Unused taps must be secured on dummy terminals labeled PARK To change out existing speed tap turn off power and switch out speed tap with tap connected to PARK See blower speed tap table on unit diagram for motor ...

Page 22: ...l system test Turn on the furnace to check operating functions such as the start up and shut off operation 1 Check the operation of the ignition system inspect and clean flame sensor Check microamps before and after Check controls and safety devices gas valve flame sensor temperature limits Consult Service Manual for proper operating range Thermal Limits should be checked by restricting airflow an...

Page 23: ...er Failure to replace all screws may cause leaks Inspect gaskets for any damage and replace if necessary 14 Reinstall burner box manifold assembly and burner box cover 15 Reconnect all wires 16 Reconnect top cap and vent pipe to combustion air in ducer outlet 17 Reconnect gas supply piping 18 Turn on power and gas supply to unit 19 Set thermostat and check for proper operation 20 Check all piping ...

Page 24: ...s are found to be closed Call for heat can continue 5 A92 integrated control energizes B6 combustion air inducer S18 combustion air pressure switch closes Once S18 closes a 15 second pre purge follows 6 A92 integrated control energizes R33 ignitor A 20 second warm up period begins 7 GV1 gas valve opens for a 4 second trial for ignition 8 Flame is sensed gas valve remains open for the heat call 9 A...

Page 25: ...LVE ENERGIZED GAS VALVE OFF COMBUSTION AIR INDUCER ON INDOOR BLOWER ON HEATING SPEED LED FLASHES CODE 11 PRESSURE SWITCH CLOSED GAS VALVE OFF COMBUSTION AIR INDUCER OFF INDOOR BLOWER OFF WITH DELAY Sequence holds until pressure switch opens or thermostat resets control NO NO YES YES IS VOLTAGE ABOVE 70 VOLTS LED FLASHES CODE 13 LOW LINE VOLTAGE CONTROL WILL NOT RESPOND TO A CALL FOR HEATING UNTIL ...

Page 26: ...TIMES FLAME SIGNAL 1 5 MICROAMPS OR GREATER YES YES YES ROLLOUT SWITCH CLOSED LED FLASHES CODE 8 ROLLOT SWITCH OPEN GAS VALVE POWER OFF COMBUSTION AIR INDUCER POWER ON INDOOR BLOWER ON SEQUENCE HOLDS UNTIL ROLLOUT SWITCH IS RESET AND MAIN POWER IS INTERRUPTED OR THERMOSTAT IS CYCLED OFF ON FOR 1 SEC MINIMUM YES THERMOSTAT DEMAND SATISFIED LED SLOW FLASH COMB AIR INDUCER CONTINUES 5 SECOND POST PUR...

Page 27: ...LOSED LED SLOW FLASH RATE REMAINS UNCHANGED THROUGHOUT COOLING CYCLE THERMOSTAT CALLS FOR COOLING COMPRESSOR CONTACTOR AND SYSTEM FAN ENERGIZED WITH 2 SECOND DELAY COOLING SPEED EAC TERM ENERGIZED COMPRESSOR OFF THERMOSTAT OPENS SYSTEM FAN AND EAC TERM OFF WITH 45 SECOND DELAY NO NO LED FLASHES CODE 8 ROLLOUT SWITCH OPEN GAS VALVE OFF COMBUSTION AIR INDUCER ON INDOOR BLOWER ON SEQUENCE HOLDS UNTIL...

Page 28: ...M FAN SWITCHED TO COOL SPEED EAC TERM REMAINS ON THERMOSTAT OPENS MANUAL FAN SELECTION MADE AT THERMOSTAT CONTROL G ENERGIZES SYSTEM FAN AT FAN SPEED EAC TERM ENERGIZED NO YES YES NO SYSTEM FAN SWITCHES TO HEAT SPEAD AFTER 30 SECOND DELAY EAC AND HUM TERMINAL REMAIN ON SYSTEM FAN CONTINUES FAN SPEED WITHOUT INTERRUPTION EAC TERMINAL REMAIN ON HUM TERMINAL IS ENERGIZED WITH COMBUSTION AIR BLOWER HU...

Reviews: