


- 4 -
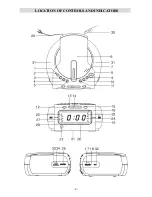
Adjusting the Wake-up Times and Selecting Wake-up Mode
This clock radio has two separate wake-up alarms that can be set and used independently. To set or adjust the
wake-up times, please proceed as follows:
1) Depress and hold the AL1 button for at least two seconds until just the Hour digits and the AL1 (Alarm 1)
indicator are flashing.
2) While the AL1 Hour digits are flashing press the TIME-DN or TIME-UP buttons repeatedly to set the
display to the correct wake-up hour. Example: 7:00
3) When the correct wake-up hour is flashing press the AL1 button again. The Hour digits stop flashing and
the minute digits begin to flash.
4) While the Minute digits are flashing press the TIME-DN or TIME-UP buttons repeatedly to set the
display to the correct wake-up minute.
5) When the desired Alarm 1 wake-up time is showing on the display, press the AL1 button to store the
Alarm 1 wake-up time in the timer memory. The AL1 indicator keeps flashing. Press the TIME-DN or
TIME-UP button to select different wake-up mode as follows, the color of the AL1 indicators will change
accordingly as to the wake-up mode that you select - Buzzer, Radio, CD, USB or SD.
a) Press the TIME-DN or TIME-UP until the AL1 indicator changes to Red and then press AL1 button
to confirm. This indicates the Wake To Buzzer mode is selected and the alarm is On . At the selected
wake up times the buzzer will turn on. It will continue for one hour and then stop automatically and
reset itself for the following day.
b) Press the TIME-DN or TIME-UP until the AL1 indicator changes to Green and then press AL1
button to confirm. This indicates the Wake To Radio mode is selected and the alarm is On . At the
selected wake up times the Radio will turn on. It will continue for one hour and then stop automatically
and reset itself for the following day.
c) Press the TIME-DN or TIME-UP until the AL1 indicator changes to Yellow and then press AL1
button to switch to select CD/USB/CARD, press the TIME-DN or TIME-UP to choose desired mode,
the corresponding mode will be shown on the display(CD-USB-CARD), after selected, press the AL1
button again to confirm. This indicates the Wake To CD/USB/CARD mode is selected and the alarm is
On . At the selected wake up times the CD player/USB/SD/MMC card will turn on. It will play for one
hour, or until the end of the disc (card), whichever comes first, and then stop automatically and reset
itself for the following day.
Note: If you select wake-up to USB or CARD mode, please make sure the USB or SD had been connected
to the USB port or SD/MMC card slot.
d) After the wake-up mode is selected, the AL1 indicator will stop flashing (steady on).
6) The wake-up time and mode of Alarm 1 is set, depress and hold the AL2 button and follow the above
steps to set alarm 2 wake up time and then press TIME-DN or TIME-UP button to select wake-up mode.
IMPORTANT: After you press the AL1 button you must make your wake-up time adjustments within 10
seconds while the wake-up time display is flashing. After 10 seconds the wake-up time display stops flashing,
the display returns to the correct time, and no wake-up time adjustments can be made. If this occurs you must
begin with Step 1 above and start the wakeup time adjustment process again.
Canceling The Alarms
To cancel the alarms completely press the respective ALARM 1 and/or ALARM 2 buttons until the AL1
and/or AL2 indicators disappear.
Snooze/Repeat Alarm
After the alarm turns on in the morning you can press the SNOOZE button for a few extra minutes sleep.
The alarm will stop for approximately 9 minutes and then come on again. Snooze operation can be repeated
several times if desired, but after one hour the alarm will not turn On again.
Weekend Sleeper
To skip all alarms in the weekend, press the WEEKEND button, the WEEKEND indicator will be on. The
alarm(s) will not sound in the weekend. Press the WEEKEND button to cancel this function, and return to
your preset alarm(s).


