background image


- 3 -


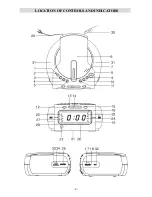
1. 

POWER Indicator 

2. 

ALARM OFF/POWER Button 

3. 

CLK.ADJ/PROG./P-MODE/FILE+10 
Button 

4. 

FUNCTION Button 

5. 

ALARM 1 Button 

6. 

Disc Compartment 

7. 

CD Door Open/Close 

8. 

SNOOZE/WEEKEND SET Button 

9. 

SLEEP Button 

10.  DISPLAY/ALBUM+ Button 
11.  ALARM 2 Button 
12.  TIME-DN/F.REV (Time down/CD fast 

reverse search) Button 

13.  CD STOP Button 
14.  CD PLAY/PAUSE&FM.ST/MONO Button 
15.  TIME-UP/F.FWD (Time up/CD fast 

forward search) Button 

16.   CD PROGRAM Indicator 

17.   Radio Tuning Window 
18.   TUNING Control 
19.   FM.ST/RANDOM/WEEKEND 

Indicator 

20.   LED Display 
21.   Battery Compartment 
22.   FM/REPEAT Indicator 
23.   Phones Jack 
24.   SLEEP Indicator  
25.   ALARM 1 Indicator 
26.   VOLUME Control 
27.   ALARM 2 Indicator 
28.   FUNCTION MODE Indicator 
29.   AC Power Cord 
30.   FM Wire Antenna  
31.   Speakers 
32.   Dimmer Control 
33.   USB port 
34.   SD/MMC card slot

Power Source 

This  system  is  designed  to  operate  on  230VAC  50Hz  house  current  only.  Connecting  this  system  to  any 
other power source may cause damage to the system and such damage is not covered by your warranty. 
Note: The system has polarized AC plug with one wide blade and one narrow blade. The plug will only fit 
into matching polarized AC outlets. 

Battery Back Up System 

This unit uses a single 9-Volt battery (not included) to maintain the time and alarm settings in event that it is 
accidentally  unplugged,  or  you  experience  a  temporary  power  failure.  We  recommend  that  you  install  a 
well-known  brand  of  Alkaline  battery  for  longest  life  and  best  performance.  To  keep  the  battery  back  up 
system operational you should install a new battery every 6 to 9 months. Some people find it convenient to 
replace the back up batteries in their alarm clocks, clock radios, and smoke detectors too, at the beginning 
and end of Daylight Saving Time.  


OPERATING INSTRUCTIONS                                           

Setting The Correct Time And Day 

NOTE: Connect the power cord to your AC outlet. Make sure to use an outlet that is always  live . Do not 
use an outlet that is controlled by a wall switch. 
1) When the unit is plugged in for the first time, the clock display will begin flashing 


. There is 

only a 24 hours system on this device. 

2) Press and hold the CLK.ADJ button for at least two seconds until only the Hour digits continue to flash. 
3) While the Hour digits are flashing press the TIME-DN or TIME-UP buttons repeatedly to set the clock to 

the correct Hour.  

4) When the correct hour is flashing, press the CLK.ADJ button again. The Minute digits begin to flash. 
5) While the Minute digits are flashing press the TIME-DN or TIME-UP buttons repeatedly to set the clock 

to the correct Minutes. 

6) Press the CLK.ADJ button. The Day indicator 


begins to flash. 

7) While the day indicator is flashing, press the TIME-DN or TIME-UP buttons repeatedly to set the display 

to the correct  Day . (1 = Monday, 2 = Tuesday, etc.) 

8) When  the  correct  day  (digit)  appears  on  the  display  press  the  CLK.ADJ  button  once  more  to  exit  the 

clock-setting mode. The display stops flashing and returns to the correct time and the clock begin to run. 

IMPORTANT:  After  you  press  the  CLK.ADJ  button  you  must  make  your  time  adjustments  within  10 

seconds while the display is flashing. After 10 seconds the display stops flashing and no time 
adjustments can be made. If this occurs you must begin with Step 2 above and start the time 
adjustment process again. 

Summary of Contents for CR-2800

Page 1: ...STEREO RADIO CD USB SD MMC MP3 PLAYER WITH DUAL ALARM CLOCK SYSTEM CR 2800 INSTRUCTION MANUAL ...

Page 2: ... safety If the provided plug does not fit into your outlet consult an electrician for replacement of the obsolete outlet 6 Protect the power cord from being walked on or pinched particularly at the plugs convenience receptacles and at the point where it exits from the apparatus 7 Only use attachments accessories specified by the manufacturer 8 Unplug the apparatus during lightening storm or when u...

Page 3: ... 2 LOCATION OF CONTROLS AND INDICATORS ...

Page 4: ... new battery every 6 to 9 months Some people find it convenient to replace the back up batteries in their alarm clocks clock radios and smoke detectors too at the beginning and end of Daylight Saving Time OPERATING INSTRUCTIONS Setting The Correct Time And Day NOTE Connect the power cord to your AC outlet Make sure to use an outlet that is always live Do not use an outlet that is controlled by a w...

Page 5: ...indicator changes to Yellow and then press AL1 button to switch to select CD USB CARD press the TIME DN or TIME UP to choose desired mode the corresponding mode will be shown on the display CD USB CARD after selected press the AL1 button again to confirm This indicates the Wake To CD USB CARD mode is selected and the alarm is On At the selected wake up times the CD player USB SD MMC card will turn...

Page 6: ...y 4 Rotate the VOLUME control on the left side panel to adjust the volume level 5 When you are finished listening press the ALARM OFF POWER button to turn the unit Off The POWER LED indicator goes off FM Antenna Wire Make sure the FM lead wire antenna is extended to it s full length You may have to vary the direction of the wire antenna to find the position that provides the best reception Playing...

Page 7: ...one album Press and hold the DISPLAY ALBUM button in stop or during playback until the desired album number appears on the display then release press the PLAY PAUSE button to play the tracks under the selected album To Select A Song Which Track Number Exceeds 10 for MP3 only To select a song track which number exceeds 10 during playback press and HOLD the CLK ADJ PROG P MODE FILE 10 button for ski...

Page 8: ... Card Installation And Remove Press the card towards the SD MMC CARD slot when the installation is well done a click sound will be heard To remove the SD MMC card press the card gently the card will flick out Now you can remove the card out of the card slot SD MMC Card Playback 1 Press the FUNCTION button until the FUNCTION indicator turns on green to enter CARD playing mode shown on display 2 Con...

Page 9: ... with a soft lint free dry cloth Never use detergents or abrasive cleaners to clean the disc If necessary use a CD cleaning kit Never write on or affix labels to the surface of compact discs Care of the cabinet If the cabinet becomes dusty wipe it with a soft dry dust cloth Do not use any wax or polish sprays on the cabinet It the front panel becomes dirty or smudged with fingerprints it may be cl...

Reviews: