background image

Power Description

Carefully check the voltage and current capacity of the rated power. The rated power is indicated in the back of main
unit.

Model

4 305 21

4 305 23/4 305 24/4 305 25

For the DC input models, be careful with the polarity of DC power. The system should be permanentally damaged by
wrong DC input.

In case that the length of the power wire is very long, there may be voltage drop and the syatem may not work properly.
Make the length of the power wire as short as possible.

RS-485 Communication

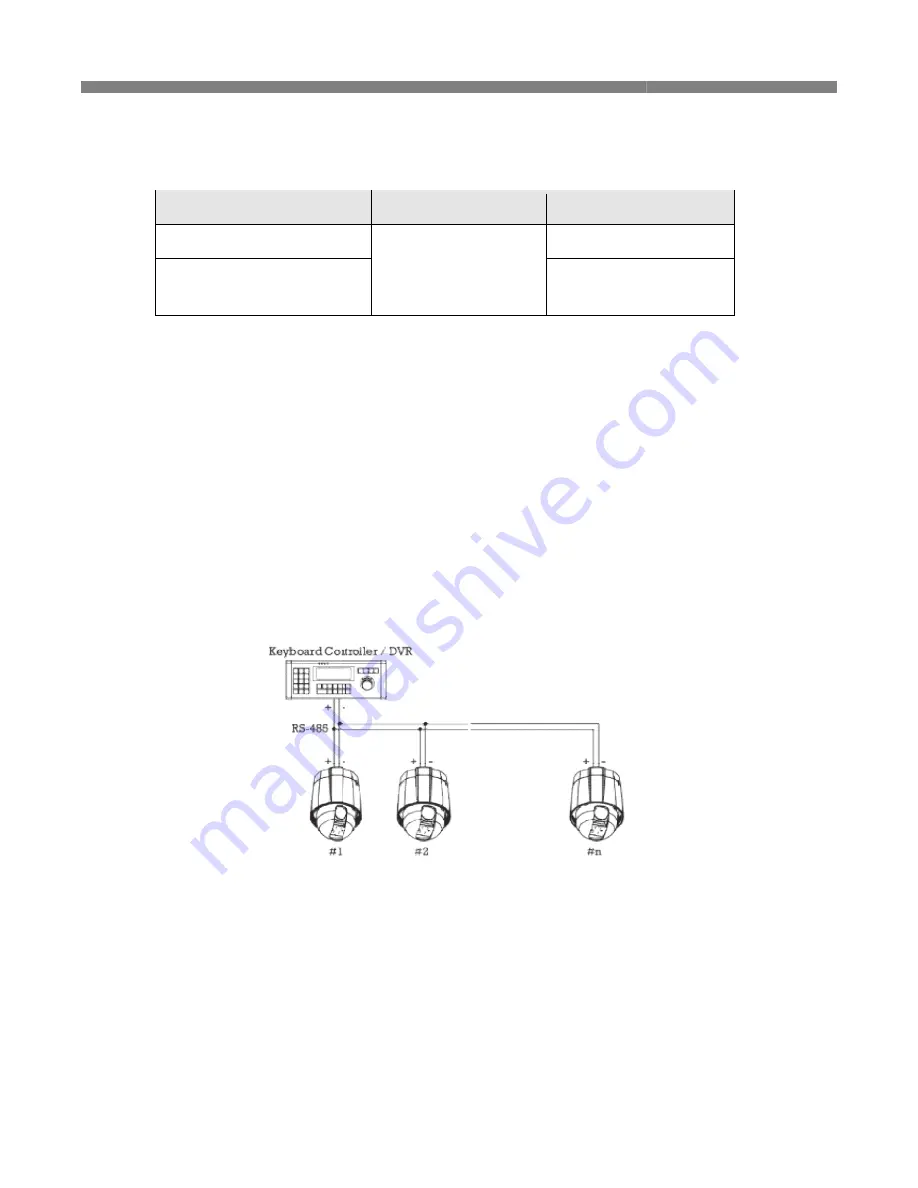
For PTZ control, connect the cable(s) to your keyboard or DVR. To connect multiple cameras to a single controller, RS
communication should be connected in
terminate the camera. When connecting more than one camera to a single controller, terminate the last camera on the
communication line. The last camera means the camera farthest in cable length from the controller.
length of the communication cable betw
less than 1.2Km.

28

Carefully check the voltage and current capacity of the rated power. The rated power is indicated in the back of main

Input Voltage Range

Current Consumption

DC 11V ~ 15V

0.8 A

2.5 A

For the DC input models, be careful with the polarity of DC power. The system should be permanentally damaged by

In case that the length of the power wire is very long, there may be voltage drop and the syatem may not work properly.
Make the length of the power wire as short as possible.

For PTZ control, connect the cable(s) to your keyboard or DVR. To connect multiple cameras to a single controller, RS
communication should be connected in parallel as shown below. If you are connecting a single camera to a controller,

era. When connecting more than one camera to a single controller, terminate the last camera on the

communication line. The last camera means the camera farthest in cable length from the controller.
length of the communication cable between a controller and the camera(s) on the same communication line must be

Carefully check the voltage and current capacity of the rated power. The rated power is indicated in the back of main

Current Consumption

For the DC input models, be careful with the polarity of DC power. The system should be permanentally damaged by

In case that the length of the power wire is very long, there may be voltage drop and the syatem may not work properly.

For PTZ control, connect the cable(s) to your keyboard or DVR. To connect multiple cameras to a single controller, RS-485

as shown below. If you are connecting a single camera to a controller,

era. When connecting more than one camera to a single controller, terminate the last camera on the

communication line. The last camera means the camera farthest in cable length from the controller. Note that the total

een a controller and the camera(s) on the same communication line must be

Summary of Contents for 4 305 21

Page 1: ...ur camera 4 305 22 3 6 44 3mm 12X weatherproof motorized day night dome colour camera 4 305 23 3 5 94 5 mm 27X weatherproof motorized day night dome colour camera 4 305 24 3 5 129 5 mm 37X weatherproof motorized day night dome colour camera 4 305 25 USER MANUAL LE03668AB 4 305 21 4 305 22 4 305 23 4 305 24 25 ...

Page 2: ...llation should be done only by qualified personnel and conform to all the instructions by the manufacturer Refer all servicing to qualified service personnel Unless the product is specifically marked as IP67 more than IP67 or confirmed by the manufacturer it is designed for indoor use only and it must not be installed where exposed to rain and moisture Do not load on the product Use stainless stee...

Page 3: ...ock and vibration as this can damage the product Care must be taken when you clean the clear dome cover Especially scratch and dust will ruin the quality of the product Installation and Storage Do not install the product in areas of extreme temperature which exceed the allowable range Avoid installing in humid or dusty places Avoid installing in places where radiation is present Avoid installing i...

Page 4: ... 4 305 22 model 23 2 7 Installation using Wall Mount Bracket 4 305 22 model 24 2 8 Installation with Ceiling Mount Bracket 4 305 23 4 305 24 4 305 25 Models 25 2 9 Installation with Wall Mount Bracket 4 305 23 4 305 24 4 305 25 Models 26 2 10 Wiring and Cabling 4 305 21 4 305 23 4 305 24 4 305 25 27 3 Operation 32 3 1 Check Points before Operation 32 3 2 Check Points for Preset and Pattern Functio...

Page 5: ... Camera Setup Dome Camera Setup Menu 43 4 6 Motion Setup 47 4 7 Preset Setup 50 4 8 Swing Setup 53 4 9 Pattern Setup 54 4 10 Group Setup 55 4 11 System Initialization 58 5 Specifications 60 5 1 Dimension 65 ...

Page 6: ...5 24 4 305 24 Optical Zoom 12 x27 x12 x27 x37 Digital Zoom 12 x12 x12 x12 x12 Max zoom magnification 144 324 x144 x324 x444 High light compensation NO NO NO YES YES Privacy Masks 8 8 8 8 8 Day Night YES WDR NO YES Focus Mode Auto Focus Manual Focus Semi Auto Focus OSD Menu YES Sensor super HAD color CCD super HAD color CCD super HAD color CCD super HAD color CCD Powerful Pan Tilt Functions MAX 360...

Page 7: ...roller and revives the trajectory operated by the joystick as closely as possible MAX 8 sets of Group are programmable This function is that the camera memorizes the combination of Presets Pattern and or Swings sequently and runs Presets Pattern and or Swings repetitively A Group can be combined upto 20 functions with any of Preset Pattern Swing 8 Privacy Masks are programmable not to intrude on a...

Page 8: ... and sequentially in succession to the action by external sensor activations Reserved Presets Hot Keys Most camera setup options can be set up easily and directly with the reserved presets Hot Keys without entering into OSD menu For more information refer to Reserved Presets Hot Keys in this manual Perfect Outdoor Environment Compatibility and Easy Installation 4 305 23 4 305 24 4 305 25 The fans ...

Page 9: ...Mount Bracket 4 305 96 Ceiling Mount Bracket 9 Product Accessories Main Body Surface Mount Bracket Default Accessories Main Cable Calblock Screws Tapping M4 Machine M3 6 Machine M3 Product Accessories Dome Cover Screws Ceiling Mount Bracket 4 305 97 Corner bracket 4 305 98 Accessories Main Cable Calblock Screws Tapping M4 16 Tapping M4 25 6 Machine M3 8 Screws Wall mount bracket 4 305 94 ...

Page 10: ...05 Pole bracket 4 305 99 10 s Product Accessories Main Body Surface Mount Bracket Default Accessories Main Cable Wrench Accessories for The Models with Alarm In Out Function I O Cable Wall Mount Bracket Screws Machine M5 15 Hex Lag 14 5 98 Ceiling Mount Bracket 99 Default Accessories Main Cable Wrench Wall Mount Bracket 15 Hex Lag 14 50 Ceiling Mount Bracket 4 305 95 ...

Page 11: ...o lock up the dome cover after assembling the dome cover with the main body Dome Cover Assembly Stud Used to line up the stud on the main body and the stud on the dome cover when assembling the dome cover with the main body DIP Switch Used to set up camera IDs and protocols Surface Mount Bracket Mounting Screw Hole Used for surface mount type wall mount type and ceiling mount type They are not use...

Page 12: ...this directly to ceiling or to the other assembled at the last stage This part keeps the camera from dropping during installation and install the Terminal Cover please hang the spring to the drop main body as shown in picture for further tasks After assembling Terminal Cover to main body screw Terminal Cover to main body to protect them from separation by vibration and so on If the fuse is burnt t...

Page 13: ...e summit of the Plate Spring is located at the arrow mark as shown in the dotted circle Check the 2 mold line for assembly before starting assembly Line up the mold lines as shown in the dotted circle and turn main body on its axis in CW Clockwise direction and assemble main body to Terminal Cover After assembling them screw main body to Terminal Cover to protect them from separation by vibration ...

Page 14: ...s or dust DIP Switch Used to set up camera IDs and protocols Mounting Hook Used to assemble the main body with wall mount bracket or ceiling mount bracket Insert the mounting hooks into the holes on the surface of the main body and turn the main body Mounting Screw Hole Used to assemble the main body with a bracket with screws Main Connector Used for the power wire the video cable and the RS 485 c...

Page 15: ... DIP switches to configure the camera ID the ISP connector Authorized person only ON ON 1 2 3 4 5 6 15 4 305 25 models Before installing the camera set up the DIP switch to configure the camera ID and the communication Before you install the camera you should set the DIP switches to configure the camera ID communication the ISP connector Authorized person only 7 8 communication protocol communicat...

Page 16: ...e camera ID with the Cam ID setting of your DVR or Controller to control the camera If you are connecting a single camera to a controller terminate the camera When connecting more than one camera to single controller terminate the last camera on the communication line The last camera means the camera farthest in Note that the total length of the communication cable between a controller and the cam...

Page 17: ...stem is one of following two cases Case1 Control cable between camera and controller is relatively very long 1 1 connection cable is very long the electrical signal will bound in the terminal point This reflected signal cause distortion of dingly the camera can be out of control In this case the terminal resistor of both sides i e camera and cameras are controlled at the same time terminal resiste...

Page 18: ...s high state when sensor is not activated Pin No Switch State Sensor Type ST1 Pin 4 ON Sensor 1 Normal Close Type OFF Sensor 1 Normal Open Type ST2 Pin 5 ON Sensor 2 Normal Close Type OFF Sensor 2 Normal Open Type ST3 Pin 6 ON Sensor 3 Normal Close Type OFF Sensor 3 Normal Open Type ST4 Pin 7 ON Sensor 4 Normal Close Type OFF Sensor 4 Normal Open Type If sensor type is not selected properly the al...

Page 19: ...g and cabling and attach the camera to the ceiling tile Tapping M4 16 Align the dome cover stud with the dome cover assembly stud and slightly push the dome cover to the ceiling tile Turn the dome cover clockwise and screw on the dome cover lock up screw Then remove the protection vinyl from the dome cover Machine M3 6 Important Notice Before starting the installation make sure that the Camera ID ...

Page 20: ... surface Tapping M4 25 Connect the wires and cables to the ports and install the main body Machine M3 8 Align the dome cover stud with the dome cover assembly stud and slightly push the dome cover to the ceiling Turn the dome cover clockwise and screw on the dome cover lock up screw Then remove the protection vinyl from the dome cover Machine M3 6 Important Notice Before starting the installation ...

Page 21: ... ceiling panel For cable connection remove the pre the Rubber Gasket and locate the summit of the Plate Spring at the arrow mark as shown in the dotted circle After assembling the Rubber Gasket to the Terminal Cover install Terminal Cover on ceiling tex and connect cables to terminal blocks Connect the Drop Prevention Spring prevent camera from drop Check the 2 mold line for assembly before starti...

Page 22: ... Locate the summit of the plate spring at the arrow mark as shown in the dotted circle Assemble main body to Terminal Cover and insert the assembly into ceiling tex Holes are to be used to sustain the device tex with 3 screws tightly Assemble Deco Ring with camera and turn Deco Ring on its axis in CW Clockwise direction Assemble Terminal Cover of camera to the Bracket as shown bellow Assemble main...

Page 23: ...ws Do not use Rubber Gasket Locate the summit of the Plate Spring at the arrow mark For more information refer to the Terminal Cover Assembling section Connect Drop Prevention Spring to main body to prevent camera from drop Line up the mold lines and turn main body on its axis in CW Clockwise direction and assemble main body to Terminal Cover After assembling them screw main body to Terminal Cover...

Page 24: ...e Plate Spring at the arrow mark For more information refer to the Terminal Cover Assembling section Connect Drop Prevention Spring to main body to prevent camera from drop Line up the mold lines and turn main body on its axis in CW Clockwise direction and assemble main body to Terminal Cover After assembling them screw main body to Terminal Cover to protect them from separation by vibration and s...

Page 25: ...e the cable s to the ports Insert the mounting hooks into the holes on the surface of the main body and turn the main body Assemble the main both with the camera mount adaptor with the 3 screws Machine M5 15 Screw the dome cover to the main body and remove the protection vinyl from the dome cover Important Notice Before starting the installation make sure that the Camera ID and Protocol are set up...

Page 26: ...tem as below Attach the wall mount bracket to the mounting surface Hex Lag 14 50 Pull the wire s and cable s for the system as below Wire the cable s to the ports Insert the mounting hooks into the holes on the surface of the main body and turn the main body Assemble the main both with the camera mount adaptor with the 3 screws Machine M5 15 Screw the dome cover to the main body and remove the pro...

Page 27: ...LLER DVR IR SENSOR DOOR SWITCH Port Description Main Cable Port Pin Number RJ45 Connector Wire Color Signal 1 BNC Connector Video 2 4 Video 5 Red RS 485 3 Yellow RS 485 7 Orange Power 6 8 White Power I O Cable Port Pin Number RJ25 Wire Color Signal 1 Blue IN COM 2 Yellow IN 1 3 Green IN 2 4 Red IN 3 5 Black OUT A 6 White OUT B ...

Page 28: ...e voltage drop and the syatem may not work properly Make the length of the power wire as short as possible For PTZ control connect the cable s to your keyboard or DVR To connect multiple cameras to a single controller RS communication should be connected in parallel as shown below If you are connecting a single camera to a controller era When connecting more than one camera to a single controller ...

Page 29: ...tage Output type in general the wiring must be done properly after considering Description The electric power source to drive input circuit Connect the wire electric power source to drive the Sensors to this port as shown in the above circuit Connect the outputs of sensors to each port as shown in the above circuit If you want to use Alarm Input the types of sensors must be selected in OSD menu Th...

Page 30: ...ck of main unit Input Voltage Range 11 15 VDC Video Connection Connect with BNC coaxial cable 30 model check the voltage and current capacity of rated power carefully Rated power is indicated in the back of main unit Current Consumption 0 75 A check the voltage and current capacity of rated power carefully Rated power is indicated in the back of main unit ...

Page 31: ...oltage and output signal type of the sensor Since output signal types of the sensors are divided into Open Collector and Voltage Output type in general the cabling must be done properly ped Also the sensor type i e Normal Open or Normal Close Description Connect cable of electric power source for Sensors to this port as shown in the circuit above Connect output of sensors for each port as shown in...

Page 32: ...if the camera can not be controlled properly The operation of this manual is based on the standard Pelco Controller 3 2 Check Points for Preset and Pattern Function before Operation Check fully how to operate preset function and pattern function with your controller or DVR in advance to operate the camera functions when using a controller or a DVR Refer to the following table when using standard P...

Page 33: ...ional Function to ON Set Preset 167 Setting Zoom Proportional Function to OFF Go Preset 170 Setting Camera BLC Mode to OFF Go Preset 171 Setting Camera BLC Mode to ON Go Preset 174 Setting Camera Focus Mode to AUTO Go Preset 175 Setting Camera Focus Mode to Manual Go Preset 176 Setting Camera Focus Mode to SEMI AUTO Go Preset 177 Setting Day Night Mode to AUTO Go Preset 178 Setting Day Night Mode ...

Page 34: ...te Presets enter into OSD menu function is that the camera moves repetitively between two preset positions at programmed speeds When a swing function runs the camera moves from the preset assigned as the 1st point to the preset assigned as the 2nd point in CW Clockwise direction Then the camera moves from the preset assigned as the 2nd point to the preset assigned as the 1st point in CCW Countercl...

Page 35: ...rammed in a pattern A Pattern can be created by the following methods Pattern Pattern NO The Pattern programming window appears on the monitor as below The movement by Joystick and the preset movement can be memorized in a pattern programmed the remaining storage is displayed in progress bar on the To save the recording press NEAR key and to cancel press FAR key Method 2 Programming in OSD Menu Se...

Page 36: ... Swings Presets Pattern and or Swings repetitively MAX 8 sets of Group are Each group can have MAX 20 actions which are the combinati and Swing Preset speed can be set up and the repeat number of Pattern Swing can be set up in Group setup Dwell time between actions can be set up also To set Groups enter into OSD menu thod 1 Run Pattern Group NO 20 Method 2 Go Preset Group NO 150 ex Run Group 7 Run...

Page 37: ...ed by the operator of the system To protect others privacy MAX 8 Privacy Masks can be created on the arbitrary position to hide objects such as windows shops or private house With the Spherical Coordinates system powerful Privacy Zone Mask function is possible A mask area will move with pan and tilt functions and automatically adjust in size as the lens zooms telephoto and wide GLOBAL LOCAL Image ...

Page 38: ...n Preset xxx is memorized When the camera reaches Preset xxx When Pattern x is in action PRESET xxx When Swing x is in action Displays both of Swing number and Preset number When a undefined function is called to Displays preset labels when the camera arrives at presets Displays activated alarms This information shows current state of Alarm I nput point is ON state it will show a number correspond...

Page 39: ...rious functions of the camera System Initialize Initializes all system 39 ve sub menus s or make the cursor move to the right press NEAR key menus press FAR key key in the menu use the joystick to the Up Down direction or Left Right Up Down of the joystick in the controller Displays the system information and configuration The system setting can not be changed using the OSD menu and the informatio...

Page 40: ...rs Displays the selected Camera ID Address ON OFF AUTO Displays the amount of pan from zero degree vertical the amount of tilt from zero degree horizontal and current compass direction Also identifies the amount of the zoom magnification ON OFF AUTO Identfies Actions SET PRESET xxx xxx ON OFF AUTO Displays the preset labels when the camera arrives at presets ON OFF AUTO Displays the activated alar...

Page 41: ...an not be viewed by the operator of the system T asks can be created on the arbitrary position to hide objects such as windows shops or With the Spherical Coordinates system powerful Privacy Zone Mask function is possible A mask area will move with pan and tilt functions and automatically adjust in size as the lens zooms telephoto and wide Selects a Mask number to program If the selected mask has ...

Page 42: ... to Left Right Adjusts the mask width Up Down Adjusts the mask height 42 Move your camera to an area to mask Then a mask and the menu to adjust the mask size will be displayed Adjusts the mask size Use the joystick or the arrow buttons of your controller to adjust mask size Adjusts the mask width Adjusts the mask height Move your camera to an area to mask Then a mask and the menu to adjust the mas...

Page 43: ...ctivates in preset operation and Auto Focus mode activates during jog operation With Manual mode at presets Focus data is memorized in each preset in advance and the camera calls focus data in correspondence with presets as soon as camera arrives at presets It should shorten time to get focuses Focus mode automatically changes to Auto Focus ration starts zoom functions to ON OFF If this is set to ...

Page 44: ...cture output in the red range Adjusts the picture output in the blue range Sets Backlight Compensation to ON OFF If a bright backlight is present the subjects in the picture appear dark or as a silhouette Backlight compensation enhances objects in the center of the The camera uses the center of the picture to adjust the iris If there is a bright light source outside of this area it will wash out t...

Page 45: ...s Shutter Speed Shutter Speed is the duration of the electronic shutter If Iris is set to Manual and Shutter Speed is set to ESC Shutter Speed has higher priority If Shutter Speed is set to A Flicker to remove Flicker Shutter Speed should be set to 1 100 sec for NTSC and 1 120 for PAL AGC OFF LOW HIGH Sets AGC This setting enhances image brightness automatically in case that luminance level of ima...

Page 46: ...too bright lights this function blocks light sources on the images to have better images For example when there is a car coming to a camera at night this function bocks car headlights to recognize its number plate Level 0 10 Assigns colors of masks to block light sources ...

Page 47: ...l to the zoom magnifications As the zoom magnification goes up the pan tilt speed goes down Sets the Jog Direction If this is set to Inverse the view direction in the screen is same as the direction of joystick If this is set to Normal the view direction in the screen is the reverse dirction of joystick Sets Frame Freeze Function This feature freezes the scene on the monitor when going to a preset...

Page 48: ...time of inactivity If Park Enable is set to ON the camera runs an assigned function automatically if there is no PTZ command during the programmed Wait Time 1 59 sec 1 180 min Wait Time can be programmed from 1 second to 180 minutes HOME PRESET PATTERN SWING GROUP PREV ACTION This feature defines the activity when the camera parks If Park Action is set to moves to the home position which is memori...

Page 49: ...tion runs sequentially in succession to the action by external sensor activation If this option is set to ENDLESS Post Action does not activate Post Action HOME PRESET PATTERN SWING GROUP PREV ACTION Selects the action that a camera will run after the time period in HOLD TIME passes If Post Action is set to PREV ACTION the camera runs the previous action which it ran most recently ...

Page 50: ...of the selected Preset to show on the monitor when the preset runs alphanuberic characteristics are allowed Defines the relay output WB White Balance and AE Auto Exposure can be set up independently for each preset There are 2 modes Global mode Local mode The Global mode is that WB and or AE are is set up totally and simultaneously for all presets The Global parameter setup such as WB and AE can b...

Page 51: ...e label of the selected preset to show on the monitor when camera arrives at the preset In rectangular is the cursor As soon as finishing selecting an alphabet or a number the cursor moves to the next digit With Left Right Up Down of the joystick move to a desired Alphabet or a desired number in the Alphanumeric set To select a desired Alphabet or a desired number press the NEAR key double quotati...

Page 52: ...Relay Out Setup 4 305 22 Relay Out ON OFF Sets Relay Outputs for assigned preset 52 Sets Relay Outputs for assigned preset ...

Page 53: ...tion If the selected preset is not defined UNDEFINED is displayed as shown below swing function runs the camera moves from the preset assigned as the 1st point to the ssigned as the 2nd point in CW Clockwise direction Then the camera moves from the preset assigned as the 2nd point to the preset assigned as the 1st point in CCW direction In case that the preset assigned as the 1st point and the pre...

Page 54: ...mber is not defined UNDEFINED will be displayed under the selected pattern number the data of the selected pattern Pattern for the test purposes to check if it works properly Edits the selected pattern With the Joystick of your controller move the camera to the start position with an appropri NEAR key To exit press FAR key Move camera with joystick of controller or run preset function to memorize ...

Page 55: ... select an Action 55 Group number to edit selected Group number is not defined UNDEFINED will be displayed under selected Group number data of the selected Group the Group for the test purposes to check if it works properly Edit the selected Group key when the cursor is at NO to start editing the selected Group Note that MAX 20 actions are allowed in a Group Move the cursor up down to select an Ac...

Page 56: ...rsor 56 Define Action Dwell time and Option Note that the dark rectangular is the cursor Move the cursor to change each parameter NONE PRESET SWING PATTERN 0 SEC 4 MIN Sets the Dwell Time between functions Option It is a preset speed when a preset is selected in the Action It is the number of repeat when a Pattern or a Swing is selected in the Action Edit the items such as Action Dwell and OPT by ...

Page 57: ...Step 6 After finishing setting up press FAR 57 a Action press Near key to go to the previous upper level menu Step Action number and repeat Step Step to keep editing the selected FAR key to exit Then the cursor will move to SAVE Press Step Move the cursor the selected Group Press Near key to save the data ...

Page 58: ...l the Reboot Camera Reboots the zoom camera module Reboot System Reboots the system 58 Deletes all configuration data and the system is set to the factory default Initializes all the configuration data for Display Initializes all the configuration data for Camera Initializes all the configuration data for Motion Deletes all the configuration data for Preset Swing Pattern and Group Reboots the zoom...

Page 59: ...ite Balance AUTO North Direction Pan 0 Backlight OFF Privacy Zone Undefined Day Night AUTO Brightness 32 Iris AUTO Shutter Motion Parameters AGC Motion Lock OFF SSNR MIDDLE Power Up Action ON SENS UP AUTO 4 Frame Auto Flip ON Jog Max Speed 120 sec User Defined Data Jog Direction INVERSE Preset 1 128 Undefined Freeze In Preset OFF Swing 1 8 Undefined Park Action OFF Pattern 1 4 Undefined Alarm Acti...

Page 60: ...tal Zoom Forcal Length F1 6 Wide F2 0 Tele f 3 6 44 3 mm Angle of View H 5444 Wide 4 64 Tele V 41 42 Wide 3 52 Tele Minimum Illuminance 2 0 Lux Color Sens Off 0 0008 Lux B W Sens x256 50 IRE F1 6 Day Night Auto Day Night ICR Focus Auto Manual SemiAuto Iris Auto Manual Shutter Speed 1 60 50 1 10000 sec x2 256 Sens UP AGC Auto Manual White Balance Auto Manual Red Blue Gain Adjustable 2000 K 10000 K ...

Page 61: ...Gain Adjustable BLC BLC HLC Off Flickerless Selectable SSNR Low Middle High Off Stabilization On Off Pan Tilt Range Pan 360 Endless Tilt 95 Pan Tilt Speed Preset 360 sec Manual 0 05 360 sec proportional to zoom Swing 1 180 sec Preset 127 Preset Label Camera Image Setting Pattern 4 Pattern 1200 commands about 5 minute Pattern Swing 8 Swing Group 8 Group 20 action entities per Group Other Functions ...

Page 62: ...ngle of View H 55 5 Wide 2 24 Tele 55 5 Wide 1 59 Tele Angle of View V 42 5 Wide 1 79 Tele 42 5 Wide 1 19 Tele Zoom Speed Wide to Tele 1 8 sec 2 5 sec Minimum Illuminance 0 4 Lux Color 0 02 Lux B W 50 IRE F1 6 0 7 Lux Color 0 6 Lux B W 50 IRE F1 6 Day Night Auto Day Night ICR Focus Auto Manual SemiAuto Iris Auto Manual Shutter Speed 256 1 120000 sec AGC Low Middle High Manual Off White Balance Aut...

Page 63: ...ther Pan Tilt Functions Auto Flip Auto Parking Power Up Action and etc Communication RS 485 Protocol Pelco D Pelco P Selectable OSD English Menu PTZ information etc Sensor Input 3 Inputs Photo Coupler Type DC 5V 12V Alarm Outputs 1 Output Relay Output MAX Load DC24V 1A AC125V 0 5A Fan Always ON Heater Operation Start from Internal Temperature 10 C Operation Temperature 0 C 40 C 4 305 21 4 305 22 M...

Page 64: ...05 24 4 305 25 Models Ceiling Mount Wall Mount Ceiling Mount Wall Mount Material Dome Polycarbonate Internal Polycarbonate ABS External Aluminium Dome Size 107 5mm 4 2 150mm 5 9 Dimension 158 2 216 mm 274 5 227 3 mm 192x265 3mm 296x276 6mm Weight kg Approx 2 6 kg Approx 2 8 kg Approx 3 2 kg Approx 3 8 kg Note 1 Specification and features are subject to change without prior notice 2 Specification a...

Page 65: ...5 1 Dimension 4 305 21 Model Main Body Unit mm 65 Surface Mount Type ...

Page 66: ... 4 305 22 Model Main Body Terminal Cover Ceiling Mount Bracket Unit mm 66 In Ceiling Mount Bracket Wall Mount Bracket ...

Page 67: ... 4 305 23 Model Main Body Wall Mount Type Unit mm 67 Ceiling Mount Type ...

Page 68: ... 4 305 24 4 305 25 Model Main Body Wall Mount Type Unit mm 68 Ceiling Mount Type ...

Reviews: