background image

U S E R ’ S   G U I D E

LDLC RS32

EN

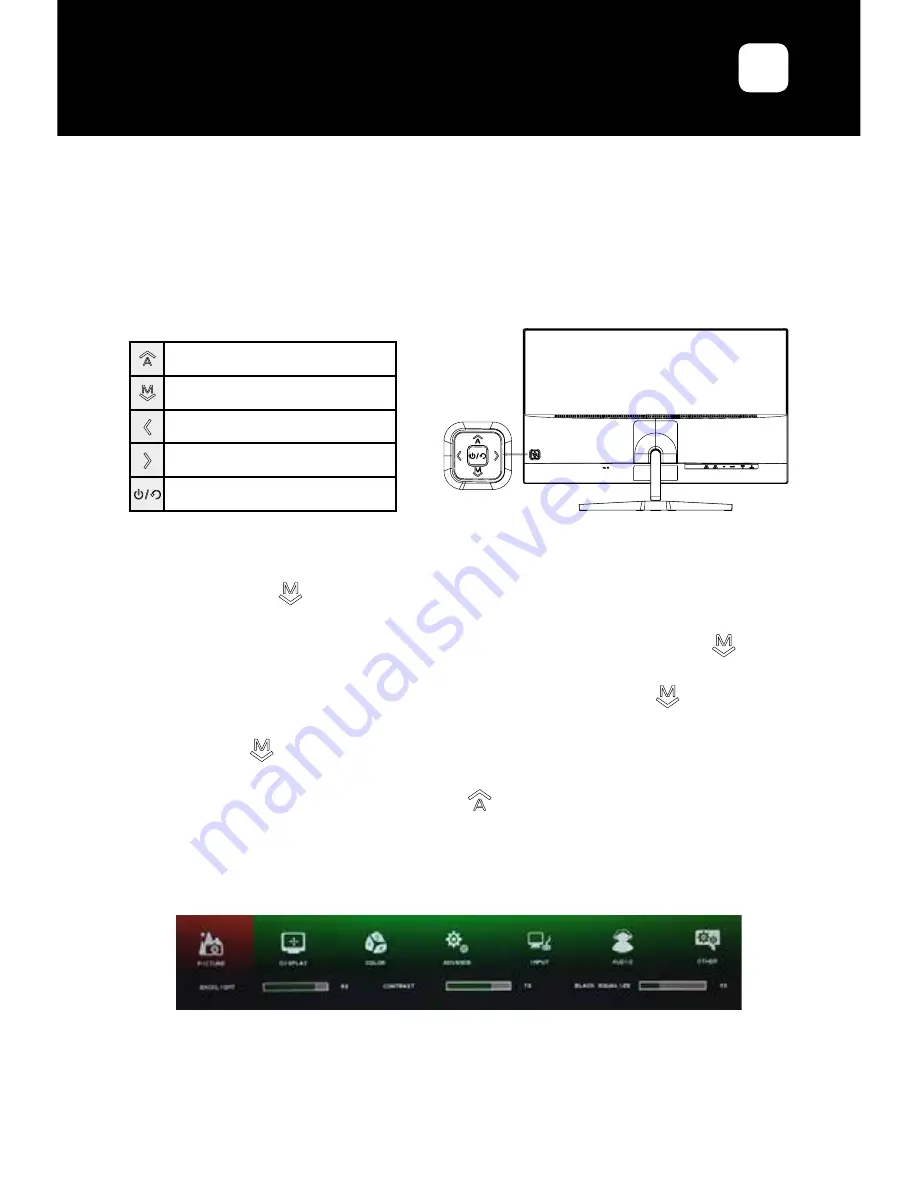
Signal source input

OSD Menu Display

Backlight adjustment shortcut key

Volume adjustment shortcut key

Power ON/OFF

3. General Instructions

3.1 OSD Menu (On-Screen Display)

Access and control of the OSD Menu is via the rocker button located at the rear of 
the screen.

3.1.1 Configuration

1.  Press the key       of the rocker button to activate the OSD Menu.
2.  Press  < or > to select the function to set.
3.  Highlight and activate the desired sub-menu by pressing the button      of the 

rocker.

4.  Press < or > to select the function to set. Validate with the key       .  
5.  Press < or > to change the settings of the selected function. Validate by pressing 

the button       .         

6.  To exit the function setting, return to the highest menu level, exit the OSD Menu, 

or return to the previous action, press       . 

7.  Repeat steps 3, 4, 5 and 6 to adjust another function.

3.1.2 Picture

•  Backlight

: Adjusts the overall image and background screen brightness. 

Adjustment value varies from 0 to 100.

•  Contrast

: Adjusts the image’s contrast. Adjustment value varies from 0 to 100.

•  Black Equalize

: Adjusts the black level. Adjustment value varies from 0 to 100.

Summary of Contents for RS32

Page 1: ...U S E R S G U I D E LDLC RS32 LED BACKLIGHT LCD DISPLAY 31 5 ...

Page 2: ...ng symbol for waste electrical and electronic equipment WEEE This means that this product must be handled pursuant to European Directive 2002 96 EC in order to be recycled or dismantled to minimize its impact on the environment For further information please contact your local or regional authorities Electronic products not included in the selective sorting process are potentially dangerous for th...

Page 3: ... Choice of place of installation 2 2 Base Installation 2 3 Installation Instructions of the fixation plate Only used for mini PC mounting 2 3 1 Installation of the fixation plate 2 3 2 Use with a VESA mounting sytem Mini PC 2 4 Tilt Adjustment 2 5 Cables connection 2 6 Switch on the screen 3 General Instructions 3 1 OSD Menu 3 1 1 Configuration 3 1 2 Picture 3 1 3 Display 3 1 4 Color 3 1 5 Advance...

Page 4: ...s on the power cord Damage to the cord may cause shock or fire Do not use monitor in high temperature 20 55 C humid dusty or oily areas In case of storm or prolonged non use unplug the screen to protect against any overvoltage damage When disconnecting the power cord of display or power adapter always remember to hold the plug instead of puling the wire to unplug the power cord Do not insert objec...

Page 5: ...ny liquid directly on the screen It could fall into the display and cause an electrical shock When cleaning ensure that any liquid enters the display housing Please make sure only soft cloths are used for cleaning purposes A hard cloth could damage the panel Clean the housing with a slightly humidified cloth and a gentle detergent then wipe it with a dry and clean cloth Do not insert anything in t...

Page 6: ...connectivity LDLC RS32 is suitable both for standard office or multimedia entertainment applications 1 2 Packing list Check out if the product box includes the following parts LCD monitor Base screws M4 10 x5 1x AC Adapter with 1 5 m cable 1 m power cable 1x HDMI cable 1 5 m VESA fixation plate screws M4 10 x4 User s guide If any part is missing or damaged contact LDLC s Technical Support http www...

Page 7: ... 7 ms OverDrive View angles H V 178 178 CR 10 Display colors 1 073 G Display area 698 112 H x 392 688 V Panel Surface Anti glare PC Input Range Horizontal Frequency 74 8 112 3 KHz Vertical Frequency 50 75 Hz Max display Frequency 2560x1440 60 Hz Inputs Outputs Video Inputs 2x HDMI 1 4 Female 1x VGA D sub 15 Female 1x DP 1 2 1x Mini DP 1 2 Audio Input No Audio Output 1x Earphone Jack 3 5 mm female ...

Page 8: ...24 19 x 46 43 mm Dimensions with base W x H x D 724 3 x 502 6 x 183 mm Gross Net Weight 5 5 Kg 7 6 Kg Security Kensington Lock No Controls Front N A Rear Rocker Button 9 languages English French German Spanish Italain Dutch Corean Traditionnal and Simplified Chines Colors 9300K 7500K 6500K sRGB User Modes Standard Game Movie Photo FPS RTS Compatible OS Windows XP Windows 7 Windows 8 Windows 10 Acc...

Page 9: ...connection 4 HDMI 2 port This port is reserved to a HDMI connection 5 DP port This port is reserved to a DP connection 6 Mini DP port This port is reserved to a Mini DP connection 7 VGA port This port is reserved to a VGA connection 8 Audio output port This port is reserved to an external audio device connection 1 2 3 4 5 6 7 8 1 Rocker Button Rear control Signal source input OSD Menu Display Back...

Page 10: ...air a door in a hallway DO NOT place this machine in places with strong electromagnetic field otherwise it may be interfered by the electromagnetic wave and get damaged 2 1 Mounted on wall 2 1 1 Choice of wall bracket It is recommended to purchase a wall bracket that suits your device dimensions and weight The wall support must also comply with the screen s VESA norm 100 x 100 mm Be sure to follow...

Page 11: ...accumulation of any dust and dirt Do not lay the display flat and do not place it upside down backwards or at a slight angle Avoid operating the display on a shelf a carpet a bed or in a cabinet Do not cover the display with cloth curtains or any other objects such as newspaper etc Select a well ventilated area to avoid any risk of overheat DO NOT place it as shown below Wall Air circulation is bl...

Page 12: ...to lock the support and back Fig 3 Replace the hat cross the support Fig 4 Install the base to the screw hole below the support as the arrow direction and lock with 1 PC screw Disassembling Disassemble the base according to the opposite order above Do not place the monitor upside down for the base installation Note Handle with care when mounting LCD monitor stand DO NOT touch the surface panel Mis...

Page 13: ...cessary ventilation and avoid the accumulation of any dust and dirt Avoid operating the display on a shelf a carpet a bed or in a cabinet Do not cover the display with cloth curtains or any other objects such as newspaper etc Select a well ventilated area to avoid any risk of overheat DO NOT place it as shown below Wall Air circulation is blocked ...

Page 14: ...fixation plate Included 1 Hold and press the hat and then lift it up from the back cover 2 Unscrew the base below the support as the arrow direction 3 Uninstall the metal support by unscrewing the 4 pcs screws 4 Remove the rear cover 5 Re Install the base according to steps described in section 2 2 Base Installation 6 Attach the fixation plate provided with the 4 M4 10 screws provided ...

Page 15: ...PC model 1 Attach the VESA bracket of your Mini PC to the fixation plate of the monitor Compatible with VESA 75x75 mm Use the screws that were included in the box of your Mini PC 2 Attach the two slightly larger screws to the bottom chassis cover of your Mini PC 3 Slide the Mini PC onto the VESA mount bracket 2 4 Tilt Adjustment For optimal vison it is recommended to have the monitor directly in f...

Page 16: ...riate end of the signal cable to the monitor and the other end to your computer or any other compatible video device When several cables are plugged use the Source menu of OSD the select the desired source or press when the OSD menu is not displayed 4 To connect an external audio device connect the device s audio cable to the output audio port of your monitor only when connecting in HDMI DP mini D...

Page 17: ...ired sub menu by pressing the button of the rocker 4 Press or to select the function to set Validate with the key 5 Press or to change the settings of the selected function Validate by pressing the button 6 To exit the function setting return to the highest menu level exit the OSD Menu or return to the previous action press 7 Repeat steps 3 4 5 and 6 to adjust another function 3 1 2 Picture Backli...

Page 18: ...alue varies from 0 to 100 Phase To adjust image distorsion and shaking Adjustment value varies from 0 to 100 V Position Controls Vertical Image position within the display area of the LCD Adjustment value varies from 0 to 100 Shape To have a clearer and sharpener image Adjustment value varies from 0 to 4 3 1 4 Color Temperature Color temperature adjustment Contains 5 modes 9300K 7500K 6500K sRGB U...

Page 19: ...e when using VGA source Low Bluelight ON OFF Attenuation function of the amount of blue light emitted by the screen 3 1 5 Advance Ultra Vivid OFF L Low M Middle H High Aspect Ratio Adjust the Aspect Ratio 16 9 4 3 5 4 1 1 Full OD OverDrive ON OFF Adjust the response time 8ms typical 5 7ms OD 3 1 6 Input Auto Select To auto select an available input VGA To select VGA input Mini DP To select Mini DP...

Page 20: ...the display time of the OSD Menu Adjustment value varies from 10 to 60 Information Displays input source and resolution OSD H Position Adjusts the horizontal position of the OSD menu Adjustment value varies from 0 to 100 OSD V Position Adjusts the vertical position of the OSD menu Adjustment value varies from 0 to 100 Transparency Adjusts the transparency of the OSD menu Adjustment value varies fr...

Page 21: ...0 Hz 31 5 kHz 800 600 60 Hz 37 9 kHz 1024 768 60 Hz 48 4 kHz 1280 720 60 Hz 45 0 kHz 1280 960 60 Hz 60 0 kHz 1280 1024 60 Hz 64 0 kHz VGA Refresh Rate Horizontal frequency 720 400 70 Hz 31 5 kHz 640 480 60 Hz 31 5 kHz 800 600 60 Hz 37 9 kHz 1024 768 60 Hz 48 4 kHz 1280 720 60 Hz 45 0 kHz 1280 960 60 Hz 60 0 kHz 1280 1024 60 Hz 64 0 kHz 1360 768 60 Hz 47 7 kHz 1600 900 60 Hz 60 0 kHz 1920 1080 60 H...

Page 22: ...utton to make sure the monitor is turned on Make sure that the power cable is correctly connected to the monitor and an electrical outlet Blurred or imperfect image Make sure that the video cable is correctly plugged Image over light or over dark Adjust the brightness and contrast setting in the OSD menu The image is not correctly centered or sized Activate the Auto Adjust function of the Display ...

Page 23: ...4 months from GROUPE LDLC s invoice date 2 Defective pixels covered by warranty if at least 7 defective pixels are distributed over the panel surface or 4 consecutive defective pixels 3 You may combine to the purchase of your display the 0 dead pixel warranty up to 3 months after purchase on our website http www ldlc com Careful to be valid the purchase of this warranty must be done simultaneously...

Page 24: ...rson not approved by LDLC In the case of bankruptcy or impossibility of supply of the manufacturer the Client may not claim against LDLC which shall assume no responsibility in this manufacturer s goods 3 Warranty Limitations GROUPE LDLC guarantee is limited to product repairing replacement or repayment in value of the goods which are recognized as defective by LDLC taking into account how they ha...

Page 25: ...not the result of a third party equipment or software The exact description of all error that are displayed A technician of GROUPE LDLC will diagnose and try to solve the issue by phone or by email If the problem cannot be solved and provided that the defect is covered by this contractual warranty LDLC com will repair or replace the equipment If GROUPE LDLC does not find any defect or malfunction ...

Page 26: ... purchase 6 To contact us You will find any related information on our website http www ldlc com As an individual please contact our Technical support By e mail via our page http www ldlc com faq By phone From France 04 27 46 6000 From Abroad 33 4 27 46 6000 Call rate any surcharge the call rate is the one applied by your operator As a professional please contact our Technical support By e mail vi...

Reviews: