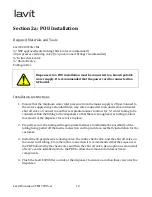
background image


Lavit   Document:   TM170915-­‐A      


5   


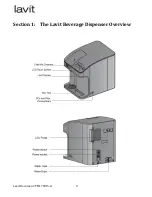
The   Lavit   Cold   Beverage   Dispenser   

   
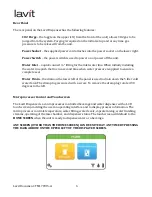
The   Lavit   Beverage   Dispenser   is   designed   to   dispense   either   cold   still   water,   cold   sparkling   water,   

or   a   Lavit   beverage,   which   can   be   made   with   either   still   water   or   sparkling   water,   depending   on   
the   beverage   type.   When   selecting   a   Lavit   beverage   using   sparkling   water,   the   beverage   can   be   

crafted   using   a   choice   of   carbonation   levels:   soft,   medium,   or   full.   
   

The   Lavit   Cold   Beverage   Capsule   


The   Lavit   beverage   capsule   and   top   lidding   are   made   from   aluminum   and   
are   fully   recyclable   without   any   additional   processing.   Each   capsule   is   
designed   to   be   a   single   use   mixing   chamber   for   the   beverage   selection.   This   

approach   eliminates   all   possible   beverage   cross   contamination.   
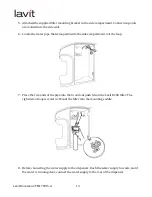
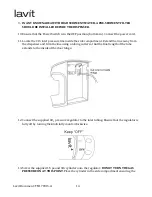
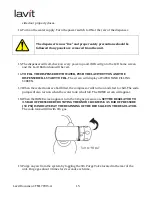


Cold   Mix   Chamber   

   
The   primary   function   of   the   Lavit   Beverage   Dispenser   is   to   make   cold,   flavored,   and   healthy   
drinks.   The   mix   chamber   is   designed   to   receive   a   Lavit   beverage   capsule,   crack   and   peel   the   top   

lidding,   introduce   a   mix   stream,   and   process   and   merge   the   beverage   stream   with   a   still   or   
sparkling   water   finishing   stream.   The   key   components   of   the   mix   chamber   include   the   blue   

capsule   tray   where   a   capsule   is   placed,   the   silicone   water   nozzle   for   the   mix   and   finishing   streams,   
and   the   entire   capsule   carriage   which   tilts   forward   to   dispense   the   mixed   beverage   into   the   
finishing   stream.   The   carriage   begins   and   ends   it   cycling   at   the   

HOME   POSITION

.      


Cold   Tanks   


The   cold   still   water   tank   has   a   storage   capacity   of   1.3   gallon   (5   liter)   of   cold   water   and   is   made   
from   304   stainless   steel.   Sparkling   water   is   made   in   a   secondary   0.26   gallon   (1   liter)   capacity   tank   

made   from   304   stainless   steel.   The   sparkling   water   tank   sits   inside   the   cold   still   water   tank   in   a   
unique   tank   in   tank   system.   The   whole   assembly   is   made   cold   by   a   fully   immersed   direct   chill   
evaporator.   The   cold   water   temperature   is   microprocessor   controlled,   is   non-­‐adjustable,   and   is   

factory   set   at   37.4F   (3C)   
   

Filter   and   CO

2

   Cylinder   Side   Compartment   


The   door   on   the   right   side   of   the   dispenser   provides   access   to   the   filter   and   CO

2   

cylinder   

compartment.   The   recommended   Lavit   ECO3   filter   or   a   Lavit   Bottled   Water   pump   is   mounted   
towards   the   front   of   the   compartment.   Connection   points   for   both   are   molded   in   the   compartment   
side   wall.   The   CO

2   

pressure   regulator   and   gas   cylinder   are   mounted   towards   the   rear   of   the   

compartment.   

Summary of Contents for LCB 100

Page 1: ...Lavit Document TM170915 A September 20 2015 Technical Manual Lavit LCB 100 Dispenser...

Page 2: ...afety information is provided Lavit also provides Distributors and Dealers with Technical Bulletins and Service Bulletins Technical Bulletins are generally information contained in this manual but pro...

Page 3: ...Page 17 Section 2c Aqua Host Installation Page 23 Water Calibration Page 26 Section 3 Operating the Lavit Dispenser Page 29 Section 4 Cleaning the Lavit Dispenser Page 35 Section 5 Service Screens Se...

Page 4: ...Lavit Document TM170915 A 4 Section 1 The Lavit Beverage Dispenser Overview...

Page 5: ...key components of the mix chamber include the blue capsule tray where a capsule is placed the silicone water nozzle for the mix and finishing streams and the entire capsule carriage which tilts forwa...

Page 6: ...d to ensure a complete seal Water Drain the drain on the lower left of the panel is used to drain down the 5 liter cold water tank The drain plug is secured with a screw To remove the drain plug rotat...

Page 7: ...etting is currently non active for future use Lavit Button The black Lavit button MUST BE PUSHED TO DISPENSE WATER OR A BEVERAGE The use of a final dispense button allows the user to verify their drin...

Page 8: ...is added to the raw plastic parts as they are manufactured This inhibits the growth of bacteria on contact surfaces The additive will not leach out and will be effective for the life of the machine Bo...

Page 9: ...se any CO2 bottle not specifically designed to work with the Lavit dispenser Use only a LAVIT labeled cylinder provided by an authorized Lavit Cylinder Distributor 4 The Lavit CO2 cylinder should be p...

Page 10: ...npack the unit Verify that the power cord drip tray and CO2 pressure regulator are included in the side walls of the foam packaging Remove and set aside 2 Remove the plastic bag from the unit and insp...

Page 11: ...he side door to access the side compartment 4 Ensure there is enough space above the mix chamber 9 inches to properly open and close the chamber 5 Do not install the dispenser in direct sunlight or ad...

Page 12: ...other acceptable manner to allow for water tubing to be connected Run the tubing to the dispenser so that there is enough excess tubing to allow movement of the dispenser for service in place 2 Proper...

Page 13: ...oped inside the side compartment Cut the loop 7 Place the two ends of the pipe into the in and out push fits on the Lavit ECO3 filter The right side of loop is water in Mount the filter into the mount...

Page 14: ...mpartment Extend the line away from the dispenser and trim the line using a tubing cutter so that the final length of the tube extends to the inside of the door hinge 12 Connect the supplied CO2 press...

Page 15: ...ER WILL START TO FILL The screen will display a WATER TANK FILLING SCREEN 17 When the water tanks are half filled the compressor will turn on and start to chill The soda pump will also turn on when th...

Page 16: ...and DISABLE when disabled the icon will read Enable Set the Filter Timer to ENABLE when enabled the icon will read Disable and reset the timer if the filter life is to be tracked by the unit The filte...

Page 17: ...Tools A five gallon bottle of water Lavit Bottled Water Pump Kit NSF approved water tubing black color recommended Tubing cutter It is recommended that the power cord be connected to a GFI outlet Ins...

Page 18: ...he 5 gallon bottle within six 6 feet of the machine and remove the bottle seal 5 Fit the water bayonet into the bottle and seal the bottle with the cap located on the water bayonet 6 Connect the water...

Page 19: ...kwise 10 Screw the supplied 1 5 pound CO2 cylinder onto the regulator DO NOT TURN THE GAS PRESSURE ON AT THIS POINT Place the cylinder in the side compartment ensuring the side door properly closes 11...

Page 20: ...will fill with CO2 gas 16 Purge any air from the system by toggling the CO2 Purge Valve located in the rear of the unit Purge gas about 3 times for 2 seconds each time 17 If the water tanks do not fi...

Page 21: ...age 25 22 After completing the water calibration return to the HOME screen by pressing the Return Arrow in the upper left of the touchscreen to back out of all service screens 23 Check for CO2 leaks c...

Page 22: ...ed by the AquaHost manufacturer 2 Locate the Lavit Beverage Dispenser no more than six 6 feet away from the AquaHost unit 3 Connect the water tubing from the outlet of the AquaHost Pump to the water i...

Page 23: ...ckwise 7 Screw the supplied 1 5 pound CO2 cylinder onto the regulator DO NOT TURN THE GAS PRESSURE ON AT THIS POINT Place the cylinder in the side compartment ensuring the side door properly closes 8...

Page 24: ...will fill with CO2 gas 13 Purge any air from the system by toggling the CO2 Purge Valve located in the rear of the unit Purge gas about 3 times for 2 seconds each time 14 If the water tanks do not fil...

Page 25: ...fter completing the water calibration return to the HOME screen by pressing the Return Arrow in the upper left of the touchscreen to back out of all service screens 20 Check for CO2 leaks check for wa...

Page 26: ...mix still and sparkling During the calibration process 12 ounces of water should be drawn from the dispenser for each calibration The unit s software determines the amount of time it takes for the 12...

Page 27: ...achieve a result in the target range 8 Follow Steps 3 through Step 7 for the Mix Stream using the appropriate CAL ON and CAL OFF icons for the Mix Stream Purge air and then calibrate 9 To calibrate th...

Page 28: ...THE BEVERAGE VOLUMES ARE TOO HIGH OR TOO LOW THEN RECALIBRATE THE STILL WATER OR THE SPARKLING WATER STREAMS AS NECESSARY TO EITHER INCREASE OR DECREASE THE BEVERAGE VOLUME RE CHECK YOUR BEVERAGE VOLU...

Page 29: ...screen may also have up to four icons displayed The FILTER icon is displayed if the Filter Timer in the Service Set Up Menu has been set to ENABLE If DISABLED this icon will not appear on the HOME scr...

Page 30: ...r Pressing and holding the Lavit Button when the halo is BLUE dispenses cold still water To Dispense Preset Volumes of Still Water and Sparkling Water Press the Water Selections button on the touchscr...

Page 31: ...UTTON WHILE FLASHING GREEN TERMINATES THE DISPENSE To Craft and Dispense an Ice Tea Insert a Lavit Tea Capsule into the Mix Chamber or Select LAVIT BEVERAGES from the HOME SCREEN If you first selected...

Page 32: ...WHILE FLASHING GREEN TERMINATES THE DISPENSE To Craft and Dispense a Still Beverage Insert a Lavit Beverage Capsule into the Mix Chamber or Select LAVIT BEVERAGES from the HOME SCREEN If you first se...

Page 33: ...N WHILE FLASHING GREEN TERMINATES THE DISPENSE To Craft and Dispense a Sparkling Beverage Insert a Lavit Beverage Capsule into the Mix Chamber or Select LAVIT BEVERAGES from the HOME SCREEN If you fir...

Page 34: ...carbonation levels Soft Medium or Full Press the Lavit Button when ready to dispense your sparkling beverage The Lavit Button halo will be GREEN While dispensing the halo will FLASH GREEN PRESSING TH...

Page 35: ...heir choice To clean the Lavit Mix Chamber follow these instructions 1 Turn off the power to the dispenser using the power switch at the rear of the unit 2 Please wear latex free sanitary gloves while...

Page 36: ...es of the chamber with an anti bacterial wipe 11 Replace the blue capsule tray and silicone nozzle Wipe down both with an anti bacterial wipe 12 Wipe down the front and top of the unit with an anti ba...

Page 37: ...is accessed by selecting the SERVICE ICON on the lower left of the HOME SCREEN Set the current DATE and TIME by selecting each field to be updated Toggle up or down to make your entry Select SERVICE...

Page 38: ...T 3 am You can manually turn the ozone cycle ON OFF to manually disinfect the dispenser by using the MANUAL ICON Selecting the MAX TEMP ICON allows you to set the maximum temperature that a beverage c...

Page 39: ...our Lavit Dispenser See the Water Calibration procedure on Page 28 The EMPTY SODA ICON allows the technician to empty the soda tank when required to decommission and move the dispenser Pressing and ho...

Page 40: ...HOME SCREEN in RED Change CO2 cylinder This screen will appear when the water tanks are below the LOW LEVEL Typically displayed during system installation Wait for tanks to reach LOW LEVEL WATER CHIL...

Page 41: ...n the mix chamber Clean the mix chamber following cleaning instructions This screen is displayed when the inlet solenoid is open for more than 5 continuous minutes The inlet solenoid will close If the...

Page 42: ...tight and dry Inspect the area around the top insulation seam towards the left side panel If there is wetness in that area the leak may be from the soda tank seal Other possible sources of a leak are...

Page 43: ...control line A short between the level probe wires will signal the PCB that the soda tank is full of water The PCB turns on the soda pump when the signal lines are open circuit To diagnose this fault...

Page 44: ...everage The RINSE solenoid and the MASTER solenoid should come on together and allow water to into the capsule Both the RINSE and the MASTER plugs on the main PCB have a red LED adjacent to them If th...

Page 45: ...r tank into a suitably sized bucket 6 Replace the drain plug 7 Turn dispenser and connect the power cord and turn the Power ON 8 Enter the SERVICE MENU and select WATER SETUP 9 Place the empty bucket...

Page 46: ...Lavit Document TM170915 A 46 Section 9 Service and Repair Removing the Top Cover Page 47 Removing the Side and Rear Panels Page 48...

Page 47: ...d pulling up and forward 4 Unplug the connector to the touchscreen PCB and unplug the Lavit Button connector 5 Set top cover aside To reinstall 1 Connect the touchscreen and Lavit Button leads to thei...

Page 48: ...the three screws under the base 3 Using a long Phillips head screwdriver remove the side mix chamber hold down screw located between the left side panel and the mix chamber The screw is about four inc...

Page 49: ...an the others and should be reinstalled in the bottom slot 2 Remove the three base screws 3 Remove the side panel screw found near the magnet on the inside front of the side compartment 4 Remove the p...

Page 50: ...housing screws which are recessed on the top and bottom of rear air louver 2 5 Remove the Power Switch and the CO2 purge screws 3 6 Remove the center screw 1 7 If the side panels are not already remov...

Page 51: ...Document TM170915 A 51 Appendices Schematics and Parts Appendix A Flow Diagram Appendix B Electrical Schematic 1 Appendix C Electrical Schematic 2 Appendix D Exploded Parts List Appendix E Wetted Part...

Page 52: ...Lavit Document TM170915 A 52 Appendix A Flow Diagram...

Page 53: ...Lavit Document TM170915 A 53 Appendix B Electrical Schematic 1...

Page 54: ...Lavit Document TM170915 A 54 Appendix C Electrical Schematic 2...

Page 55: ...Lavit Document TM170915 A 55 Appendix D Exploded Parts Detail...

Page 56: ...Lavit Document TM170915 A 56...

Page 57: ...Lavit Document TM170915 A 57 Appendix D Exploded Wetted Parts Detail...

Page 58: ...Lavit Document TM170915 A 58...

Reviews: