background image

   Preparation


   Job Menu


4

3

It mainly includes the following function modules

:

To configure the tool to operate as a professional 
diagnostic tool.

This option presents a quick way to check for DTCs, 
isolate the cause of the illuminated Malfunction 
Indicator Lamp (MIL), check monitor status prior to 
emissions certification testing, verify repairs, and 
perform a number of other services that are 
emission-related.

A  quick  access  to  the  I/M  Readiness  function  of 
OBD II Diagnosis.

Measures the current voltage of the vehicle's 
battery.

To update vehicle diagnostic software and APK.

*Note: This function requires a stable network 
connection. 

Includes Diagnostic report, Diagnostic record, 
Feedback and DTC library etc.

To make some system settings, including Network 
setup, Email and Brightness etc.

Diagnose

OBD II

Reset

I/M

Battery 
Voltage

Update

Data

Settings

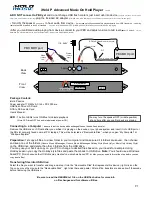
Diagnostic Cable

1. Turn the ignition off.

2. Locate vehicle's DLC: It 

provides standard 16 pins 
and is generally located on 
driver's side, about 12 
inches away from the 
center of dashboard. See 
Figure 

DLC Location

. If 

DLC is not equipped under 
dashboard, a label 
indicating its position will 
be given. 

3.  Plug  one  end  of  the  diagnostic  cable  into  the  DB-15  connector  of 

the  tool,  and  tighten  the  captive  screws.  Connect  the  other  end  to 
the vehicle's DLC.

Vehicle

DLC

Display Tablet

*Note: The tool ONLY works with the 12V passenger cars equipped with 
standard OBD-II diagnostic socket.

4. Turn the ignition key on.

In case no DLC is found, please refer to Automobile Repair Manual.

To  perform  common  repair  &  maintenance  items, 
which  includes  Oil  Lamp  Reset,  Steering  Angle 
Sensor  (SAS)  Reset,  Electronic  Parking  Brake 
(EPB), Battery Maintenance System (BMS) Reset, 
Diesel Particulate Filter (DPF), Electronic Throttle 
Position Reset, ABS bleeding.

Summary of Contents for TOUCH PRO ELITE

Page 1: ...lly charged Press the Power button to power it on Follow the steps below to proceed If it is the first time you have used this tool you need to make some system settings and keep the diagnostic softwa...

Page 2: ...Diagnose OBD II Reset I M Battery Voltage Update Data Settings Diagnostic Cable 1 Turn the ignition off 2 Locate vehicle s DLC It provides standard 16 pins and is generally located on driver s side ab...

Page 3: ...ted to use DEMO to get familiar with the diagnostic process Input the VIN and tap OK the system will automatically identify the vehicle model If the vehicle VIN is successfully decoded it will perform...

Page 4: ...ed and the connection to the vehicle DLC Data Link Connector is clear and secure Automotive batteries contain sulfuric acid that is harmful to skin In operation direct contact with the automotive batt...

Page 5: ...eria est totalmente carregada H dois m todos de carregamento dispon veis Se for a primeira vez que voc utiliza essa ferramenta necess rio fazer algumas configura es do sistema e manter o software de d...

Page 6: ...s Cabo de diagn stico 1 Desligue a igni o 2 Localize o DLC do ve culo Ele fornece 16 pinos padr o e geralmente est localizado no lado do motorista a cerca de 12 polegadas do centro do painel de instru...

Page 7: ...VIN e toque em OK o sistema vai identificar automaticamente o modelo do ve culo Se o VIN do ve culo decodificado com sucesso ele vai executar o diagn stico autom tico at que um relat rio de diagn sti...

Page 8: ...press o Reservamo nos o direito de fazer altera es a qualquer momento sem aviso pr vio Sempre realize testes automotivos num ambiente seguro O ve culo deve ser testado numa rea de trabalho bem ventila...

Page 9: ...umer Il existe deux m thodes de charge disponibles Suivez les tapes ci dessous pour proc der Si vous utilisez cet outil pour la premi re fois vous devez d finir certains param tres du syst me et conse...

Page 10: ...fonction n cessite une connexion du r seau stable Comprend un rapport de diagnostic un enregistrement de diagnostic commentaires et une base de DTCs etc Pour d finir certains param tres du syst me not...

Page 11: ...l vous est sugg r d utiliser DEMO pour vous familiariser avec le processus de diagnostic Entrez le NIV et appuyez sur OK le syst me identifiera automatiquement le mod le du v hicule Si le NIV du v hic...

Page 12: ...s le v hicule et n utilisez pas l quipement d essai en m me temps car toute distraction pourrait causer un accident Les batteries automobiles contiennent de l acide sulfurique nocif pour la peau Penda...

Page 13: ...resione el bot n Encendido para encenderlo Siga los pasos a continuaci n para continuar Si es la primera vez que utiliza esta herramienta debe realizar algunos ajustes del sistema y mantener el softwa...

Page 14: ...agn stico del veh culo y APK Incluye informe de diagn stico registro de diagn stico retroalimentaci n y biblioteca de DTC etc Para realizar algunas configuraciones del sistema incluyendo configuraci n...

Page 15: ...izado con el diagn stico del veh culo le sugerimos que use DEMO para familiarse con el proceso de diagn stico Nota La ubicaci n m s reconocible para el VIN est en la esquina izquierda superior del tab...

Page 16: ...de Enlace de Datos del veh culo sea clara y segura Las bater as de autom viles contienen cido sulf rico que es da oso a la piel En funcionamiento debe evitarse el contacto directo con las bater as de...

Page 17: ...ses Ger t zum ersten Mal verwenden m ssen Sie einige Systemeinstellungen vornehmen und die Diagnosesoftware mit der neuesten Version synchronisieren F hren Sie die folgenden Schritte aus um fortzufahr...

Page 18: ...zeugdiagnosesoftware und APK Beinhalten Diagnosebericht Diagnosedatensatz R ckmeldung und DTC Bibliothek usw So nehmen Sie einige Systemeinstellungen vor einschlie lich Netzwerkeinstellung E Mail und...

Page 19: ...hlen DEMO zu verwenden um sich mit dem Diagnosevorgang vertraut zu machen Hinweis Die am besten erkennbare Position von VIN befindet sich in der oberen linken Ecke des Armaturenbretts des Fahrzeugs Di...

Page 20: ...leichzeitig Jede Ablenkung kann einen Unfall verursachen Die Fahrzeugbatterien enthalten hautsch dliche Schwefels ure Im Betrieb sollte ein direkter Kontakt mit den Fahrzeugbatterien vermieden werden...

Page 21: ...5 HOME OK DB 15 5V DLC 5V DB 15 DLC 1 2 LAUNCH Start WLAN ignore RU TOUCH PRO ELITE...

Page 22: ...4 3 I M OBD II APK DTC OBD II I M 1 2 DLC DLC 16 12 DLC 3 DB 15 DLC DLC 12V OBD II 4 ABS...

Page 23: ...6 5 LAUNCH VIN VIN VIN VIN VIN ABS overseas service cnlaunch com 86 755 8455 7891 RU...

Page 24: ...7 P ANSI O B B B VIN O 1 DLC 2 B O O 1 2 B 3 O 3...

Page 25: ...e DC esterna Se la prima volta che si utilizza questo strumento necessario effettuare alcune impostazioni di sistema e mantenere il software di diagnostica sincronizzato con la versione pi recente Att...

Page 26: ...ione richiede una connessione di rete stabile Per aggiornare il software diagnostico del veicolo e l APK Include il rapporto di diagnostica il record di diagnostica il feedback e la libreria DTC ecc P...

Page 27: ...anuale Se sei fresco di diagnostica del veicolo ti viene suggerito di utilizzare DEMO per familiarizzare con il processo diagnostico Inserire il VIN e toccare OK il sistema identificher automaticament...

Page 28: ...I test Tenere un estintore adatto per incendi chimici benzina ed elettrici nelle vicinanze Per evitare di danneggiare l apparecchiatura di prova o generare dati falsi assicurarsi che la batteria del v...

Page 29: ...5 LED OK DB 15 5V DLC DC LED 5V DC DB 15 DLC 1 2 LAUNCH WLAN JP TOUCH PRO ELITE...

Page 30: ...4 3 DTC MIL ABS OBD II I M APK DTC OBD II I M 1 2 DLC 16pin 12 DLC DLC 3 DB 15 DC DLC OBD II 12V 4 DLC...

Page 31: ...6 5 LAUNCH VIN VIN OK VIN VIN OK VIN ABS overseas service cnlaunch com 86 755 8455 7891 JP...

Page 32: ...7 ANSI DLC Q A LED 3 A 1 DLC 2 A 1 2 Q VIN Q 3 Q A Q A...

Page 33: ...210mm x 148mm 1 1 80g EN TOUCH PRO ELITE...

Reviews: