


3-7
XR700T 2/28/22
Initial Setup
Initial Setup
Blades
3
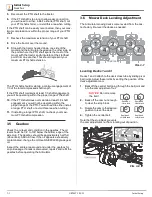
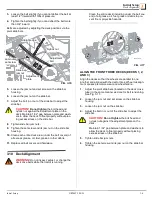
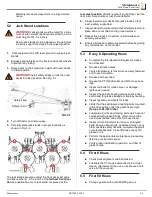
ALIGN THE OUTSIDE DECKS (DECKS 6 AND 7)
Adjust the tie rod located under the hydraulic cylinder on
each deck. See Fig. 3-17. Adjusting the tie rod out swings
the deck back; adjusting it in swings the deck forward.
7.
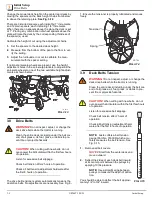
Loosen the jam nut. See Fig. 3-18.
8.
Remove the bolt from the tie rod.
9.
Turn the rod end (which can only be done in 1/2 turn
increments) to the desired length.
10.
Replace the bolt.
11.
Reset the jam nut.
12.
Clean each entire deck area (under the belt covers) of
all excess grease, oil, fuel, grass, or debris before
operating the Articulator.
This will help prevent damage to the equipment, fire haz-
ard, and projectile hazards.
13.
Replace all belt covers and hardware.
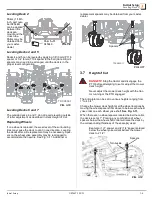
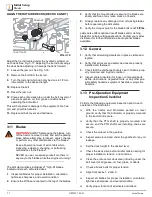
3.11 Blades
WARNING!
ALWAYS disengage the blades, turn
off the tractor, remove the key, and set the parking
brake before attempting to inspect, adjust, change
or perform any other maintenance to the blades.
Keep all personnel clear of all controls while
inspecting, adjusting, changing, or performing
maintenance to the blades!
NEVER go near, or expose yourself or others in
any way to the blades while the engine is running!
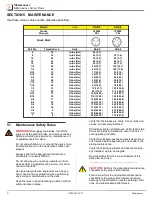
The Articulator utilizes individual 21” high-lift blades,
located under each articulated deck.
1.
Inspect all blades for proper installation, orientation,
tightness, sharpness, and overall condition.
2.
Ensure the lift fins are oriented to the top of the blades.
3.
Verify that the mount bolts are secure, the blades are
sharp, and free of any nicks, cracks, or bends.
4.
Always replace any damaged, dull, or missing blades
before operating the Articulator.
5.
Verify the torque value for the blade bolts is at
75 ft/lbs
.
Lastec also offers optional low-lift blades and mulching
blades for certain cutting applications. Contact your Lastec
distributor for further information about optional blades
available.
3.12 General
1.
Verify that all warning decals are in place, visible and
legible.
2.
Verify that all covers and safety devices are properly
installed and fastened.
3.
Check that the discharge chute is clear of debris, prop-
erly mounted, and in good condition.
4.
Inspect entire Articulator for loose or entangled parts,
debris, obstructions, neglected tools, or any other pos-
sible safety hazards, equipment hazards or projectile
hazards.
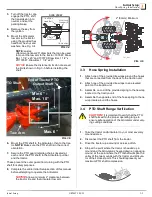
3.13 Pre-Operation Equipment
Inspection Checklist
Perform the following equipment inspection prior to each
operation of the Articulator.
With the tractor and Articulator parked on level
ground, verify that the Articulator is properly mounted
to the tractor and secure.
Verify that the PTO shaft is properly mounted and
secure, and the PTO shaft cover retaining chains are
secure.
Check the oil level in the gearbox.
Inspect area around and under the gearbox for any oil
leakage.
Set the deck height to the desired level.
Check the deck drive belt and idler tension spring for
proper installation, tension, and condition.
Clean the entire center deck area (including under the
belt cover) of all grease, oil, fuel, grass, or debris.
Check all deck belts for proper tension.
Align front decks 1, 2 and 3.
Inspect all blades for proper installation, orientation,
tightness, sharpness, and overall condition.
Verify proper function of all wheels and rollers.
TDXRT750-02
FIG. 3-18
Jam nut


