background image

S1 Dream Espresso Machine – GUI Addendum 

Dream GUI Addendum 

Page 22 


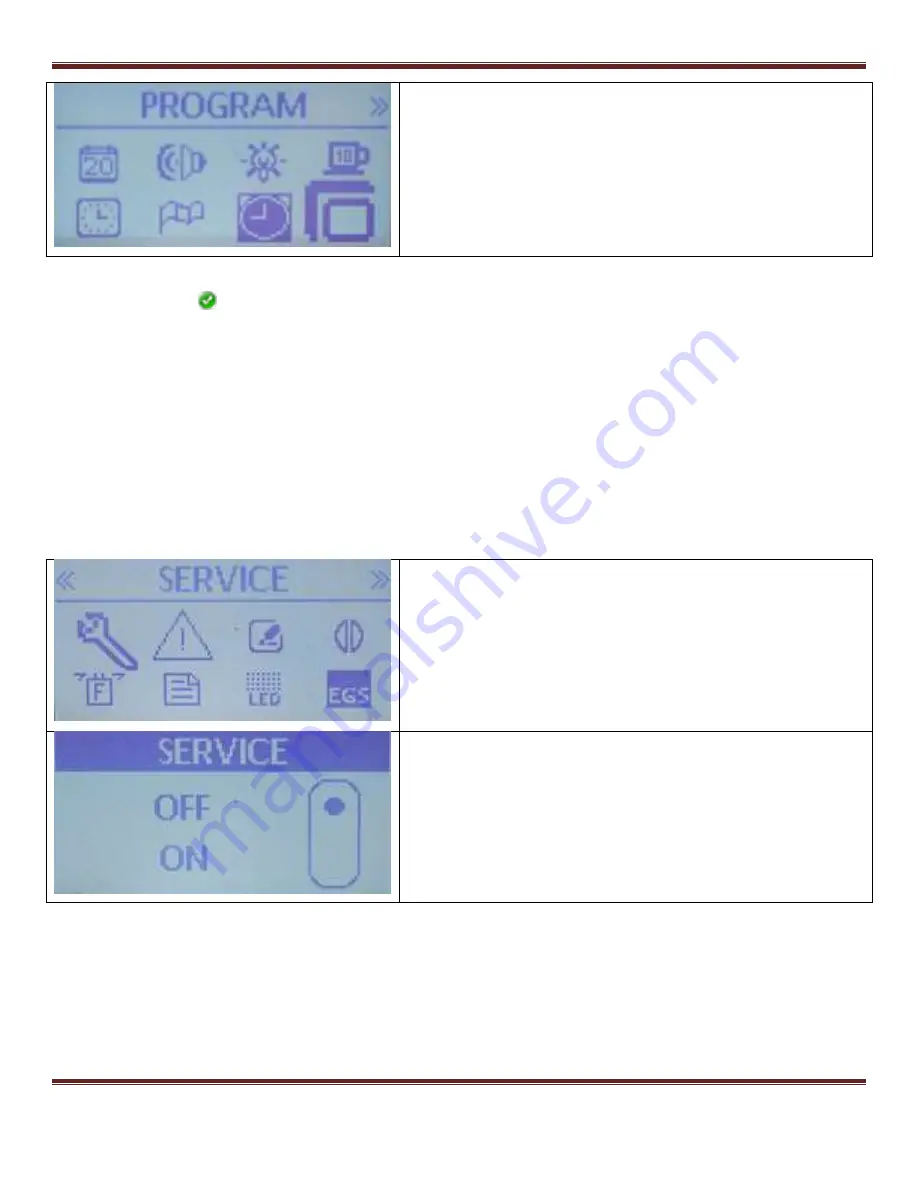
Starting with the Program icon on menu Screen 1 
highlighted, press the Down arrow to bring up Menu 
screen #2.   


7.12  Service Menu 


Note that this is the top item on Screen #2. In the upper corner of the screen you see double left 
pointing arrows and in the upper right corner you see double right pointing arrows.  This indicates that 
there are additional screens “above” and “below” (or to the “left” and right” if you prefer) of this screen. 
While 

you can’t tell which screen you are on specifically, you know you are not on the 1

st

 or the last 

screen. Note that all the screens in the previous section only have the double right pointing arrows 
which tell the user they are on the 1

st

 screen. 

This menu allows you to program a number of times the One-Cup, Two-Cup, or Continuous Buttons 
have been pressed. This allows the user to be notified when service is due. This is completely user 
definable. It might be the number of cycles between backflushes or it could be the number of cycles 
between boiler descalings, for example. It would not be used to determine when to change water 
filters as there is a separate function available for that. 


With the large wrench icon displayed and the word 
SERVICE showing at the top of the screen, press the 
Menu button. 


Use the up or down arrow buttons to select OFF or ON, 
then press the Menu button to activate your choice. If 
OFF is selected, the previous Menu screen #2 is 
displayed. If ON is selected you are taken to the next 
Menu Option. 


Summary of Contents for S1 Dream

Page 1: ...Espresso Machine Made In Italy by Owner s Manual User Interface Details Addendum Covers Firmware Version 1 19 Only Version Date April 5 2014...

Page 2: ...7 7 Show Reset Shot Counters 15 7 8 Program Set Modify Profiles 15 7 9 Profile Sub menus 16 7 9 1 Set Coffee Water Temperature 17 7 9 2 Set Steam Boiler Temperature Pressure 17 7 9 3 Set Coffee Doses...

Page 3: ...aka Firmware Update 35 7 29 Menu Screen 4 Last Menu Screen 36 7 30 Default Setting 36 7 31 Set Calibration Temperature of Steam Boiler Sensor Don t Use 36 7 32 Full Power 15A 20A Setting 37 7 33 Group...

Page 4: ...replaced depending on how extensive the changes are Most of the settings documented below are completely safe You can set them to any allowed value and while you may not like the result the settings s...

Page 5: ...evel sensor on the first production run of Dreams was connected to the control board with the leads reversed This caused the signal to control board to be slightly off from what was expected by the so...

Page 6: ...til BACK is displayed pressing Menu with BACK display returned the machine to the OFF state without changing the original threshold value 5 The Home Screen The Home Screen is what you normally see whe...

Page 7: ...ure which equals the incoming street pressure when the pump is not running during an espresso shot Tank models do not support this feature Their espresso shot pressure shows on the mechanical pressure...

Page 8: ...es are programmed the timer status will be displayed but the values are meaningless Therefore the timer should also be set to disabled if all the times are deleted This photo shows a thermometer like...

Page 9: ...isplayed This screen shows that the next Timer Off time is at 6 30PM These lines automatically scroll back and forth to show the entire line of text The Group Boiler offset is 1F and Preinfusion is se...

Page 10: ...highlighted press the Menu button to select it the display then jumps back to the Home Screen This saves you from having to navigate through the Menu system in order to select a different active prof...

Page 11: ...ll be changed back to default 1234 and disabled WRONG PASSWORD If you enter an incorrect Password the screen displays the message WRONG PASSWORD for a few seconds and then bounces you back to the Home...

Page 12: ...on the date entered and is not user settable Also if the currently highlighted date field is already correct just press the Menu button to skip to the next field 7 2 SetTime of Day Wherever you curre...

Page 13: ...Wherever you currently are in the menu system be sure you are seeing Menu screen 1 Use the Arrow keys to get there and then highlight the Language icon which looks like a flag Then press the Menu but...

Page 14: ...s The maximum is 60min which is shown on the display The options are 5 10 30 or 60 minutes Use the Up and Down Arrows to select your desired option then press the Menu button to lock in the value and...

Page 15: ...reen you are not taken to the Monday 3 screen However if you did enter any times on this screen you are taken to the 3 rd screen which looks just like this one but a circled 3 above pm Note that if yo...

Page 16: ...rning to the Main screen If you return to this Counters display again you will see that the par line values are all zeroed out The tot line is never cleared The value under the Cup icon in the par lin...

Page 17: ...vertently entered the Profile PROGRAM menu press the arrow keys until BACK is displayed and then you will return to main Menu screen 1 When you have completed setting up the profile you will exit back...

Page 18: ...257F or 85C 125C In spite of upper range please keep actual value below boiling Not that the higher you altitude the lower the boiling point of water 7 9 2 Set Steam Boiler Temperature Pressure Depen...

Page 19: ...er you have programmed a button the display shows you how many seconds the machine ran and how many turns of the impeller blades occurred inside the volumetric dosimeter When you press either cup butt...

Page 20: ...ly This programmable preinfusion mode is not available on the Dream Tank but there is a non programmable mechanical option for that model Depending on where you are in the profile menus press the Up o...

Page 21: ...on where you are in the profile menus press the Up or Down arrow to highlight the MAT icon and display that text on the top of the screen Then press the Menu button to enter the MAT programming scree...

Page 22: ...n press menu to advance to the next character Repeat through all eight characters When you press the Menu button after the eighth character the string is locked in and you return to the main Profile m...

Page 23: ...ve the double right pointing arrows which tell the user they are on the 1st screen This menu allows you to program a number of times the One Cup Two Cup or Continuous Buttons have been pressed This al...

Page 24: ...The options are 5000 2000 1000 500 and BACK If you elect BACK and then press Menu you return to Menu screen 2 without changing the value and losing you current count If you pick any other value the s...

Page 25: ...o the Home screen For the other option see the last screen in this paragraph Use the Up and Down Arrow buttons to select the desired number of gallons of water that you can run through your filter The...

Page 26: ...les of four alarm history screens from this Dream machine Note that this is alarm 6 of 11 You use the Up and Down arrow keys to scroll back and forth through the list Note that details of the alarm as...

Page 27: ...chine configuration The file name created on the SD Card is DREAM_R CSV With the large Read icon displayed and the word READ showing at the top of the screen press the Menu button With the SD card tha...

Page 28: ...ur Dream s SD card to a computer and rename or copy the DREAM_R CSV file to a file named DREAM_W CSV The Backup Read operation from the previous section backs up everything including the current time...

Page 29: ...utomatically turn off when the shot is complete NOTE Pressing the Hot Water button does NOT light the LEDs 7 18 EspressoGrindsWarning System This can be programmed to give a warning on the Home Screen...

Page 30: ...value is set to 5 seconds Example 1 A shot is pulled and the shot time is 40sec You will get a Home Screen warning that your coffee is ground too fine since 40 25 5 Example 2 A shot is pulled and the...

Page 31: ...TO SH DOWN showing at the top of the screen press the Menu button Use the Up or Down Arrows to select the desired value and then press the Menu button to lock it in When enabled if no operations have...

Page 32: ...visible even when the machine is turned off However for a screen saver to actually prevent that from occurring it needs to be in nearly constant motion The two screen saver options provided are just...

Page 33: ...ty as your screensaver then press Menu to lock in your choice and return to Menu screen 3 Which of these two screens is shown first depends on the most recent one previously selected 7 24 Time Update...

Page 34: ...changes on the LCD panel Once you have the value you prefer press the Menu button to return to Menu screen 3 7 26 Deactivate GroupPressure FrontePanel Display PlumbedVersionOnly With the large Drop wi...

Page 35: ...u don t know what it is Return to the Home screen and re enter the Menu system You will be presented with a password entry screen Press and hold the Menu button for 5 sec This will reset the password...

Page 36: ...ware version 1 19 and this Menu is called the Software Update function Even though there is a slight difference in the definition of the two terms LaSpaziale is using them interchangeably Plug in the...

Page 37: ...ions to their factory defaults You probably want to do a Backup Read operation first to save all your current settings just in case Performing this operation does NOT impact the serial number the prof...

Page 38: ...en 4 Off 15A mode In this mode the steam boiler and the group boiler heater elements will never be switched on simultaneously On 20A mode In this mode the steam boiler and the group boiler heater elem...

Page 39: ...ttings values initially change quickly by ones After a few seconds they start to change by 10s Unfortunately there seems to be an issue in the current 1 19 software so that after several seconds of ad...

Page 40: ...reen 1 Using the Up Arrow key either continually press it or else press and hold it down until this screen appears This is the top level of Menu screen 1 Then press the Menu button to return to the Ho...

Page 41: ...of a comma delimited file Apparently it s a European thing Since they use a comma instead of a decimal point in their numbers they can t really use a comma as a delimiter so they opted for a semi colo...

Page 42: ...e SD card and writes it to DREAM memory As noted above after this file is loaded you will need to update the time and date The Write function will only restore the file named DREAM_W CSV so make sure...

Page 43: ...S1 Dream Espresso Machine GUI Addendum Dream GUI Addendum Page 42 8 1 Example ofconverted DREAM_R CSV file...

Page 44: ...S1 Dream Espresso Machine GUI Addendum Dream GUI Addendum Page 43 8 2 Raw Dream_R csvfile...

Reviews: