background image


32 


-


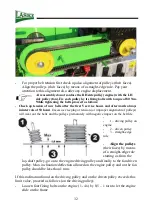
For proper belt tension first check up also alignment of pulleys (their faces). 
Align the pulleys (their faces) by means of a straight-edge rule. Pay your 
attention to this alignment also after any engine displacement.    


At reassembly do not confuse the RH side pulley (engine) with the LH 
side pulley (fan). Fix each pulley by its fixing bolts with torque of 80 Nm. 
While tightening the belts proceed as follows:      

-


Check up tension of new belts after the first 5 service hours and afterwards always 
in intervals of 50 hours

 Excessive creeping or tension (or improper alignment of pulleys) 

will wear out the belts and the pulleys prematurely with negative impact on the belt life. 

-


-


1 – driving pulley on 

engine 
-


2 – driven pulley 

-


3 – straight-edge 

rule  
 

-


Align the pulleys


(their faces) by means 
of a straight-edge rule 
starting as from the 

lay-shaft pulley, go on to the engine driving pulley and finally to the fan driven 
pulley. Max. inclination/deflection allowed on the engine pulley and on the fan 
pulley should be less than 1 mm.  
 

If this inclination found on the driving pulley and on the driven pulley exceeds this 
limit value, proceed as follows (on the driving pulley): 
-


Loosen four fixing bolts on the engine (1 - 4x) by 0,5 – 1 turn to let the engine 
slide on the frame.    

Summary of Contents for VD 500

Page 1: ...OPERATING INSTRUCTIONS LEAVES EXHAUSTER VD 500 Version 03 2020...

Page 2: ...thorised for doing checks and other actions on the machine Your local dealer will give you this manual with instructions for operation and maintenance while taking this new machine over Make sure if y...

Page 3: ...FORE RIDE 16 STORAGE 17 BEFORE PUTTING INTO OPERATION 18 BEFORE PUTTING INTO OPERATION 19 PUTTING OUT OF OPERATION 21 NOISE AND VIBRATIONS 23 RESIDUAL RISKS 23 TECHNICAL DESCRIPTION 24 Suction Line 24...

Page 4: ...4...

Page 5: ...5...

Page 6: ...ta in the following form concerning the given product and your dealer Type of product Serial number of product Engine type Serial number of engine Dealer s address Address of authorised service Date o...

Page 7: ...the third persons within the operating reach of the machine Before working learn all functions of individual controls and safety elements and carry out functional checks before any use Ask your deale...

Page 8: ...en in this manual nor allowed by the manufacturer The machine not correctly installed or adjusted may run without problems now but in the future it could damage any of important parts Do not put any o...

Page 9: ...fixed in its place Do not start the machine in confined or ill ventilated spaces Do not use the machine under conditions of low visibility especially at foggy weather when you may overlook unwanted pe...

Page 10: ...These work safety symbols warn the operator against risks connected with the machine use Your respect to the symbol meanings is a precondition for your work safety The user is obliged to keep all the...

Page 11: ...g Close all guards before starting the machine Transport of Product Handling This product is delivered completely mounted and fitted on its chassis The exhauster can be towed by towing means which acc...

Page 12: ...and etc apply a corresponding grease film on their surface While putting the trailer aside use the jockey wheel for supporting Lock it by tightening Precautions in Design This product is equipped with...

Page 13: ...ler should be coupled to transport means equipped with towing brackets approved accordingly The given towing vehicle should be also approved for this way of transport and equipped with a respective to...

Page 14: ...er the unbraked trailer wheels While coupling go always with the towing vehicle to the trailer Be careful this approaching could be dangerous particularly on hilly terrain First of all set the drawbar...

Page 15: ...ehicle Extrude the jockey wheel let it rest on the ground and lock it in its extruded position mechanically Should the trailer be uncoupled from a towing vehicle first unload the towing bracket by low...

Page 16: ...pressure condition and functions of lights and reflector glasses trailer coupling condition of towing bracket hitch drawbar eye and its locking fixing of machine parts on chassis in their transport p...

Page 17: ...ed and restarting brings loss of battery voltage Such a drop of potential might be insufficient for the next start Storage Store the exhauster always in a dry shelter to protect it against weather eff...

Page 18: ...el mechanically Dipstick Air filter Fuel tank Oil filling hole Fuel filter Before Putting into Operation Before the first putting into operation check up the machine for contingent damages and complet...

Page 19: ...to be used is unleaded petrol NATURAL 95 After storage check the battery Recharge it if necessary Plus and minus poles should be connected just before starting It is strictly forbidden to do any unau...

Page 20: ...ne reach Release the suction hose and put it in front of leaves to be sucked Fix the suction hose to the framing Open the choke cold start Set the speed regulator throttle valve to minimum speed Open...

Page 21: ...rease about one minute idling Turn the switch key in the STOP position Never forget that the rotor wheel is running out Emergency Situations Turn off the exhauster and stop working in following situat...

Page 22: ...oise The driver must always have overview over the site Catch the grip of the suction hose and apply the hose slowly to leaves to be sucked Proper sucking action requires keeping the continuous air fl...

Page 23: ...LA 89 3 dB Noise at 3 m distance LA 92 3 dB Sound power LWA 114 4 dB All measurements taken in accordance with EN ISO 11201 and EN ISO 3744 Extended uncertainty of measurements U 0 6 dB The given unce...

Page 24: ...istance than the sucked leaves Therefore direct the hose end in order to regulate ejecting Keep persons and animals away UNWISHED MOTION While putting the trailer aside on a slope block its wheels aga...

Page 25: ...40 mm The exhauster is powered by an independent combustion engine The exhausting blowing job is allowed to be done only with the trailer standing Necessary coupling device overrun brake system axle...

Page 26: ...length mm 2240 Overall width mm 1560 Overall height mm 2350 Wheel base mm 1530 Wheel track mm 1375 Weight operating kg 400 Weight max permissible kg 400 Axle load max permissible kg 750 Max vertical c...

Page 27: ...er is not equipped with any spare wheel In case of light untightness it is possible to repair the tire by means of a special spray intended for tire service Before wheel replacement block the trailer...

Page 28: ...r maintenance Check up the trailer daily for good technical condition before ride and remove detected faults The trailer should be ready for operation only in good technical order Keep all the routine...

Page 29: ...n to routine maintenance of the battery It requires special tools measuring appliances and skilled attendants If necessary ask for help by an authorised service in order to inspect or to recharge the...

Page 30: ...lways be replaced V belt tension It is necessary to pay special attention to the routine maintenance and proper belt tension adjustment because the V belts on this machine transfer the engine torque t...

Page 31: ...s of necessary replacement of the driving engine in its longitudinal grooves Loosen the nuts of bolted joints 1 approximately by one turn loosen the locking nuts alternately Then move the engine in th...

Page 32: ...e creeping or tension or improper alignment of pulleys will wear out the belts and the pulleys prematurely with negative impact on the belt life 1 driving pulley on engine 2 driven pulley 3 straight e...

Page 33: ...il always when the engine is turned off and still warm Discharge the used oil into a bin through the drain plug in the casing bottom Having discharged the whole volume screw up the plug and fill new o...

Page 34: ...o adjustment Spark plugs power cable and plug socket should be checked every 100 hrs This check consists in cleaning of electrodes and setting of the spark gap to 0 75 mm Spark plugs should be changed...

Page 35: ...e disposed in accordance with laws and regulations valid in the given country Warranty The warranty time begins upon delivery to the customer This warranty covers all failures resulted from faulty ass...

Page 36: ...36 This warranty does not cover consequences resulted from weather effects Any warranty claims must be submitted in writing with papers concerning acceptance for warranty or post warranty repair...

Page 37: ...37 Service Report...

Page 38: ...38 Service Report...

Page 39: ...39 Service Report...

Reviews: