


Installation
2 - 5
1.
Connect at least one printer to the EPS using an available serial or parallel port.
2.
If desired, connect a terminal to port 1 (the console port) to receive diagnostic and initial
configuration messages.
3.
Connect the EPS to the 10/100BASE-T network.
NOTE:
The default serial port settings are 9600 baud, 8 bit characters, and no parity.
4.
Attach one end of the power cable to the EPS; plug the other end into an electrical outlet.
Power will come on automatically.
5.
Allow 45 seconds for the unit to fully boot. The OK LED should be lit to show the unit is
functioning properly.
If you have connected a 10BASE-T cable to the Server, the Link LED should be solid
green. If you have connected a 100BASE-T cable, The Link and 100MBit LEDs should
both be solid green. If not, check your network connection.
6.
Print a Test page by pressing the Test/Reset button.
NOTE:
If the Power LED does not light or the Test page does not print, refer to
Appendix I, Troubleshooting.
7.
Install EZWebCon on your 32-bit Windows PC to configure your Server. The EZWebCon
software is located on the CD-ROM. See
EZWebCon Configuration
on page 3-2 for more
information.
Summary of Contents for EPS2-100
Page 4: ...Declaration of Conformity Index ...
Page 12: ......
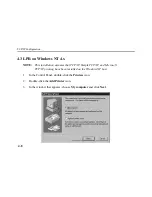
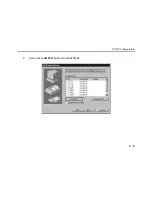
Page 25: ...TCP IP Configuration 4 9 4 Select the Add Port button and click Next ...
Page 27: ...TCP IP Configuration 4 11 7 Select the manufacturer and printer type ...
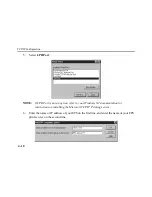
Page 28: ...TCP IP Configuration 4 12 8 Enter the queue name ...
Page 30: ...TCP IP Configuration 4 14 10 Test the printer ...
Page 40: ......
Page 50: ......
Page 58: ......
Page 70: ......
Page 75: ...Pinouts J 5 J 2 2 RJ45 to DB9 Figure J 4 RJ45 DTE DB9 Adapter ...
Page 88: ...Updating Software K 12 ...
Page 92: ...Specifications L 4 ...
Page 108: ...Frequently used Commands M 16 ...
Page 114: ......


