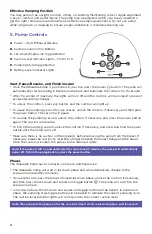
Lansinoh Wearable Quick Start Manual Download Page 11

7

8. Charging

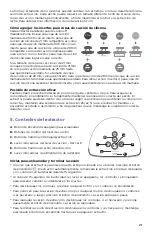
The battery level indicator lights indicate the pump operating time remaining. A red bar is 

illuminated when the battery is low. Charge immediately if red light is indicated. 

• 

Monitor battery life to ensure there is at least one solid green bar illuminated prior starting 

a session. 

• 

Green battery lights will flash when charging is in progress. The pump will NOT turn on 

during charging. 

• 

It takes approximately 4 hours to fully charge the battery utilizing the charging cord provided 

with the Wearable Pump.

• 

For best charging results, use a power brick rated for 5 Watts minimum.

• 

When the pump is fully charged, the battery lights will illuminate 4 green bars.

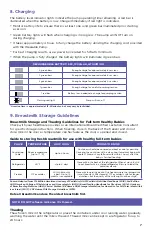
RECHARGEABLE BATTERY: 3.8V, 1300mAH, LITHIUM ION

4 green bars

Enough charge for approximately 8 sessions 

3 green bars

Enough charge for approximately 6 sessions  

2 green bars

Enough charge for approximately 4 sessions

1 green bar

Enough charge for one full pumping session

1 red bar

Battery low, inadequate charge for pumping session 

Flashing red light

Pump will turn off

*A session time is approximated at 15-20 minutes, but may vary by individual.

9. Breastmilk Storage Guidelines

Breastmilk Storage and Thawing Guidelines for Full-term Healthy Babies

Check with your healthcare provider or an International Board Certified Lactation Consultant 

for specific storage instructions. When freezing, store in the back of the freezer and do not 

store milk in the door as temperature can fluctuate as the door is opened and closed.

Guide to storing fresh breastmilk for use with healthy, full-term babies

PLACE

TEMPERATURE

HOW LONG

THINGS TO KNOW

Countertop, 

table

Room temperature 

(up to 77°F)

Up to 4 hours

Containers should be covered and kept as cool as possible. 

Covering the container with a clean cool towel may keep milk 

cooler. Throw out any leftover milk within 2 hours after the 

baby is finished feeding.

Refrigerator

40°F

Up to 4 days

Store milk in the back of the refrigerator. When at work, it's OK 

to put breastmilk in a shared refrigerator. Be sure to label the 

container clearly.

Freezer

0°F or colder

Within 6 months 

is best. Up to 12 

months is acceptable

Store milk toward the back of the freezer where the temperature 

is most constant. Milk stored at 0°F or colder is safe for longer 

durations, but the quality of the milk might not be as high.

Source: Adapted from 7th Edition American Academy of Pediatrics (AAP) Pediatric Nutrition Handbook (2014); 2nd Edition 

AAP/American College of Obstetricians and Gynecologists (ACOG) Breastfeeding Handbook for Physicians (2014); Academy 

of Breastfeeding Medicine (ABM) Clinical Protocol #8 Human Milk Storage Information for Home Use for Full-Term Infants(link 

is external) (2017); CDC Human Milk Storage Guidelines (2018).

Date all breastmilk and use the oldest breastmilk first.

NOTE:


DO NOT refreeze milk once it is thawed. 

Thawing

Thaw frozen milk in the refrigerator or place the containers under cool running water, gradually 

warming the water until the milk is thawed. Thawed milk can be kept in a refrigerator for up to 

24 hours.

Summary of Contents for Wearable

Page 1: ...rights reserved Printed in T rkiye Lansinoh Wearable Pump QUICK START GUIDE GU A R PIDA DE INICIO Wearable Pump The Lansinoh Wearable Pump includes 4 different flange size options To determine the app...

Page 2: ...cup PASO 10 Retire el extractor de su brasier Mantenga la copa de extracci n en posici n vertical y separe cuidadosamente el n cleo del extractor de la copa de extracci n STEP 11 Use the pour spout t...

Page 3: ...care single user item To prevent cross contamination infection the Wearable Pump should never be shared between individuals or re sold from one individual to another Each individual should use their o...

Page 4: ...e immediately if you note any smoke or burning from the pump unit or the charging cord Not intended for use while flying Caution If you feel pain in your breast or nipple during operation turn the pum...

Page 5: ...ng the Lansinoh Wearable Pump for the first time it needs to be charged See Section 8 for charging and battery details Before First Use Disassemble the Wearable Pump and clean and disinfect the Pumpin...

Page 6: ...and water before handling the Wearable Pump 2 Before assembling the Pumping Cups be sure that all the parts are completely dry 3 Visually inspect the individual components for cracks chips tears disc...

Page 7: ...you will want to try the next size up and if there is a lot of space around the nipple you will want to size down Signs you have found the right breast flange when Only your nipple and some of your ar...

Page 8: ...me the pumping session unlock the controls if necessary and press the power button again The session will resume To finish the pumping session unlock the controls if necessary and press and hold the p...

Page 9: ...ease suction beyond the point of comfort Pumping Styles in Expression Phase The Wearable Pump offers three different customizable pumping styles in expression phase that mimic baby s feeding patterns...

Page 10: ...infant feeding equipment Do not place the parts directly in the sink because germs in sinks or drains could contaminate the parts 2 Hand wash the parts using warm soapy water A nipple brush may be use...

Page 11: ...in the door as temperature can fluctuate as the door is opened and closed Guide to storing fresh breastmilk for use with healthy full term babies PLACE TEMPERATURE HOW LONG THINGS TO KNOW Countertop...

Page 12: ...p Verify the battery is properly charged If the pump is shutting off and the battery is charged then please contact Lansinoh Customer Service by calling 800 292 4794 or emailing customerservice lansin...

Page 13: ...th local waste electrical and electronic equipment regulations To avoid the harmful effects on the environment and public health align with your defined local return and collection rules for waste ele...

Page 14: ...ND REGARDING THE PRODUCT OTHER THAN THOSE WARRANTIES EXPLICITLY SET FORTH HEREIN ANY IMPLIED WARRANTY INCLUDING ANY IMPLIED WARRANTY OF MERCHANTABILITY OR ANY IMPLIED WARRANTY OF FITNESS FOR A PARTICU...

Page 15: ...me Healthcare Environment Electrical fast transients bursts a l o IEC 61000 4 4 2 kV 100 kHz repetition frequency Surges a b j o Line to line IEC 61000 4 5 0 5 kV 1 kV Surges a b j k o Line to ground...

Page 16: ...r Class A Equipment HARMONIC ORDER n MAXIMUM PERMISSIBLE HARMONIC CURRENT A Odd Harmonics 3 5 7 9 11 13 15 n 39 2 30 1 14 0 77 0 40 0 33 0 21 0 15 15 n Even Harmonics 2 4 6 8 n 40 1 08 0 43 0 30 0 23...

Page 17: ...13...

Page 18: ...14...

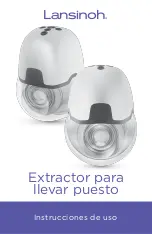
Page 19: ...15 Instrucciones de uso Extractor para llevar puesto...

Page 20: ...iezas Advertencia El extractor para llevar puesto Lansinoh Wearable Pump es un art culo para el cuidado personal previsto para ser utilizado por una sola usuaria Para prevenir la contaminaci n o la in...

Page 21: ...inmediato si observa que sale humo de la unidad de extracci n o del cable de carga o que estos se queman Este dispositivo no est previsto para su uso en un avi n Precauci n Si siente dolor en el pecho...

Page 22: ...usar el extractor para llevar puesto Lansinoh Wearable Pump por primera vez es necesario cargarlo Consulte la Secci n 8 para obtener los detalles de la carga y la bater a Antes del primer uso Desarme...

Page 23: ...ractor Debe mantenerse seco para prevenir los da os Antes de cada uso 1 Siempre l vese las manos con agua y jab n y s quese bien antes de tocar el extractor para llevar puesto 2 Antes de ensamblar las...

Page 24: ...s de encender el extractor 4 Selecci n de la copa de succi n del tama o correcto para usted Es importante usar la copa de succi n mamaria del tama o correcto y realizar una adecuada alineaci n del pez...

Page 25: ...dad y el rendimiento es fundamental mantener la alineaci n correcta del pez n El extractor puede ajustarse dentro de su brasier seg n sea necesario para obtener la compresi n correcta y mantener una e...

Page 26: ...ncia de succi n para elegir Presione los botones de control del nivel de succi n para encontrar el ajuste que prefiera Cada extractor para llevar puesto tiene luces indicadoras del nivel de succi n La...

Page 27: ...n o a una bolsa de almacenamiento de leche Vierta la leche materna con cuidado en el envase de almacenamiento seleccionado 7 Limpieza despu s de cada uso Desarme las copas de extracci n NO lave el n c...

Page 28: ...etamente la bater a usando el cable de carga provisto con el extractor para llevar puesto demora aproximadamente 4 horas Para obtener los mejores resultados use un cargador con capacidad nominal para...

Page 29: ...O vuelva a congelar la leche una vez que la haya descongelado Descongelamiento Descongele la leche materna en el refrigerador o ponga los envases bajo agua fr a del grifo y aumente gradualmente la tem...

Page 30: ...xtracci n y 3 estilos de extracci n que se controlan con los botones del extractor Nivel de succi n ajustable Se pueden seleccionar 8 niveles de succi n que se controlan con los botones del extractor...

Page 31: ...er a S mbolo de TUV El producto o el material de empaque pueden reciclarse No arroje la bater a al fuego El n mero 20 dentro del s mbolo universal de reciclaje representa art culos hechos de cart n El...

Page 32: ...ER GARANT A EXPRESA O IMPL CITA Si quiere hacer un reclamo conforme a esta garant a debe devolver el producto a Lansinoh Laboratories Inc en un env o prepagado junto con su contrato de compra fechado...

Page 33: ...AM a 1 kHz e Ca das de voltaje f p r IEC 61000 4 11 0 UT 0 5 ciclo g At 0 45 90 135 180 225 270 y 315 q 0 UT 1 ciclo y 70 UT 25 30 ciclos h Monof sica a 0 Interrupciones de voltaje f i o r IEC 61000 4...

Page 34: ...30 Par metros del nivel de la prueba de emisiones parpadeo Parpadeo breve 1 00 Cambio de voltaje relativo en estado estable 3 30 Cambio de voltaje relativo m ximo 4 00...

Reviews: