2-24
9K998-2306
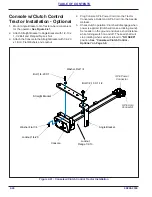
Console w/Clutch Control
Installation - Optional
1. If equipped with Clutch Switch Bar, remove from
Tractor and remove Clutch Harness from Seeder.
2. Mount Seeder Console with Clutch Control on
Tractor.
3. Route Console Harness with 9-Pin Connector to the
Seeder Harness.
4. Attach 3-Pin Power Plug to Tractor.
5. Secure Console Harness with tie wraps.
6. Route Seeder Harness along Frame of Seeder.
Ensure plug labeled Electric Clutch Power is on the
left side.
7. On left side connect plug labeled “Electric Clutch
Power” to the Electric Clutch Lead.
8. Connect plug labeled “Left Front Seed Shaft Sensor”
to the left front Seed Shaft Sensor. Seal the plug end
using a 3-Pin Tower and Cavity Plugs to protect it
from the environment.
9. Repeat for the right side.
10. Secure all Harnesses with tie wraps.
Figure 2-38: Console w/Clutch Control Electrical Schematic
Seeder
Harness
9-Pin
Connector
Labled
Electric Clutch
Power
Seed Shaft
Sensor
Clutch included
with Seeder
Labled
Left Rear Seed
Shaft Sensor
Cavity
Plug
3-Pin Tower
Cavity Plug
3-Pin
Power Plug
Seeder Console
with Clutch Control
Seed Shaft
Sensor
3-Pin
Tower
Labled
Right Rear Seed
Shaft Sensor
Labled
Right Front Seed
Shaft Sensor
Labled
Left Front Seed
Shaft Sensor
Summary of Contents for Brillion Turfmaker II Series
Page 4: ......
Page 18: ...1 10 9K998 2306 TABLE OF CONTENTS Table provided for general use NOTES...
Page 45: ...9K998 2306 2 27 TABLE OF CONTENTS Table provided for general use NOTES...
Page 53: ...9K998 2306 2 35 TABLE OF CONTENTS Table provided for general use NOTES...
Page 61: ...9K998 2306 2 43 TABLE OF CONTENTS Table provided for general use NOTES...
Page 94: ...4 8 9K998 2306 TABLE OF CONTENTS Table provided for general use NOTES...


