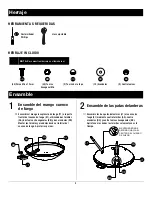
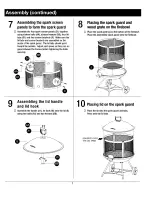
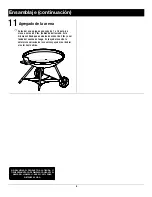
background image

L1

F1

E1

F2

CC

5


Assembling the wheels


Assemble the two wheels (H1) to the bottom shelf axle 
(Y) using two locknuts (EE).  Tighten hexnuts securely.

6


Assembling the firebowl
handle shield


Assemble the firebowl handle shield (U) to
the handle (T1) using two bolts (AA)
and two hexnuts (BB).

DD

AA

BB

KEEP ROUND
EDGE TOWARDS
THE CENTER OF 
FIREBOWL 

Y

Y

EE

Y

H1

T1

AA

BB

U


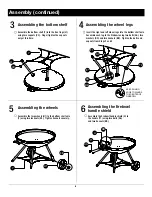
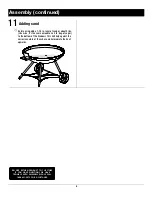
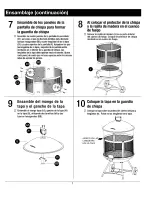
Assembly (continued)


3


Assembling the bottom shelf


Assemble the bottom shelf (Y) into the front legs (L1) 
using two capnuts (CC).  Finger tighten the capnuts 
only at this time.


4


Assembling the wheel legs


Insert the right and left wheel legs into the bottom shelf axle.  
Assemble each leg to the firebowl using two bolts (AA), two 
washers (DD) and two hexnuts (BB).  Tighten the bolts and 
capnuts from Steps 2 and 3.


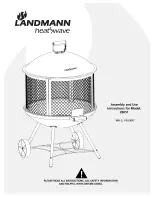
Summary of Contents for Heatwave 28051

Page 1: ......

Page 2: ......

Page 3: ......

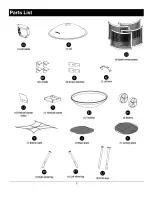
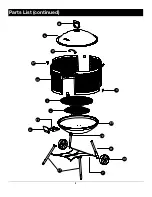
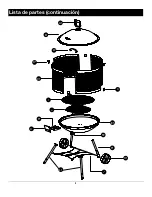
Page 4: ...B C1 J I T1 L1 F2 W D1 X U E1 F1 H1 Y A1 4 Parts List continued...

Page 5: ...ual size TOOLS REQUIRED 5 Hardware Assembly 1 Assembling the firebowl handle Assemble the firebowl handle T1 to the front of the firebowl E1 using two bolts AA two hexnuts BB and two washers DD Assemb...

Page 6: ...D AA BB KEEP ROUND EDGE TOWARDS THE CENTER OF FIREBOWL Y Y EE Y H1 T1 AA BB U 6 Assembly continued 3 Assembling the bottom shelf Assemble the bottom shelf Y into the front legs L1 using two capnuts CC...

Page 7: ......

Page 8: ...1 800 321 3473 FOR ASSISTANCE 8 Assembly continued 11Adding sand Before using add a 1 1 5 in layer of sand or about 5 lbs size wise it s the same amount as a 5 lb bag of sugar to the bottom of the fi...

Page 9: ......

Page 10: ...nce to heat Proper care will provide many seasons of carefree use Follow these rules for long life Do not drop the lid on the ground this will cause the porcelain finish to chip Avoid excessive poking...

Page 11: ......

Page 12: ......

Page 13: ......

Page 14: ...B C1 J I T1 L1 F2 W D1 X U E1 F1 H1 Y A1 4 Lista de partes continuaci n...

Page 15: ...e Ensamble 1 Ensamble del mango cuenco de fuego Ensamble el mango recept culo de fuego T1 a la parte frontal del cuenco de fuego E1 utilizando dos tornillos AA dos tuercas hexagonales BB y dos arandel...

Page 16: ...uego U en el mango T1 con dos tornillos AA y dos tuercas hexagonales BB 6 Ensamblaje continuaci n 3 Ensamble del estante inferior 4 Ensamble de las patas de ruedas Ensamble el estante inferior Y en la...

Page 17: ......

Page 18: ...8 Ensamblaje continuaci n 11Agregado de la arena Antes del uso agregue una capa de 1 a 1 5 pulg de arena o cerca de 5 lbs hablando del tama o es la misma cantidad que una bolsa de az car de 5 lbs en e...

Page 19: ......

Page 20: ...resistencia contra el calor Un cuidado adecuado proporcionar muchas temporadas de uso sin mantenimiento Siga estas reglas para alcanzar una mayor vida til No deje caer la tapa esto astillar el acabad...

Reviews: