background image

16

For Tech Tip Instructions

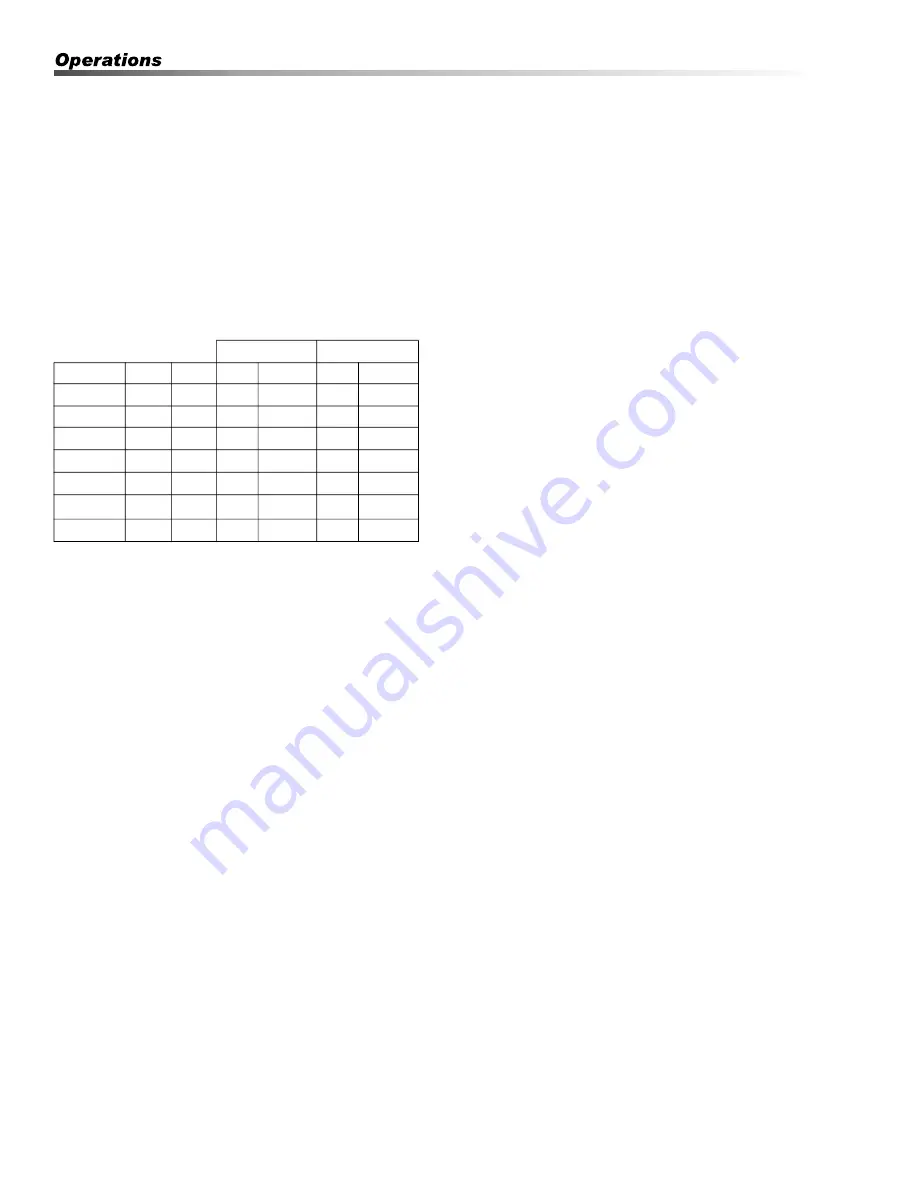
Combustion efficiency in a natural draft pressure 
washer is significantly influenced by the heat created 
inside the coil, the design of the coil and flue and the 
length and diameter of the exhaust stack.  The table 
below shows data included in the operator’s manual for 
flue and stack sizes and gas manifold pressure 
settings. These sizes are critical for achieving proper 
combustion and acceptable emissions.

Testing has shown that simply adding a 36” stack 
extension to the flue adapter on top of the pressure 
washer can reduce the outlet temperature by 5-10°F.

This occurs by inducing a higher pressure differential at 
the exit of the coil and increasing the flow of air into the 
combustion process and through the stack. Most or all 
of the lost outlet temperature can be recovered by 
installing and adjusting a damper in the stack. However 
this adjustment must only be performed by a trained 
technician using a combustion analyzer. 

The damper should be installed 24-36” above the flue 
adapter. The pressure washer can be operated safely 
with the damper fully open but with the lower outlet 
temperature. If the damper is closed too far there will 
not be enough oxygen to burn all of the fuel. This will 
cause higher and potentially dangerous levels of CO in 
the flue gas emissions.

To adjust the damper for proper combustion and effi-
ciency perform the following:

1. If there is no sample port for the analyzer probe, 

drill a hole slightly larger than the combustion 
analyzer probe through the exhaust stack at a point 
about 18” above the flue adapter.

2. Insert the probe of the combustion analyzer so that 

the tip is at the center of the stack.

3. Open the damper to the fully open position.

4. Start the pressure washer and allow it to heat up 

for at least 20 minutes before making any adjust-
ments.

5. Note the values for % Excess Air and/or % 

Oxygen.

6. Close the damper in small increments until % 

Excess Air is between 20-30% and/or % Oxygen is 
4-5%.

This process can also be used when turning down the 
firing rate for high altitude installations above 2000 ft.

1. Adjust the gas pressure down 4% for every 1000 ft 

of elevation.

Example: Recommended firing rate for a 4.8@3000 
is 4.2 wc-in. For an installation at 3500 feet reduce 
this pressure by 16% by setting the manifold pressure 
to 4.2*.84 = 3.5 wc-in.

A manometer capable of reading to at least the nearest 
0.1 wc-in will be required for this adjustment. These can 
be found for less than $200 (Extech HD700). 

2. Follow steps 1-6 above to optimize the outlet 

temperature of the pressure washer.

Installations Above 2000 ft:

Installation at altitudes greater than 2000 ft will require 
adjustments to the gas manifold pressure.

For installations above 2000 feet the firing rate should 
be reduced by 4% per 1000 feet. Example: Recom-
mended firing rate for a 4.8@3000 is 4.2 wc-in. For an 
installation at 3500 feet reduce this pressure by 16% by 
setting the manifold pressure to 4.2*.84 = 3.5 wc-in.  
This adjustment should only be made by a properly 
trained service technician. A manometer capable of 
reading to the nearest 0.1 wc-in will be required for this 
adjustment.

In Canada, certification for installation at altitudes over 
4500 feet is the jurisdiction of local authorities.

NG

LP

Model

Collar Stack wc-in kBTU-in wc-in kBTU-in

3.5@2000

10"

8"

3.6

310

7.8

310

4.0@3000

10"

8"

3.4

354

7.4

354

4.0@2200

10"

8"

5.1

364

11.2

364

5.0@3000

10"

10"

4.2

415

9.1

415

5.0@2300

10"

10"

4.7

437

9.5

439

6.0@3800

12"

10"

4.3

507

7.4

507

8.0@3800

12"

12"

3.1

658

7.0

658

Landa VHG Operator’s Manual  8.913-952.0 - BR

Summary of Contents for VHG

Page 1: ...8 913 952 0 BR 08 21 20 VHG Hot Water Electric Powered Natural Gas or LP Heated Operator s Manual Pressure Washer MODELS VHG4 3000 VHG4 2000 VHG4 2200 VHG5 3000 VHG6 3000 VHG8 3000...

Page 2: ...2 Landa VHG Operator s Manual 8 913 952 0 BR...

Page 3: ...Hot Water Thermostat 24 Pumps 24 Heating Coils 24 Gas Valve Regulator Adjustment 25 Pressure Relief Valve 25 Propane Gas 25 Burner Features 26 Basic Facts 27 Smart Relay Instructions 28 Factory Set P...

Page 4: ...in tenance to keep the machine and its components in good working condition They are listed in this general order Spray Nozzles Unloader Valves Winterizing Procedure Low Pressure Diagnosis High Limit...

Page 5: ...perty damage personal injury or loss of life AVERTISSEMENT Si ces directives ne sont pas suivies la lettre un incendie ou une explosion pourrait survenir et entra ner des dommages la propri t des l si...

Page 6: ...liquides inflammables WARNING Risk of fire Do not change LP tanks when the product is operating or still hot AVERTISSEMENT Risque d incendie Ne pas changer les r servoirs de p trole liquide pendant q...

Page 7: ...in a well ventilated area DANGER Risque d asphyxie Utiliser ce produit uniquement dans un endroit bien ventil 14 Avoid installing machines in small areas or near exhaust fans Adequate oxygen is neede...

Page 8: ...When tightening the POL Nut left hand thread on the service valve draw it up snug with a proper wrench This is a machined male brass fitting which seats securely against a female seat in the POL valve...

Page 9: ...sure Hose Connect one end to water pump high pressure discharge nipple and the other end to spray gun Rupture Disk Secondary pressure release in the unlikely event the unloader valve fails Not Shown U...

Page 10: ...10 Installation VHG 4 5 Landa VHG Operator s Manual 8 913 952 0 BR...

Page 11: ...11 Installation VHG 6 8 Landa VHG Operator s Manual 8 913 952 0 BR...

Page 12: ...t away Allow enough space for servicing the machine Local code will require certain distances from floor and walls Two feet away should be ade quate WARNING Avoid small areas or near exhaust fans AVER...

Page 13: ...reprise oeuvrant dans le domaine du propane Most LP gas pressure washer heaters are designed to operate on LP gas vapor only Therefore all LP gas containers designed for vapor service must be trans po...

Page 14: ...ouble wall type Sometimes vents have to be built of such great length that they come apart at their joints under their own weight These should be screwed together at the joints with sheet metal screws...

Page 15: ...anufacturer and not a licensed contractor and as such we are unable to make recom mendations for suitable make and model of power vents and compliance with local building codes Damper An exhaust stack...

Page 16: ...3 Open the damper to the fully open position 4 Start the pressure washer and allow it to heat up for at least 20 minutes before making any adjust ments 5 Note the values for Excess Air and or Oxygen...

Page 17: ...ne pourrait causer des dommages mat riels ou des blessures corporelles 1 Installation or servicing of gas appliances and controls must only be performed by qualified personnel After installation or se...

Page 18: ...ally grounded Is there ample water supply Have all flammable liquids or gases been removed from installation location Is there adequate gas supply for the BTU rating of the burner Is incoming gas supp...

Page 19: ...ssembly to union on machine and plug in wires STEP 2 Connect the high pressure hose to the discharge fitting Push coupler collar forward until secure STEP 5 Before installing nozzle turn on the water...

Page 20: ...ot water push the burner switch to the ON position and pull the trigger on the spray gun Landa VHG Operator s Manual 8 913 952 0 BR Selection of high or low pressure is accompanied by turning the hand...

Page 21: ...e to the pump Cleaning Tips Pre rinse cleaning surface with fresh water Place detergent suction tube directly into cleaning solution and apply to surface For best results limit your work area to secti...

Page 22: ...detergent valve and spray gun allowing the detergent lines to be flushed and the burner to cool Otherwise coil damage may occur STEP 3 After water has cooled push or turn pump switch to OFF position I...

Page 23: ...etach water supply hose and high pressure hose 3 Turn on the machine for a few seconds until remaining water exits Turn pump off immediately 4 Do not allow high pressure hose to become kinked 5 Store...

Page 24: ...tly to the pump If high pressure is developed in this manner the pump is good and the unloader needs to be repaired or replaced If low pressure is still present then the pump needs repairing CAUTION W...

Page 25: ...rather than rise out of the stack Hence adequate floor space and good ventilation are especially important with propane systems Gas Pressure Requirements All propane fired machines operate on vapor pr...

Page 26: ...union in main burner line below thermostat Slide burner manifold out through shell opening 2 TO CLEAN BURNER JETS Select proper size drill for type gas involved Use pin vise to hold drill and ream ou...

Page 27: ...per Gal Liquid 91 547 102 032 BTU per Lb Liquid 21 591 21 221 Cu Ft per Lb Liquid 8 607 6 53 Cu Ft per Gal Liquid 36 45 31 8 Octane Number 125 91 Molecular Weight 44 09 58 12 To Calculate Running Cost...

Page 28: ...own arrow keys or 8 To set the date repeat steps 6 and 7 9 To accept your entries press OK 10 To go back to the previous menu at anytime press ESC Programming Instructions The 900 1400 can be configur...

Page 29: ...indow shows the three parame ters See figure 4 NOTE Ta is the accumulator timer and T is the adjustable timer the variable that changes 5 Press OK to change the value of Timer 1 Using the left right a...

Page 30: ...e Pump On switch Timer 2 30 00 Seconds Pump will run in bypass for 30 seconds before shutting off machine is still in standby mode Pulling the gun trigger will restart the pump Timer 3 15 00 Seconds I...

Page 31: ...s for 3 minutes and shut off To restart push the Pump On switch Timer 2 01 00 Hours To operate in time delay mode timer 2 must be deactivated This is done by setting timer 2 to value greater than time...

Page 32: ...lumn 6 35 oz sq in 11 Water Column 4 lb sq in 1 lb sq in 27 71 Water Column 1 lb sq in 14 73 lbs sq in 1 Mercury 39 lb sq in 1 Std Atmosphere 14 73 lbs sq in Date Oil Changed Month Day Year Estimated...

Page 33: ...er severe conditions Maintenance Schedule Replace Fuel Lines Annually Pump Oil SAE 10W 40 non foaming Inspect Daily inspect the oil level Change After first 50 hours then every 500 hours or annually C...

Page 34: ...iscosity of detergent Dilute detergent to specifications Restriction behind float tank screen removed Install restriction Hole in detergent line s Repair hole Strainer basket plugged Remove and clean...

Page 35: ...g kit Fouled or dirty inlet or discharge valves in pump Clean inlet and discharge valve Worn inlet or discharge valves Replace with valve kit Obstruction in spray nozzle Remove obstruction Leaking pre...

Page 36: ...is turned on 2 With gas on and system sparking probe terminals PV and 24V GND If pilot gas does not flow with 24 volts at these terminals replace gas valve 3 Probe terminals PV and MV PV If 24 volts...

Page 37: ...r rod the main burner should turn on If it does not replace the ignition control unit SHORT CYCLING OF MAIN BURNER MAIN BURNER TURNS OFF BEFORE THE BURNER SWITCH OR FLOW SWITCH IS TURNED OFF Draft con...

Page 38: ......

Reviews: