background image

Section 1: Options & Accessory Set-up 

SPL0548 & SPL0560 Snow Pusher 303-454M

11/9/20

19

Table of Contents

4. Screw adjustment bolts (#4) fully into adjusting 

block (E) as shown in Figure 1-13. Screw jam nuts 

(#5) 3 or 4 full turns onto bolts (#4). 

5. Slowly approach the Snow Pusher clevises while 

adjusting the loader arms until the pin holes on the 

end of the loader arms aligns with the pin holes in the 

clevises.

6. Without changing the loader height, shut tractor 

down using 

“Tractor Shutdown Procedure” 

on 

page 21.

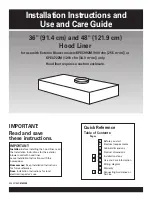
Hitch Pin Installation (Shown Hooked to a Snow Pusher)

Figure 1-13

Refer to Figure 1-11 on page 18 & Figure 1-13:

7.

On the left-hand side, insert hitch pin (#2) through 

the pin holes in the clevis plates and loader arm, 

bracket (D), flat washer (C), and lift stand (B) as 

shown with the flat washer located between 

items (B & D). 

8. Secure lift stand (B) to hitch pin (#2) with snap 

ring (A).

9. Secure hitch pin (#2) with 5/16"-18 GR5 bolt (#1) and 

lock nut (#3). Tighten bolt (#1) and locknut (#3) to 

17 ft-lbs (24 

N·m

) of torque.

10. Repeat steps 7 through 9 on the right-hand side of 

the loader.

Refer to Figure 1-11 on page 18:

11. Secure tilt cylinder (not shown) to the Snow Pusher’s 

center clevis with hitch pin (#6). Secure hitch pin with 

1/4"-20 GR5 bolt (#8) and locknut (#7). Thread 

locknut up snug, but do not tighten locknut.

12. Shut tractor down according to 

“Tractor Shutdown 

Procedure” 

on page 21.

13. Adjust bolts (#4) to the length required to operate lift 

stand (B). Refer to 

“Adjusting the Height of Lifting 

Stand”

 in 

“Kubota’s LA344 Front Loader 

Operator’s Manual, Code No. 7J629-6911-4

1

2

4

3

B

D

C

5

A

74899A

E

Unhook BX80 Loader Arm Pin-on

WARNING

!

To avoid serious injury or death:  The Snow Pusher is back 

heavy and can tip over backwards easily once unhooked. 

Always unhook unit on level ground with support blocks under 

the skid shoes at the back to tip the unit forward. Never unhook 

unit with back of unit facing downhill.

Refer to Figure 1-11 on page 18:

1. See 

“Long-Term Storage” 

on page 25 if parking the 

Snow Pusher for long periods or at the end of the 

season.

2. Reduce tractor engine speed to an idle and park 

tractor and Snow Pusher on level, solid ground. 

3. Lower Snow Pusher until back of skid shoes are 

resting on support blocks (#6) and front of skid shoes 

are resting on the ground.

4. Shut tractor down properly. Refer to 

“Tractor 

Shutdown Procedure” 

on page 21.

Refer to Figure 1-11 on page 18:

5. Remove snap rings (A), locknuts (#3), bolts (#1) and 

hitch pins (#2). 

6. Remove nut (#7), bolt (#8), and hitch pin (#6).
7.

Slide Snow Pusher froward about 6" (15 cm).

8. Replace hitch pin (#6) into the Snow Pusher’s center 

clevis and secure it with bolt (#8) and locknut (#7). 

Screw locknut on 3 or 4 full turns.

9. Replace hitch pins (#2) into the Snow Pusher’s outer 

clevises. Secure hitch pins with bolts (#1) and 

locknuts (#3). Thread locknuts on 3 or 4 full turns.

10.

Refer to Figure 1-13: 

Keep flat washers (C) and snap 

rings (A) with the loader. They will be reused when 

hooking up to the next attachment.

Summary of Contents for 39546

Page 1: ...please see your Land Pride dealer Read the Operator s Manual entirely When you see this symbol the subsequent instructions and warnings are serious follow without exception Your life and the lives of...

Page 2: ...inally ordered the weights and measurements are no longer accurate for your machine Update the record by adding the machine weight and measurements provided in the Specifications Capacities Section of...

Page 3: ...ety Alert Symbol 1 Safety Labels 6 Introduction 8 Application 8 Using This Manual 8 Owner Assistance 8 Section 1 Options Accessory Set up 9 Tractor Requirements 9 Torque Requirements 9 Dealer Preparat...

Page 4: ...ent Download the appropriate App on your smart phone open the App point your phone on the QR code and take a picture Dealer QR Locator The QR code on the left will link you to available dealers for La...

Page 5: ...ws it Hazard control and accident prevention are dependent upon the awareness concern prudence and proper training of personnel involved in the operation transport maintenance and storage of equipment...

Page 6: ...equipment securely support it with stands or suitable blocking beforehand Use properly grounded electrical outlets and tools Use correct tools and equipment for the job that are in good condition All...

Page 7: ...S is in the locked up position fasten seat belt snugly and securely to help protect against serious injury or death from falling and machine overturn Avoid High Pressure Fluids Escaping fluid under pr...

Page 8: ...ight fitting respirators can not have beards mustaches which interfere with the respirator seal to the face If possible change into disposable or washable work clothes at the work site shower and chan...

Page 9: ...Important Safety Information 11 9 20 5 This page left blank intentionally...

Page 10: ...tor at www landpride com 3 Some new equipment installed during repair requires safety labels to be affixed to the replaced component as 39713 39713 specified by Land Pride When ordering new components...

Page 11: ...Important Safety Information SPL0548 SPL0560 Snow Pusher 303 454M 11 9 20 7 Table of Contents 39713 858 215C Danger Roll Over Crushing Hazard...

Page 12: ...ssure you of the best performance To order a new Operator s or Parts Manual contact your authorized dealer Manuals can also be downloaded free of charge from our website at www landpride com Terminolo...

Page 13: ...ons Ensure that the intended tractor conforms to the requirements stated under the heading Tractor Requirements on this page Refer to Figure 1 1 CAUTION To avoid minor or moderate injury Keep clear Th...

Page 14: ...1 GR5 carriage bolts 3 and hex whiz nuts 4 3 Tighten hex whiz nuts 4 6 to the correct torque Orange Markers Accessory Part No 323 026A Refer to Figure 1 3 Land Pride offers 28 71 cm high orange marker...

Page 15: ...ade kits complete with mounting hardware See Figure 1 5 for part numbers and descriptions IMPORTANT Steel blades are not designed to move soil rock and other compacted surfaces They can cause structur...

Page 16: ...elow if hooking Snow Pusher to Kubota Original Quick Hitch Option No BX6315 Refer to Figure 1 6 1 Check for and remove any debris in the hitch point areas before hooking up the Snow Pusher 2 Remove re...

Page 17: ...son 2 Reduce tractor engine speed to an idle and park tractor and Snow Pusher on level solid ground 3 Lower Snow Pusher until the back of skid shoes are resting on support blocks 6 and front of skid s...

Page 18: ...e any preexisting hook up hardware from the Snow Pusher such hitch pins hair pin cotters and or bolts and nuts Safely store items for future use 2 Prepare to install both bolt on hitch plates 2 by lin...

Page 19: ...roperly attached unit can fall and be thrown toward bystanders and or operator Check hitch fit up frequently to make sure loader hitch is properly positioned under the implement s top angle bar s with...

Page 20: ...ront loader arms See your nearest Land Pride for this option Extended Hitch Pin Accessory Option 380 146A Figure 1 10 Refer to Figure 1 10 380 146A Option BX Loader Direct Pin 35848 Refer to Figure 1...

Page 21: ...the working season 2 Reduce tractor engine speed to an idle and park tractor and Snow Pusher on level solid ground 3 Lower Snow Pusher until back of skid shoes are resting on support blocks 6 and fro...

Page 22: ...he loader arms must be secured to the lower clevises with hitch pins and each hitch pin secured with a bolt nut and snap ring Land Pride s BX80 Loader Arm Pin on option is required when hooking the Sn...

Page 23: ...just bolts 4 to the length required to operate lift stand B Refer to Adjusting the Height of Lifting Stand in Kubota s LA344 Front Loader Operator s Manual Code No 7J629 6911 4 1 2 4 3 B D C 5 A 74899...

Page 24: ...initially and periodically for loose bolts Refer to TorqueValues Chart 28 Avoid hitting solid objects with this attachment as it does not have a trip mechanism Solid objects can damage equipment and t...

Page 25: ...Pusher to your tractor loader you are about ready to begin work The Snow Pusher is ideal for pushing snow off of driveways and small parking lots or any other areas you want cleared of snow They also...

Page 26: ...y concrete blocks or hydraulics Concrete can break hydraulic lines can burst and or hydraulic controls can be actuated even when power to hydraulics is off Do not alter implement or replace parts on t...

Page 27: ...oader An unhooked Snow Pusher can tip over backwards causing serious injury or death CAUTION To avoid minor or moderate injury Exercise caution when working on or near the steel blade Always wear glov...

Page 28: ...erly before dismounting to reverse or replace blade Refer to Tractor Shutdown Procedure on page 21 Reverse Poly Blade The poly blade 4 can be reversed rotated upside down and reused to extend its life...

Page 29: ...help ensure that the Snow Pusher is ready for field use next time you hook up to it 1 Clean off any dirt that may have accumulated on the Snow Pusher Scrape off compacted dirt and then wash surfaces t...

Page 30: ...21 kW Operating weight of carrier 1 800 lbs 817 kg Lift capacity of carrier 800 lbs 363 kg at pivot pins Hitch type Fits Kubota BX front loader hitch with or without Kubota BX6315 Quick Hitch Skid sh...

Page 31: ...inforces side panels and back for a stronger unit 1 4 6 mm Formed back plate at blade mount Makes for a strong moldboard Replaceable skid shoes Protects the side panels from wear Options Accessories R...

Page 32: ...11 130 97 205 150 285 210 M16 X 1 5 155 115 240 180 335 245 5 8 18 150 110 230 170 325 240 M18 X 2 5 195 145 310 230 405 300 3 4 10 235 170 360 265 510 375 M18 X 1 5 220 165 350 260 485 355 3 4 16 260...

Page 33: ...operly maintain oil levels grease points and driveline shafts Claims under this Warranty should be made to the dealer which originally sold the product and all warranty adjustments must be made throug...

Page 34: ...Corporate Office P O Box 5060 Salina Kansas 67402 5060 USA www landpride com...

Reviews: