background image

15

TROUBLE

CAUSE

REMEDY

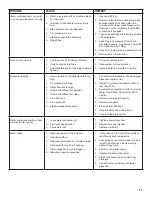
Water only dispensed; no syrup; 

or syrup only dispensed, no water

1. 

Water or syrup shutoff on mounting block 

not fully open.

2. 

Improper or inadequate water or syrup 

flow.

3.  BIB supply too far from dispenser.

4. 

CO

2

 pressure too low.

5.  Stalled or inoperative BIB pump
6.  Kinked line.

1. 

Open shutoff fully.

2.  Remove valve from mounting block, open 

shutoffs slightly and check water and 

syrup flow. If no flow, check dispenser for  

freeze-up or other problems. Ensure BIB 

connection is engaged. 

3.  Check that BIB supply is within six (6) feet 

of the dispenser.

4. 

Check the CO

2

 pressure to the pump 

manifold to ensure it is between 70 and 80 

Psi (0.483 and 0.552 MPa).

5.  Check CO

2

 pressure and/or replace pump.

6.  Remove kink or replace line.

Valve will not shut off.

1.  Cup lever may be sticking or binding.
2.  Switch not actuating freely.
3.  Solenoid armature not returning to bottom 

position.

1.  Correct or replace lever.
2.  Check switch for free actuation.
3.  Replace defective armature or spring.

Excessive foaming.

1.  Incoming water or syrup temperature too 

high.

2.  CO

2

 pressure too high.

3. 

Water flow rate too high.

4.  Nozzle and diffuser not installed.

5. 

Nozzle and diffuser not clean.

6.  Air in BIB lines.
7. 

Poor quality ice.

8.  High beverage temperature.

1.  Correct prior to dispenser. Consider larger 

dispenser or pre-cooler.

2.  Adjust CO

2

 pressure downward, but not 

less than 70 Psi.

3.  Re-adjust and reset ratio. Refer to “Adjust 

Water Flow Rate & Syrup/Water Ratio” 

Section.

4. 

Remove and reinstall properly.

5.  Remove and clean.
6.  Bleed air from BIB lines.
7. 

Check quality of ice used in drink.

8.  Check refrigeration system.

Water continually overflows from 

water bath into drip tray.

1.  Loose water connection(s).
2. 

Flare seal washer leaks.

3. 

Faulty water coil.

1.  Tighten water connections.
2. 

Replace flare seal washer.

3.  Replace water coil.

Warm drinks.

1.  Dispenser was recently installed.
2. 

Restricted airflow.

3.  Dispenser connected to hot water supply.

4. 

Condenser fan motor not working.

5.  Dirty condenser, air vents clogged.
6.  Dispenser capacity exceeded.

1.  It may take up to 5 hours, after install, to 

reach the desired temperature.

2.  Check clearances around sides, top, and 

inlet of unit. Remove objects blocking 

airflow through grill.

3.  Switch to cold water supply.

4. 

Replace condenser fan motor.

5.  Clean condenser and air vents of any 

blockage.

6.  Add pre-cooler or replace with larger 

dispenser.

Summary of Contents for Delta-600 R-290

Page 1: ...ved 9000 Lancer Corporation 6655 Lancer Blvd San Antonio Texas 78219 800 729 1500 Tech Support Warranty 800 729 1550 email custserv lancercorp com web lancercorp com Lancer PN 28 1002 01 01 Revision 0...

Page 2: ...Assembly 21 Control Housing Assembly 22 Wiring Diagram 23 Plumbing Diagram 24 SAFETY NOTICES READ ALL SAFETY INSTRUCTIONS BEFORE USING THIS UNIT This manual contains important safety information and...

Page 3: ...lectrical connections If this dispenser is installed in an area that is susceptible to more than 10 variation of the nominal line voltage consider installing a surge protector or similar protection de...

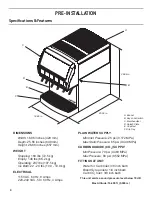
Page 4: ...9 kg ELECTRICAL 115 VAC 60 Hz 8 Amps 220 240 VAC 50 60 Hz 4 Amps PLAIN WATER SUPPLY Min Inlet Pressure 25 psi 0 172 MPa Max Static Pressure 65 psi 0 448 MPa CARBON DIOXIDE CO2 SUPPLY Min Pressure 70 p...

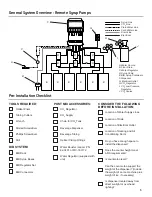
Page 5: ...p level Can the counter top support the weight of the dispenser Include the weight of an ice machine plus weight of ice if necessary Is dispenser located away from direct sunlight or overhead lighting...

Page 6: ...or damaged H WARNING Never energize the machine if there is any trace of damage Contact Lancer Customer Service for assistance H WARNING In order to facilitate proper dispenser drainage ensure that th...

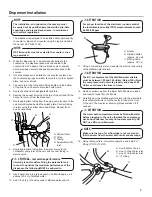
Page 7: ...the maximum performance of the dispenser the following MUST be adhered to CRITICAL to maximize performance 12 Remove yellow cap from the water bath fill hole and insert and insert a funnel into the fi...

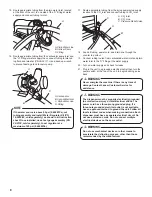
Page 8: ...connections Each dispenser must have a separate electrical circuit Do not use extension cords Do not connect multiple electrical devices on the same outlet WARNING Do not use mechanical devices or ot...

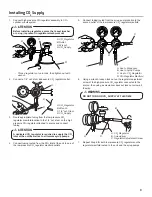
Page 9: ...cation to the 1 4 nut stem on the high pressure CO2 regulator attached to source and connect tubing DO NOT TURN ON CO2 SUPPLY AT THIS TIME WARNING 5 Connect tubing routed from the syrup pump location...

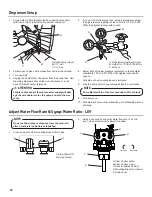
Page 10: ...he low pressure regulators on the regulator manifold to 75 Psi 0 517 MPa then tighten locknut with wrench 7 Activate each valve until gas out is achieved 8 Plug the Pump Motor Connector back into the...

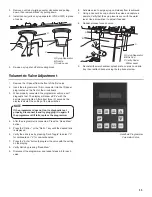
Page 11: ...diagnostic test properly disconnect it and try plugging it in again If the programmer still fails replace the programmer NOTE Handheld Programmer Volumetric Valve 1 Remove the ID panel from the front...

Page 12: ...d Instruction warnings on the product being used must be followed Use sanitary gloves when cleaning the unit and observe all applicable safety precautions DO NOT use a water jet to clean or sanitize t...

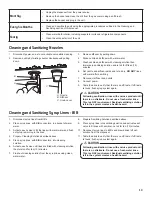
Page 13: ...ry DO NOT rinse with water after sanitizing 7 Reconnect diffuser and nozzle 8 Connect power 9 Taste the drink to verify that there is no off taste If off taste is found flush syrup system again Cleani...

Page 14: ...5 Bad syrup pump 1 Adjust CO2 pressure to 80 Psi 0 550 MPa minimum 70 Psi 0 480 MPa for BIB pumps 2 Replace CO2 tank refill 3 Open shutoff fully 4 Remove syrup flow control form upper body and clean...

Page 15: ...h 3 Water flow rate too high 4 Nozzle and diffuser not installed 5 Nozzle and diffuser not clean 6 Air in BIB lines 7 Poor quality ice 8 High beverage temperature 1 Correct prior to dispenser Consider...

Page 16: ...BIB connector is stopped up 3 Kinks in syrup line 4 Bad BIB Pumps 1 Tighten BIB connector 2 Clean out or replace BIB connector 3 Straighten or replace line 4 Replace BIB pump BIB pump fails to restart...

Page 17: ...spenser ON A green LED will be blinking every second upon startup 7 Observe time and check voltage of the PCB connections 8 Turn electrical power OFF for 15 seconds and then back ON again to reset Car...

Page 18: ...Assembly 04 12 0097 Key switch Assembly 05 51 6711 Wrapper Assembly 06 30 13199 Drip Tray Bracket Right 07 30 13200 Drip Tray Bracket Left 08 42 0215 Foam Tank Assembly 09 05 3711 Drip Tray 10 05 1585...

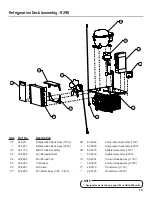
Page 19: ...ttom 04 30 5865 Fan Shroud Top 05 23 0985 Condenser 06 30 5867 Air Shield 07 52 3880 Fan Motor Assy 110V 240V 08 83 0082 Compressor Assembly 115V 83 0083 Compressor Assembly 230V 09 82 5215 Agitator A...

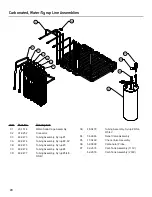
Page 20: ...Assembly Syrup 1 3A 48 0474 Tubing Assembly Syrup 2 6V 3B 48 0475 Tubing Assembly Syrup 3 3C 48 0476 Tubing Assembly Syrup 4 3D 48 0477 Tubing Assembly Syrup 5 4 3 6 5 4V 3E 48 0478 Tubing Assembly S...

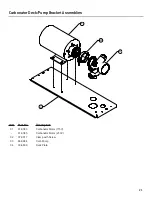
Page 21: ...1 02 03 Carbonator Deck Pump Bracket Assemblies Item Part No Description 01 91 0063 Carbonator Motor 115V 91 0065 Carbonator Motor 230V 02 07 0017 Clamp with Screw 03 86 0084 Carb Pump 04 30 6800 Deck...

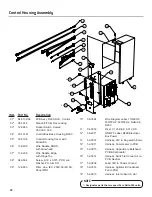
Page 22: ...Screw 8 18 x 0 375 PHD w o Washer PH AB SH 09 12 0653 Filter Line IEC 250V 50 60 6A Panel MNT 10 06 3584 Wire Diagram Label 115 60 HZ 230 50 HZ 220 60 Hz Delta 06 R290 11 04 0072 Rivet 0 125 Dia X 0...

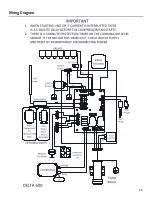
Page 23: ...23 Wiring Diagram...
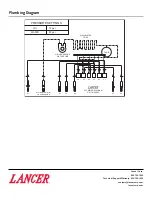
Page 24: ...729 1550 custserv lancercorp com lancercorp com Plumbing Diagram PLAIN WATER COILS CARB HIGH PRESSURE WATER PUMP V6 V5 V4 V3 V2 V1 S2 S1 S3 S4 S5 S6 PRESSURE SETTINGS CO 75 psi 50 psi WATER 2 PLAIN WA...

Reviews: