background image

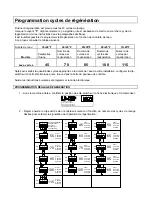
Setting of regeneration cycles                   


By default the regeneration  is planned every 45  washing cycles. 
When the 

“F”

 led winks slowly, it means it is necessary to start again the regeneration cycle (see the 

instructions in the apposite paragraph). 
However, it is possible to plan the Regeneration on the basis of water hardness. 
To do so, see the following table. 
 

Water hardness 

35÷40°F


30÷35°F


25÷30°F


20÷25°F


15÷20°F


Model 

Default  setting 

Number of 
cycles per 
regeneration 

Number of 
cycles per 
regeneration 

Number of 
cycles per 
regeneration 

Number of 
cycles per  
regeneration 

Glasswashers 

45 

70 

85 

100 

115 


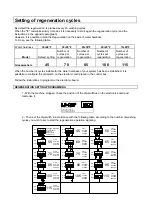
When the number of cycles suitable for the water hardness of your system has been established, it is 
possibile to configure the dip-switch on the electronic card placed in the control box. 
 
Follow the instructions to programme the electronic board. 
 

REGENERATION SETTING PROGRAMMING 

 
1 - With the machine stopped, check the position of the dip-switches on the electronic board and 
memorise it; 


1 2 3 4

CON ADDOLCITORE
AVEC ADOUCISSEUR
WITH WATER-SOFTENER
MIT REINIGUNGSAPPARAT


2  - Then set the dip-switch in accordance with the following table, according to the number of washing 
cycles you wish to set to start the regeneration operation signaling; 


1 2 3 4

ON

ON

O N

ON

ON

O N

ON

ON

O N

ON

ON

O N

ON

ON

O N

ON

Conteggio disabilitato
Compte inactif
Count-off
Nachzahlung
nicht Aktiviert

CICLI
CYCLES
CYCLES
ZYKLUS

CICLI
CYCLES
CYCLES
ZYKLUS

CICLI
CYCLES
CYCLES
ZYKLUS

CICLI
CYCLES
CYCLES
ZYKLUS

CICLI
CYCLES
CYCLES
ZYKLUS

CICLI
CYCLES
CYCLES
ZYKLUS

CICLI
CYCLES
CYCLES
ZYKLUS

CICLI
CYCLES
CYCLES
ZYKLUS

CICLI
CYCLES
CYCLES
ZYKLUS

CICLI
CYCLES
CYCLES
ZYKLUS

CICLI
CYCLES
CYCLES
ZYKLUS

CICLI
CYCLES
CYCLES
ZYKLUS

CICLI
CYCLES
CYCLES
ZYKLUS

CICLI
CYCLES
CYCLES
ZYKLUS

CICLI
CYCLES
CYCLES
ZYKLUS

55

45

50

70

60

65

85

75

80

100

90

95

115

105

110

OFF

O F F

OFF

OFF

O F F

OFF

OFF

O F F

OFF

OFF

O F F

OFF

OFF

O F F

OFF

OFF

1 2 3 4

1 2 3 4

1 2 3 4

1 2 3 4

1 2 3 4

1 2 3 4

1 2 3 4

1 2 3 4

1 2 3 4

1 2 3 4

1 2 3 4

1 2 3 4

1 2 3 4

1 2 3 4

1 2 3 4


Summary of Contents for S510

Page 1: ...dishwashing machines EN 292 2 1992 Part 1 PART 2 Sicurezza del macchinario Concetti fondamentali Principi generali progettazione Specifiche e principi tecnici Safety of machinery Basic concepts Genera...

Page 2: ......

Page 3: ...gnetic compatibility EMC Part 3 2 Limits Limits for harmonic current emissions equipment input current 16 A per phase EN 61000 3 2 2000 Compatibilit elettromagnetica EMC Parte 3 2 Limiti Limiti per le...

Page 4: ...rammation cycles de r g neration pag 37 Sch ma branchements pag 47 Sch ma r gulations pag 48 Sch ma lectrique pag 49 Composants pag 51 Donn es techniques pag 52 CONTENTS ENGLISH General norms pag 05 I...

Page 5: ...s le manuel y compris les recommandations et les suggestions Lisez aussi les conditions de vente y compris celles qui limitent la garantie GENERAL NORMS ENGLISH Thank You for purchasing our Glasswashi...

Page 6: ...di lesioni personali e danneggiamento della macchina Non tentare di spostare installare mettere a punto o azionare la macchina senza prima avere letto e pienamente compreso quanto contenuto nel manual...

Page 7: ...point ou actionner la machine avant d avoir lu et avoir pleinement compris le contenu du manuel En cas de doutes s adresser son sup rieur Ne jamais laisser d ustensiles objets ou autre mat riel sur la...

Page 8: ...the machine Do not attempt to move install set up or operate with this machine until you have read and fully understood this Manual If doubt persists ask your supervisor never leave tools parts or oth...

Page 9: ...hr f r Sie und andere Niemals versuchen die Maschine zu versetzen zu installieren einzustellen oder in Betrieb zu nehmen bevor man nicht das Handbuch gelesen und den Inhalt volist ndig verstanden hat...

Page 10: ...nzavasca R sistance cuve Tank Heating element Tankheizung Risciacquo inferiore rotante in acciaio inox cono 90 Rin age inf rieur rotatif en acier inoxydable c ne 90 Stainless steel Lower rotating rins...

Page 11: ...NORME PER L UTENTE INSTRUCTIONS POUR L UTILISATEUR INSTRUCTIONS FOR THE USER AUFSTELLUNGSANLEITUNG F R DEN BENUTZER...

Page 12: ...rucktaste Lampada linea Lampe indicatrice de ligne Main switch lamp Netzkontrollampe Lampada ciclo Lampe indicatrice de cycle Cycle lamp Programmkontrollampe Lampada temperatura Lampe temp rature Temp...

Page 13: ...e Stoviglie non devono sovrapporsi l acqua deve aver modo di poterle investire direttamente in ogni loro parte Per un corretto posizionamento delle stoviglie vedere il paragrafo specifico C Dare tensi...

Page 14: ...ne la mancanza di sale nel contenitore provoca danni alla macchina causati dal calcare oltre ad un lavaggio non perfetto dei bicchieri e delle stoviglie Tali danni non sono contemplati dalla garanzia...

Page 15: ...o danneggiare le parti elettriche Per evitare il formarsi di cattivi odori consigliabile lasciare lo sportello aperto In previsione di un fermo prolungato della macchina bene procedere alle operazioni...

Page 16: ...di prodotti adatti per la pulizia occorre infatti ricordare che regola essenziale quella di garantire la non tossicit e la massima igiene dei prodotti trattati Prima di usare qualsiasi tipo di deterg...

Page 17: ...graisses Ne pas entasser les paniers la vaisselle ne doit pas tre superpos e l eau doit avoir la possibilit de recouvrir la vaisselle directement de tous les c t s C Mettre la tension l interrupteur m...

Page 18: ...iquement achev e et la machine est de nouveau pr te l usage La signalation se produit implicitement apr s 45 cycles de lavage En fonction de la dur t de l eau il est toutefois possible de modifier la...

Page 19: ...ext rieur de la machine au moyen d une ponge humide ne pas utiliser de jets d eau car en autre d tre dangereux il pourraient endommager les composants lectriques Afin d viter la formation de mauvaises...

Page 20: ...ciaux pour le nettoyage et respecter simplement les conseils ci apr s ne jamais oublier que la premi re r gle fondamentale pour l emploi de ces appareils est de garantir l absence de toxicit et l hyg...

Page 21: ...one upon the other water must have the way to run on each part of the same C Turn the machine on by using the wall switch and push the switch A on the control panel DIS 1 The green lamp G lights up a...

Page 22: ...r the F lamp blinks quickly This operation is programmed to be performed every 10 regeneration cycles Unscrew the plug of the salt container at the bottom of the tank and put 1 kg coarse salt tablets...

Page 23: ...the machine by using a wet sponge don t use water jets because besides being dangerous they could damage the electrical parts don t use abrasive detergents When the machine is to remain idle for a lo...

Page 24: ...om reforming these substances corrode the stainless steel itself and can cause irreparable damage It is therefore necessary to prevent this by choosing correct cleaning products and by complying with...

Page 25: ...folgt Wenn die Tankf llung erfolgt hat die Lampe F leuchtet und zeigt das die Maschine f r der Waschung Zyklus fertig ist Bevor man der Zyklus wieder Starten la t kontrollieren Sie das die Lampe E ein...

Page 26: ...g der Dichtung den Deckel schlie en Nach dem der Salzbeh lter gef hlt ist durchf hren Sie die Aufbereitung durch nach o g Anweisungen Der Salzmangel im Beh lter verursacht Maschinensch den durch Kalba...

Page 27: ...es ratsam die G ratet r ge ffnet zu lassen 7 Wenn die Maschine vorraussichtlich f r l ngere Zeit nicht benutzt wird ist eine Entkalkung durchzuf hren DIE MASCHINE DARF NIE MIT EINEM WASSERSTRAHL GEREI...

Page 28: ...giene Vor der Verwendung jeglicher Art von Reinigungsmittel ist ber den gew hnlichen Lieferanten immer sicherzustellen da das geeignete Reinigungsmittel keine Korrosion am Edelstahl verursacht Die Kor...

Page 29: ...ur d cline toute responsabilit en cas d interventions effectu es par du personnel non qualifi INSTRUCTIONS FOR THE INSTALLER The following instructions are addressed to a qualified personnel the only...

Page 30: ...ettrica Branchement lectrique Electric input Netzanschlu Drain Ablauf 3 4 G 32 mm 1 1 4 G Dis 2 Scarico acqua Evacuation Eau L S E S E 535 555 330 300 50 50 555 A A Altezza massima per scarico a muro...

Page 31: ...ristiche adeguate all uso con l apparecchio Il fusibile dell Interruttore generale deve essere di 16A Per l allacciamento alla rete di alimentazione si dovr usare un cavo di alimentazione del tipo H07...

Page 32: ...versa I procedimenti basati su campi magnetici o radiazioni elettromagnetiche sono del tutto inutili per l uso specifico in Lavastoviglie CONDOTTO Provvedere a portare in prossimit della macchina una...

Page 33: ...a spenta controllare la posizione dei dip switch sulla scheda elettronica e memorizzarla 1 2 3 4 CON ADDOLCITORE AVECADOUCISSEUR WITH WATER SOFTENER MIT REINIGUNGSAPPARAT 2 Impostare poi il dip switch...

Page 34: ...la macchina agendo sull interruttore A 6 Attendere l accensione del led ciclo 2 7 Spegnere la macchina agendo sull interruttore A 8 Riconfigurare i dip switch secondo la posizione originale di program...

Page 35: ...faut utiliser un c ble d alimentation du type H07RN F qui en plus a une section nominale ad quate Pour un choix correct de la section nominale du c ble consulter le tableau suivant Surface Absorption...

Page 36: ...est conseill d utiliser seulement des adoucisseurs change ionique Osmose inverse les proc d s bas s aux champs lectriques ou aux radiations lectromagn tiques sont tout fait inutiles pour l usage en l...

Page 37: ...NERATION 1 Avec la machine arr t e contr ler la position des dip switch sur la fiche lectronique et la m moriser 1 2 3 4 CON ADDOLCITORE AVECADOUCISSEUR WITH WATER SOFTENER MIT REINIGUNGSAPPARAT 2 R g...

Page 38: ...ine en utilisant l interrupteur A 6 Attendre que la lampe du cycle 2 s allume 7 Arr ter la machine en utilisant l interrupteur A 8 Configurer nouveau les dip switch selon la position initiale de progr...

Page 39: ...tem must also be provided with a proper ground lead in accordance with the existings norms The electric cable must be of the following type H07RN F For the right choice of the cross section area refer...

Page 40: ...7 2 and 12 5 French If the hardness values are higher than those mentioned above it is advisable to install a water softener WORK TEMPERATURES Washing temperature 55 60 C Rinse temperature 80 85 C n b...

Page 41: ...k the position of the dip switches on the electronic board and memorise it 1 2 3 4 CON ADDOLCITORE AVECADOUCISSEUR WITH WATER SOFTENER MIT REINIGUNGSAPPARAT 2 Then set the dip switch in accordance wit...

Page 42: ...he machine ON by using the A switch 6 Wait for the lighting of the cycle 2 lamp 7 Turn the machine OFF by using the A switch 8 Reset the dip switches according to the original position of the washing...

Page 43: ...sprechen Querschnitt Nennstrom mm A 0 75 6 1 6 10 1 5 10 16 2 5 16 25 DAS GER T MU ORDNUNGSGEM GEERDET WERDEN DAS GER T IST IN EIN POTENTIONALAUSGLEICHSSYSTEM EINZUBEZIEHEN DER ANSCHLU BOLZEN BEFINDET...

Page 44: ...7 2 und 12 5 F Die Maschine ist mit dem mitgelieferten Schlauch 3 4 an die Wasserversorgung anzuschlie en Bei Stillstand Ger tes sollte die Wasserzufuhr durch einen Hahn gesperrt werden ARBEITSTEMPER...

Page 45: ...t ist Kontrollieren Sie die position der dip switch in Elektronische Tafeln und speichern Sie die 1 2 3 4 CON ADDOLCITORE AVECADOUCISSEUR WITH WATER SOFTENER MIT REINIGUNGSAPPARAT 2 Programmieren Sie...

Page 46: ...aschine anschalten mit Schalter A 6 Warten Sie auf die anschaltung von led Zyklus 2 7 Maschine ausschalten mit schalter A 8 Die dip switch wieder Programmieren nach original Position programmierung vo...

Page 47: ...ehen Sie den Schraubenzieher im Uhrzeigersinn Per aumentare la dose di detergente ruotare in senso orario la vite di regolazione To increase the detergent dose turn CW the regulation screw Portata pom...

Page 48: ...aid inlet Nachsp lmitteldosierger t SCHEMA REGOLAZIONI SCHEMA REGULATION REGULATION SCHEME EICHUNG A B LAVAGGIO LAVAGE WASH WASCHTEMPERATUR RISCIACQUO RIN AGE RINSE SP LEN A B 80 85 C Per aumentare la...

Page 49: ...lmitteldosierger t Waschmitteldosierger t timermotor Waschmitteldosierger t Timer Reinigungs timermotor Elektrisches Reinigungsventil Digitale Displayanzeige Sch ts f r Ablaufpumpe Ablaufpumpe Interr...

Page 50: ...N REGENRATION FUNCTION AUFARBEITUNGSAUFGABE 2 OFF ON 1 1 2 2 3 3 4 4 ON ON FUNZIONE CICLO FONCTION CYCLE CYCLE FUNCTION ABLAUFSAUFGABE CICLO MANUALE CYCLE MANUEL MANUAL CYCLE HANDABLAUF CICLOAUTOMATIC...

Page 51: ...MPONENTS COMPONENTI CASSETTA QUADRO COMANDO CONTROL BOARD BOITE DE CONTROLE SCHALTTAFEL BASAMENTO SOCLE BASE UNTERBAU CNP LB 2006 Ad CP LS2 LS4 LS Fc PC IN 1 3 2 LS5 PS CT3 SCHEDAELETTRONICA FICHE ELE...

Page 52: ......

Reviews: