background image

36 

The choice of a suitable cleansing agent is an 
essential condition if you want to obtain 
extremely good washing results as regards 
hygienic results. That’s why it’s  important to 
consider some points. First of all only highly 
alkaline and chlorine-active antifoam products, 
especially made for industrial dish-washing 
machines, must be used and they must be 
produced by well-known reliable Firms. Mean 
concentration of the cleansing agents in powder 
must be 1,5÷2,5 g/lt. Mean concentration of 
liquid cleansing agents must be 2÷4 g/lt. 
In order to avoid scales and corrosions, put 
cleansing agent above water level on the 
nearest area of the sucking pump filter, in this 
way it will immediately dilute and will not deposit 
on the tank bottom. 


ELECTRICAL CONNECTION OF DETERGENT 
DISPENSER 

(ONLY FOR MACHINES WITH INCORPORATED 
DETERGENT PUMP AND EXPANSION BOARD  


WARNING

Danger to life due to live 

components! 

During all electrical operations, disconnect the 

machine from the network and verify the 
absence of power. 

The machine and its accessories must be connected 

in accordance with local regulation, by a 
company that is specialized in electrical 
installation authorized by the competent 
authorities. 

 
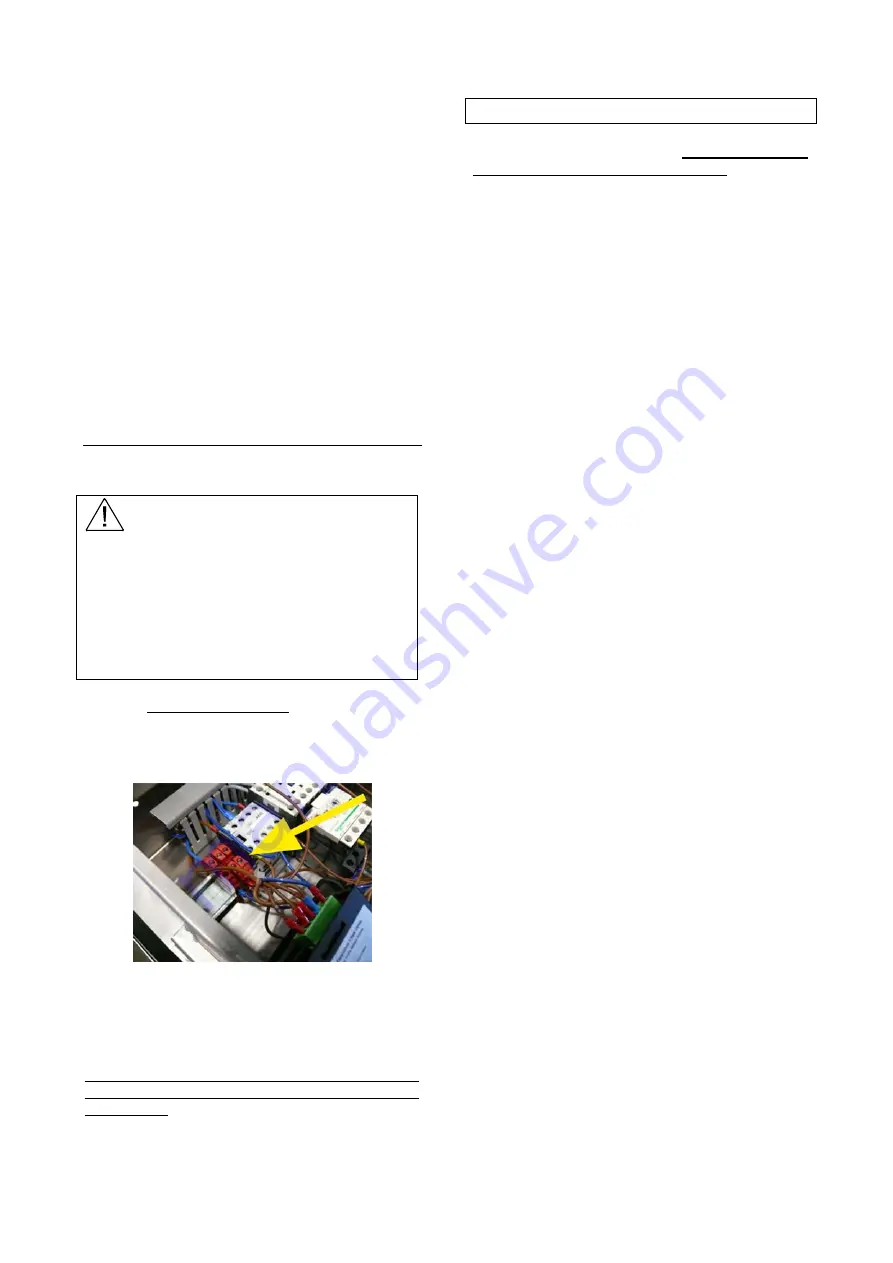
For the electrical connection of the dispenser, 
refer to the red terminals inside the electrical 
cabinet (see photo below) and refer to the wiring 
diagram sheet 3. 


To prevent damages to the electrical components 
of the machine is mandatory the  use of these 
terminals to avoid flying connections in other parts 
of the installation (valves, etc.)  
 

N.B. For the cables using the cable gland 
provided in the electrical control box and identified 
with a lebel.. 


DESCALING CYCLE :


For programming, see section  CONFIGURATION 
USER TECHNICAL-PROGRAMMING  


The descaling cycle has a duration of about 35 
minutes and takes place according to the steps 
listed below: 

  
1.  pump dispenser rinsing and descaling 

until the tank is full 

2.   heating phase until the boiler 

temperaturer >50°Cand tank> 45 °C 

3.   wash pumps for 1 minute 
4.    1 minute rest 
5.    wash pump for 1 minute 
6.    rinsing pump and limestone dosing for 

15 seconds 

7.   1 minute rest 
8.    wash pump for  1 minute 
9.    1 minute rest 
10.  wash pump for 1 minute 
11. rinsing  pump and limestone dosing for 

15 seconds 

12. 1 minute rest 
13.  wash pump for 1 miunute 
14.  1 minute rest 
15.  washing pump for 1 minute 
16.  rinsing pump  for 15 seconds  
17.  heating boiler off 
18.  1 minute rest 
19.  washing pump for 1 minute 
20.  1 minute rest 
21.  washing pump for 1 minute 
22.  rinsing pumps for 15 seconds 
23.  1 minute rest 
24.  drain pump until the tank is empty and 

for another 2 minutesi 

25.  rinsing pump up to full tank 
26.  washing pump for 5 seconds 
27.  drain  pump until the tank is empty and 

for another 2 minutes 


Summary of Contents for LP6-dy

Page 1: ...POT WASHER LP6 dy LP8 dy LP6 dy CVP S LP8 dy CVP S INSTRUCTIONS MANUAL R00 2017...

Page 2: ...2...

Page 3: ...ermal appliances for households and similar purposes electric tools and similar electric apparatus EN 55014 1 2006 A1 2009 A2 2011 Limits for harmonic current emissions equipment input current 16 A pe...

Page 4: ...or returned to the distributor against purchase of new equipment of similar type or having the same functions The directive mentioned above to which make reference for further details provides for pu...

Page 5: ...ly cleaning of the interior of the machine pag 20 Detergents rinse additives descaling sanitation pag 24 Inconveniences Possible causes remedies pag 25 Useful advices for the maintenance of stainless...

Page 6: ...in the manual recommendations and suggestions included Carefully read the terms of sale too even the ones limiting warranty This appliance in not intended for use by persons including children with r...

Page 7: ...ndicator in the OFF position the incoming cables are still live BEFORE starting the machine or the cycle after any maintenance or repair work make sure all protective are correctly installed be vigila...

Page 8: ...skin with insulation 14mm Tank with slanting bottom Autodraining washing pump Body tank and Top in Stainless steel construction Stainless steel Boiler with insulation Stainless steel Lower rotating ri...

Page 9: ...INSTRUCTIONS FOR THE USER...

Page 10: ...1 10 A C D E CONTROL PANEL Cycle pushbutton Wash time selection pushbutton Interactive display Programming pushbutton B Main switch F Temperature data display...

Page 11: ...nd dosage data for the use of chemicals During the use of the chemical substance wear protective clothing gloves and protective glasses Do not mix different cleaning products TURN ON THE MACHINE and o...

Page 12: ...rinsing In any case the rinse will start only in temperature regime reached The duration of the washing time chosen will then be continued until it reaches the set temperature Thermocontrol WASHING 3...

Page 13: ...ove the basket and tilting it shake it lightly to bring down the remaing drops Allow to dry the objets by evaporation then remove them from the basket taking care not to touch the inside edge of the s...

Page 14: ...off 2 Remove the overflow of the tank and wait until same is empty For machines equipped with drain pump see the instructions at the specific paragraph For machines without drain pump Visually check t...

Page 15: ...t the End of the drain 1 2 3 4 To make the cycle do the following operations 1 Punt the machine OFF by pressing the switch A led off 2 Remove the OVERFLOW from the tank 3 Press the B button for 3 seco...

Page 16: ...s to be removed to perform the selected operations self washing descaling or discharge of the tank Attention In case of machines with drain pump there is no Overflow The data will disappear automatica...

Page 17: ...the tank filling is not concluded the message TANK FILLING ALARM will be displayed accompanied by an acoustic alarm The dishwasher stops working Switch off the machine by pressing ON OFF pushbutton I...

Page 18: ...620 mm LP8 H max 620 mm CLEARANCE 700 700 H OBJETS POSITIONING To achieve optimal cleaning results make sure that objets are correctly stored inside the machine Warning Only use the baskets supplied w...

Page 19: ...g the floor be careful not to saturate the base of the machine in order to avoid a prolonged stagnation of water To clean the inside of the machine use a brush or a soft cloth To clean the machine do...

Page 20: ...s or damaged water pipes not rust proof Open the door of the machine Remove disc inox cod 0800902 ATTENTION Daily disassemble the upper rinse arm by working on the big ring nut like in the picture Uns...

Page 21: ...rt Clean the rinse arm Remove the frontal tank filter Clean the pump filter by means of a brush Wipe with a cloth the tank and check for any debris on the bottom Remove the overflow pipe Clean the was...

Page 22: ...their place Replace the s s disc cod 0800902 After insert the overflow in his place Replace the lower washing arm Screw the lower rinse arm Remove the frontal tank filter Make sure is correctly in hi...

Page 23: ...ike in the picture Control the wash arm is in his place Screw the upper rinse arm Completely close the door of the machine If there is an extended downtime it is advisable to leave the dooropen Check...

Page 24: ...ence of liquid in the tanks and set the dosages by the installer The mean concentration of liquid detergents should be of 2 4 g liters In order to avoid corrosion and scalling the placing of the deter...

Page 25: ...Hydraulic pressure lower than 1 bar 100 kPa Wait until the pressure is on or buy a booster pump The machine will not drain Drain hose obstructed Check and remove any obstruction The filter of the dra...

Page 26: ...nse abundantly SANIFICATION At least each 30 days it would be useful to do this operation which guarantees the complete hygienic conditions of the machine We suggest to contact your cleansing agent su...

Page 27: ...ype for exterior panelling upper tops tanks etc Comply with the following instructions when cleaning and servicing parts in stainless steel Ordinary daily maintenance Carefully and frequently clean th...

Page 28: ...28...

Page 29: ...he following instructions are addressed to a qualified personnel the only one authorised to carry out checks and repair if any The Manufacturer declines any responsibility in the case of interventions...

Page 30: ......

Page 31: ......

Page 32: ...32...

Page 33: ...t be 16 A The mains must be wired to be able to handle the current drawn by the machine The system must also be provided with a proper ground lead in accordance with the existings norms The electric c...

Page 34: ...ended to use only softeners to Ion Exchange or Reverse Osmosis The procedure based on magnetic field or electromagnetic radiation are completely useless for the specific use in dishsashers DUCT Provid...

Page 35: ...he button START the dispenser will start working till when you will release the button the message DISPENSER FILLING will be displayed DETERGENT DISPENSER INSTALLATION AND CONNECTION OF THE DETERGENT...

Page 36: ...r to the red terminals inside the electrical cabinet see photo below and refer to the wiring diagram sheet 3 To prevent damages to the electrical components of the machine is mandatory the use of thes...

Page 37: ...s working Switch off the machine by pressing ON OFF pushbutton Check if there is water inside the network or that the water feeding hose is not twisted or chocked Check the inlet solenoid valve CHECK...

Page 38: ...and the detergent pump with water once a month Failure to comply with these guidelines will render this guarantee invalid Lamber disclaims any liability for consequential damage on the product You ca...

Page 39: ...while the machine is ON Select the washing Select the washing program Key while the machine is ON START Washing Program Key B while the machine is ON USER SET UP Button for 5 seconds while the machin...

Page 40: ...P3 viewing g P4 For temperatures back and after and fixed for the entire cycle Temperature Cycles of washing press Washing P1 push button 22 70 C P2 P3 for 3 seconds P4 back back back Washing P1 To m...

Page 41: ...ge YES To confirm Drain pumpe NO Drain time 0 60 To confirm end cycle end cycle Water dump and fill 0 50 Intervallo cicli To confirm cambio acqua Aspirator YES To confirm NO With NO the aspirator time...

Page 42: ...neration YES To confirm Water softener NO Filling time Drain time To confirm regeneration 30 90 Cycle number Number of cycles To confirm regeneration 0 15 With 0 the regenerating is enabled Economy th...

Page 43: ...TWIN NO standard To confirm Name machine A name machine 1 B name machine 2 Key sound YES To confirm NO NO Exit At the end of the programming operations the machine turns off Press push button A...

Page 44: ...COL L25 EK display 2014 4 1 2 3 2 1 3 4 2 1 3 4 4 1 2 3 CONNECTIONS SCHEME BOILER Elements Brown Brown Black Black Black Black Staples Staples TANK Elements...

Page 45: ...01 02 2017 15 06 39...

Page 46: ...01 02 2017 15 06 40...

Page 47: ...01 02 2017 15 06 40...

Page 48: ...01 02 2017 15 06 40...

Page 49: ...R M A T O R E T R A S F O R M A T O R E ON ON 1 2 4 3 1 10 A B cod 0300842 S3 S4 EH1 P1 M1 M2 YV1 EH2 MS1 optional LP6 dy LP8 dy PT850 dy Cnp LP6 LP8 PT850 dy display 2017 L1 L2 YP1 M3 COMPONENTS MEM...

Page 50: ...G electric 12000 12000 W steam 26 4000 26 4000 kg W MAX CURRENT INTENSITY 20 20 A 110 110 Lt SPECIFICATIONS FRONTAL POT WASHING MACHINES TANK CAPACITY 110 110 Lt BOILER CAPACITY 8 8 Lt WATER CONNECTIO...

Page 51: ......

Page 52: ......

Reviews: