INSTRUCTION BOOKLET
Model: 71075
SPACE SAVER BLENDER
J19704_SpaceSaverBlender.indd 1
03/11/2015 10:48
Page 1: ...INSTRUCTION BOOKLET Model 71075 SPACE SAVER BLENDER J19704_SpaceSaverBlender indd 1 03 11 2015 10 48 ...
Page 2: ...on the base and take up to 30 less space in your cupboard Here at Lakeland our award winning family owned business still offers the same excellent quality value for money and exceptional customer service as when we founded the company back in the 1960s Our products are hand picked and thoroughly tested so you can be sure that everything you purchase will be a pleasure to use for many years to come...
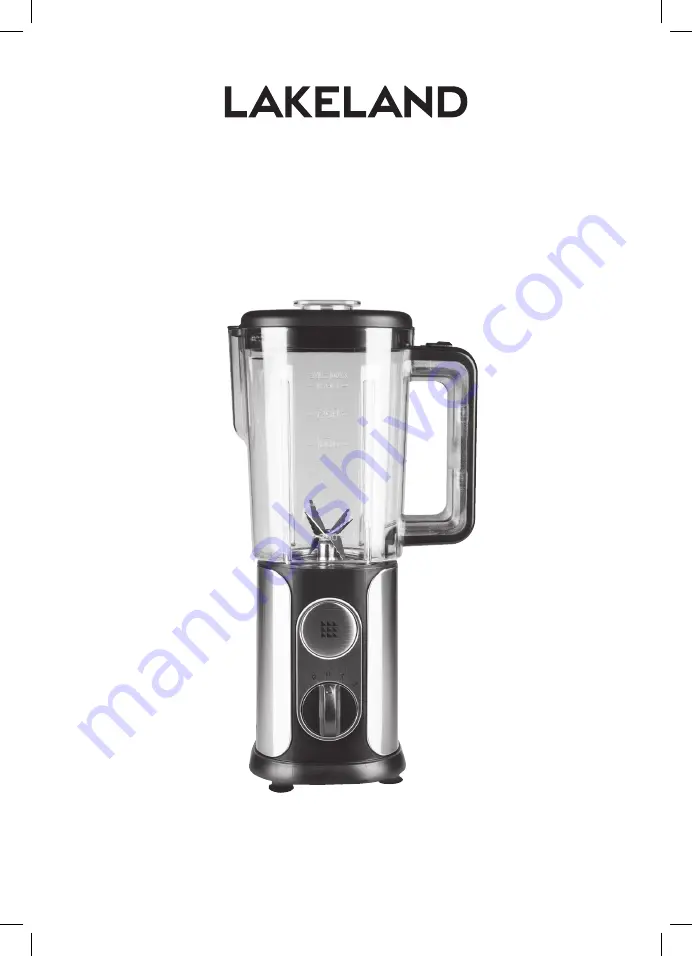
Page 3: ...EATURES 1 Measuring cup 2 Lid 3 Lid release button 4 Blender jug 5 Sealing ring 6 Blades 7 Blade base 8 Motor base unit 9 Dial 10 Non slip feet 1 5 6 7 8 9 10 3 2 4 J19704_SpaceSaverBlender indd 3 03 11 2015 10 48 ...
Page 4: ...f damage Do not use if damaged or has been dropped In the event of damage or if the appliance develops a fault contact the Lakeland customer care team on 015394 88100 Do not use this appliance if the lead is damaged If the lead is damaged it must be replaced with a special lead Contact the Lakeland customer care team on 015394 88100 Always use the appliance on a dry level heat resistant surface Un...
Page 5: ...ot lift or move the appliance while it is switched on or leave the blender unattended Do not operate the blender empty Always ensure the blender is filled with a minimum of 500ml of liquid or food Do not blend more than the maximum capacity 1500ml of liquid and 500g of food Do not use the blender for hot liquids and foods excess pressure may build up inside the blender and this could cause the lid...
Page 6: ...bling the product The silicone ring must be fitted over the blade The blade sits inside the blade base These then screw into the base of the jug Turn the jug upside down so you are looking at the base The blade base has three notches on the outside Two of these need to be in line with the notches either side of the handle on the blender jug Sit the blender jug onto the base with the handle towards...
Page 7: ... ensure the blender is filled with a minimum of 500ml of liquid or food The maximum amount of food is 500g and the maximum amount of liquid is 1500ml DO NOT use the blender for hot liquids and excess foods pressure may build up inside the blender and this could cause the lid come off and the contents to splash out Allow hot food and liquids to cool to room temperature before blending Turn the dial...
Page 8: ...heavy dough If making breadcrumbs or processing herbs make sure the blender jug and blade are completely dry Use a spatula to redistribute ingredients in the blender jug NEVER use metal utensils as these may damage the jug or blade DO NOT over process most foods will blend in just a few seconds When blending ice the maximum amount you should blend is 150g of ice cubes Wait 5 minutes when you ve re...
Page 9: ... and 1 tbsp is 15ml We recommend using measuring spoons for accurate results Ingredients Quantity Honeydew or water melon peeled seeded and chopped into chunks melon Raspberries frozen or fresh 15 Fruit juice apple or orange juice work well 200ml Vanilla yoghurt 100ml Mint leaves 2 3 WHAT YOU DO In a blender mix together the melon raspberries fruit juice vanilla yoghurt and mint leaves Turn the di...
Page 10: ...pe banana peeled and broken into chunks 1 WHAT YOU DO Before crushing the ice and frozen mango chunks take them out of the freezer and allow to rest for a few minutes Put the ice into the blender with the coconut water and using the P function mix until the ice is crushed you may need to turn off the blender and give the crushed ice a stir to ensure the cubes are evenly crushed as quickly as possi...
Page 11: ...ay need to blend in smaller batches Question My mixture is not blending evenly Answer The ingredients you are processing may be too big or you are trying to process too large a quantity of ingredients at the same time Ensure the ingredients are cut into smaller pieces before blending Question Food is sticking to the side of the blender Answer The mixture may be too thick Switch off the blender and...
Page 12: ...thoroughly before storing The removable parts can be washed in hot soapy water Rinse and dry thoroughly before storing Do not wash any parts in the dishwasher You can half fill the jug with warm soapy water Fit the jug back into the motor base and with the lid in place let the unit run on LOW speed until the jug is clean CAUTION The blades inside the jug are very sharp Take care when cleaning Stor...
Page 13: ...ing the terminals in your plug proceed as follows The wire which is coloured blue MUST be connected to the terminal which is marked with the letter N Neutral The wire which is coloured brown MUST be connected to the terminal which is marked with the letter L Live Before refitting the plug cover check that there are no cut or stray strands of wire inside If you are at all unsure which plug or fuse ...
Page 14: ...14 J19704_SpaceSaverBlender indd 14 03 11 2015 10 48 ...
Page 15: ...GEBRAUCHSANWEISUNG Modell 71514 PLATZSPARENDER MIXER J19704_SpaceSaverBlender indd 15 03 11 2015 10 48 ...
Page 16: ...zwei Maßeinheiten und der 20 ml Messbecher im Deckel lassen sich im Fußteil verstauen und nehmen bis zu 30 weniger Platz im Küchenschrank ein Unser mehrfach ausgezeichneter Familienbetrieb legt heute genauso viel Wert auf ein Höchstmaß an Qualität ein gutes Preis Leistungs Verhältnis und einen hervorragenden Kundenservice wie damals in den 1960er Jahren als Lakeland gegründet wurde Unsere Artikel ...
Page 17: ...MERKMALE 1 Messbecher 2 Deckel 3 Deckelentriegelung 4 Mixbehälter 5 Dichtring 6 Klingen 7 Mixwerk 8 Motorunterbau 9 Drehregler 10 Rutschfeste Füße 1 5 6 7 8 9 10 3 2 4 J19704_SpaceSaverBlender indd 17 03 11 2015 10 48 ...
Page 18: ...n vom Gerät Vergewissern Sie sich stets vor Gebrauch des Geräts dass es keine erkennbaren Schäden aufweist Verwenden Sie das Produkt nicht falls es Schäden aufweist oder versehentlich fallen gelassen wurde Wenden Sie sich im Falle von Schäden oder Defekten am Gerät an den Kundenservice von Lakeland unter der Rufnummer 0800 444 1500 Verwenden Sie das Produkt nicht falls das Netzkabel beschädigt ist...
Page 19: ...Erstickungsgefahr besteht Diese Verpackungsmaterialien sind kein Spielzeug Stellen Sie das Gerät nicht auf oder in der Nähe eines heißen Gas oder Elektroherds auf Heben Sie das Gerät nicht an und bewegen Sie es nicht während es eingeschaltet ist Lassen Sie den Mixer nicht unbeaufsichtigt Lassen Sie den Mixer nicht leer laufen Vergewissern Sie sich stets dass der Mixer mindestens mit 500 ml Flüssig...
Page 20: ... müssen sauber und trocken sein bevor Sie das Produkt montieren Der Silikonring muss über die Klinge gezogen werden Die Klinge sitzt im Mixwerk Welches dann in den Fuß des Mixbehälters geschraubt wird Drehen Sie den Behälter um sodass Sie den Behälterboden sehen Das Mixwerk hat außen drei Kerben Zwei davon müssen an den Kerben an beiden Seiten des Griffs des Mixbehälters ausgerichtet werden Setzen...
Page 21: ... Regler auf 0 AUS OFF steht Stecken Sie den Netzstecker in die Steckdose Füllen Sie die Flüssigkeit bzw Verwenden Sie den Mixer nicht ohne ihn vorher mit Zutaten bzw Flüssigkeiten zu füllen Vergewissern Sie sich stets dass der Mixer mindestens mit 500 ml Flüssigkeit bzw 500 g Zutaten gefüllt ist Die Zutaten in den Mixbehälter Sie können höchstens 500 g Zutaten bzw 1500 ml Flüssigkeit in den Behält...
Page 22: ... bilden Lassen Sie sie etwas antauen und zerteilen Sie sie vor dem Mixen in kleinere Stücke Verwenden Sie den Mixer NICHT zum Pürieren von Kartoffeln oder zum Kneten von festem Teig Vergewissern Sie sich dass der Mixbehälter und die Klinge trocken sind wenn Sie Semmelmehl zubereiten oder Kräuter verarbeiten möchten Verteilen Sie die Zutaten mit einem Spatel im Mixbehälter neu Verwenden Sie niemals...
Page 23: ...n blockieren Möglicherweise müssen Sie kleinere Portionen mixen Frage Die Mixtur hat keine gleichmäßige Konsistenz Antwort Ihre Zutaten sind möglicherweise zu groß oder Sie versuchen zu viele Zutaten gleichzeitig zu mixen Schneiden Sie die Zutaten in kleinere Stücke bevor Sie sie in den Mixer füllen Frage Die Zutaten haften an einer Seite des Mixers Antwort Möglicherweise ist die Mixtur zu dick Sc...
Page 24: ... Gerät verstauen Die abnehmbaren Teile können in heißem Seifenwasser abgewaschen werden Waschen und trocknen Sie sie vor dem Verstauen gründlich ab Die Teile sind nicht spülmaschinenfest Sie können den Mixbehälter zur Hälfte mit warmem Seifenwasser füllen Setzen Sie den Behälter wieder in den Motorunterbau und schließen Sie den Deckel Lassen Sie das Gerät mit niedriger LOW Geschwindigkeit laufen b...
Page 25: ...25 J19704_SpaceSaverBlender indd 25 03 11 2015 10 48 ...
Page 26: ...26 J19704_SpaceSaverBlender indd 26 03 11 2015 10 48 ...
Page 27: ...27 J19704_SpaceSaverBlender indd 27 03 11 2015 10 48 ...
Page 28: ...28 Lakeland Alexandra Buildings Windermere Cumbria UK LA23 1BQ Tel 44 0 15394 88100 www lakeland co uk Tel 0800 444 1500 www lakeland de D J19704_SpaceSaverBlender indd 28 03 11 2015 10 48 ...