background image


Copyright © 2021 Laia · www.laiatech.com       

42        


All rights reserved 


Parameter 

Description 

Enable PoP 

Choose whether to enable the paint side layout, if not enabled, all 
the layouts of the draw side type will not be displayed. 


Enable PiP 

Choose whether to enable the PiP layout. If not enabled, all PIP-
type layouts will not be displayed. 


Enable Side by Side 

Choose whether to enable equal size layouts. If not enabled, all 
layouts of the same size type will not be displayed. 


Layout when idle with 
presentation 

Select the layout when there is an auxiliary stream state, and the 
terminal will automatically switch to the layout when it enters this 
state. 


Layout  when  meeting 
without presention 

Select the layout when the conference has no auxiliary stream state, 
and the terminal will automatically switch to the layout when it enters 
this state. 


Layout when meeting with 
presention 

Select the layout when the conference has the auxiliary stream state, 
and the terminal will automatically switch to the layout when entering 
the state. 


Layout 

when 

host 

embedded MCU meeting 

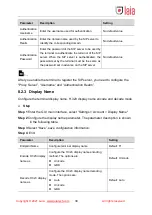
When the built-in multi-point no-auxiliary state is selected, the 
terminal will automatically switch to the layout when it enters this 
state. 

Layout when host 
embedded MCU meeting 
with presentation 

Select the layout when the built-in multipoint has the auxiliary stream 
state, and the terminal will automatically switch to the layout when it 
enters this state. 


In addition to pre-configuring the layout, you can also switch layouts in a 

meeting in two ways: 


Method 1 

Switch the HDMI-1/SDI screen layout by pressing the display button  


on the 

remote control. 


Method 2 

HDMI-1/SDI and HDMI-2 screens can be selected by selecting "Control > Video 

Layout" on the GUI main interface. 

8.6  Security 

To prevent the loss and tampering of data content during communication, you can set 

up encryption for communications. 

Summary of Contents for TP-100

Page 1: ...without the permission of the company Product specifications and information which were referred to in this document are for reference only We may change delete or update any content at any time and...

Page 2: ...7 5 Call History 18 5 1 View All Call History 18 5 2 View Call In History 18 5 3 View Call Out History 18 5 4 Delete All Call History 18 6 Diagnostic 19 6 1 Call Information 19 6 2 Local Audio Loopbac...

Page 3: ...8 8 5 1 Video Output 38 8 5 2 Video Codecs 40 8 5 3 HDMI 1 SDI HDMI 2 Layout 41 8 6 Security 42 8 6 1 System Security 43 8 6 2 H323 Cryptos 43 8 6 3 SIP Cryptos 44 8 7 Protocol 44 8 7 1 H323 44 8 7 2...

Page 4: ...oubleshooting 55 10 Product Specifications 58 10 1 Physical Specification 58 10 2 Performance Specification 58 10 3 Interface Definition 59 10 4 Protocol Support 60 11 Remote Control 61 12 Terminology...

Page 5: ...and management Terminal system routine maintenance Terminal system exception handling Ordinary user terminal usage question and answer 1 2 Administrator Requirements Mastering the necessary basic kno...

Page 6: ...pment In the process of storing transporting and using equipment it is necessary to avoid violent collisions Do not disassemble the device by yourself If the device is faulty please contact the manufa...

Page 7: ...p etc in order to prevent the human body from damaging the sensitive components you must wear an anti static wrist strap and ground the other end of the anti static wriststrap Please use the accessori...

Page 8: ...deo cable audio cable network cable and serial cable to prevent the device from being damaged by lightning When not using the device for a long time disconnect the power supply and unplug all the cabl...

Page 9: ...ace Call Call Protocol Call Rate Contacts Local Contacts Network Contacts History All Call in Call out Delete all Diagnostic Call information Local audio loopback Video Input System information Contro...

Page 10: ...m Network IPv4 Work mode DHCP Static IP IPv6 Enable IPv6 DHCP AutoConf Static IP Firewall TCP Port Range UDP Port Range NAT keep alive time Enable H 460 for NAT traversal of H 323 calls Enable fixed t...

Page 11: ...de Transfer Protocol Proxy Server Username Authentication Username Authentication Realm Authentication Password Display Name Endpoint Name Encode H 323 display name as Decode H 323 display name as Tab...

Page 12: ...icense EMCU license status Enable EMCU Conference mode Table 2 5 Audio Page Structure Diagram Audio Audio Input Input Volume Enable Microphone 1 Microphone digital gain Enable Microphone 2 Microphone...

Page 13: ...l from Output of Line Out right channel from Echo Cancel Enable echo cancellation on microphone Enable echo cancellation on microphone 2 Enable echo cancellation on line in Enable echo cancellation on...

Page 14: ...o Protocol HDMI 1 SDI Layout Auto start preview when presentation has signal Show presentation Enable PoP Enable PiP Enable Side by Side Layout when idle with presentation Layout when meeting without...

Page 15: ...tructure Diagram Protocol H323 Enable call IP address when registered Enable H 245 tunneling Enable H 239 control H 239 Video Role Send DTMF as SIP Send DTMF as Keep alive mode Keep alive interval Ena...

Page 16: ...deo Bit rate Record mode Table 2 10 Subtitles Page Structure Diagram Subtitles Endpoint Name Name option Font string Font color Background color Message Font size Font color Background Enter short mes...

Page 17: ...ry settings Table 2 12 Other Page Structure Diagram Other Upgrade Enable upgrade Enable check new version on startup Force upgrade Select upgrade mode Http upgrade URL Check new version right now Powe...

Page 18: ...ote meeting in the following ways Select the remote site to be called from the recent call in the center of the call interface If the site to be called is not in the recent call you need to manually f...

Page 19: ...Step 4 End 3 3 Send Dual Streams You can connect your computer to a terminal to display what is stored on your computer When you share content on your computer the remote site can see you and see wha...

Page 20: ...ntact field Step 4 Enter the meeting number or IP address to be added in the Address field Step 5 Select the meeting site grouping in the Groups drop down list box Step 6 Select the appropriate Call P...

Page 21: ...hts reserved Step 6 Select OK Step 7 End 4 3 Delete Contact You can delete a meeting in the contacts page Step Step 1 Enter the GUI main interface select Contacts Step 2 Select the item to be deleted...

Page 22: ...all call history Step 3 End 5 2 View Call In History Step Step 1 Enter the GUI main interface select History Call In Step 2 View call In history Step 3 End 5 3 View Call Out History Step Step 1 Enter...

Page 23: ...w to understand Whether to Encrypt Enable or disable encryption Call Bandwidth Actual call bandwidth after negotiation Audio Protocol The actual audio protocol after the capability negotiation Audio R...

Page 24: ...ber of frames displayed by the secondary video per second This value changes dynamically according to the current network environment Shake The degree of change in network latency Packet Loss Rate Net...

Page 25: ...d image zoom to get the video you want Precondition Knowing the shortcut button icon of the camera control page in advance can effectively guide you to control the camera The shortcut icon of the remo...

Page 26: ...elect Control Camera Control Preset Position Set Step 3 Select the preset position to be set and press the remote control confirm button to set it as the preset position Step 4 End Call Camera Preset...

Page 27: ...e recording and playback and choose whether to enable USB recording remote recording or RTMP 7 4 Main Video Source Control the main video source select HDMI SDI or DVI as the main video source and the...

Page 28: ...ch as IP address gateway and subnet mask etc Step 3 Select Save save configuration information Step 4 End Parameter Description Setting Work Mode Configure the network working mode the options are Aut...

Page 29: ...ter the GUI main interface select Settings Network Firewall Step 2 Configure firewall parameters The parameters are described in the following table Step 3 Select Save save configuration information S...

Page 30: ...you need to set up the router at the same time Step Step 1 Disable the ALG function in the router Step 2 It is set in the router to expose the terminal to the external network and map the terminal s T...

Page 31: ...main interface select Settings Network VPN Step 2 Configure VPN parameter information The parameters are described in the following table Step 3 Select Save save configuration information Step 4 End P...

Page 32: ...the terminal is successfully registered to the GK server you can call other terminals through the remote meeting number Disable The terminal does not register with the GK server When calling with the...

Page 33: ...for SIP registration ZijingCloud You need to enter the username and site password of ZijingCloud Default Manual Register SIP Enable or disable register SIP function the options are Enable The termina...

Page 34: ...enable the terminal to register the SIP server you need to configure the Proxy Server Username and Authentication Realm 8 2 3 Display Name Configure the terminal display name H 323 display name encod...

Page 35: ...isable automatically answer incoming calls When a call is received a request window is popped up to prompt the user to accept the request Enable automatically answer incoming calls When the local site...

Page 36: ...h limit Regardless of the call rate the actual receive rate does not exceed the receive bandwidth Default 8000 kbps Presentation bandwidth percent The proportion of bandwidth allocated for the seconda...

Page 37: ...ected to the microphone the remote end can receive the microphone input of the local end Default Enable Microphone digital gain Adjust the microphone 1 digital gain Default 8 Enable Microphone 2 After...

Page 38: ...o output parameter information The parameter description is shown in the following table Step 3 Select Save save configuration information Step 4 End Parameter Description Setting Audio output digital...

Page 39: ...Both channels Default Both channels Output of HDMI 1 left channel from Optional Left channel Right channel Both channels and when the value is the same as the Mix microphone into the HDMI 1 left chan...

Page 40: ...hannel The output interface configured to output left channel right channel will simultaneously output stereo left and right channels Even if stereo is enabled in the case of mono codec all inputs are...

Page 41: ...Save save configuration information Step 4 End Parameter Description Setting Show advanced settings Enable or disable display advanced settings Default Disable Enable USB audio in After the USB audio...

Page 42: ...l can establish a voice call The terminal currently supports audio protocols such as G 722 1C AAC LC SILK G 722 G 711 G 711 A G 726 and G 722 1 In the case where both parties support G722 1C G722 1C i...

Page 43: ...UT1 MODE Select HDMI 1 mode the options are DVI HDMI Default HDMI The video output system supports the following seven types and you can select one of the output modes as needed 1080P60 HDMI OUT1 1080...

Page 44: ...Option items 0 6 HDMI 1 vertical Option items 0 6 Enable HDMI 2 OverScan Set Choose whether to enable HDMI 2 overscan Display devices may have varying degrees of overscan causing images and interfaces...

Page 45: ...condition There are at least two or more image sources of the local primary video the local secondary video the remote primary video or the remote dual stream Step Step 1 Enter the GUI main interface...

Page 46: ...te Layout when meeting with presention Select the layout when the conference has the auxiliary stream state and the terminal will automatically switch to the layout when entering the state Layout when...

Page 47: ...terminal WEB interface through HTTP and HTTPS The HTTP and HTTPS access user names are fixed to admin Default admin Enable SSH Service The SSH protocol encrypts the data transmission between the two p...

Page 48: ...ation information Step 4 End Parameter Description Setting SRTP AES 128 SHA1 80 Select whether to enable SRTP AES 128 SHA1 80 Default Enable Clear Text Select whether to enable Clear Text Default Enab...

Page 49: ...39 Presentation Role Default Force Presentation Role H 239 Send DTMF as Choose which type to send DTMF to the options are String Tone RFC2833 Q 931 In Band Default RFC2833 8 7 2 SIP Step Step 1 Enter...

Page 50: ...ener port Configure UDP listener port Default 5060 Enable TCP listener Select whether to enable TCP listener Default Enable TCP listener port Configure TCP listener port Default 5060 8 7 3 E1 optional...

Page 51: ...e recording server USB recording is the terminal to store the recorded content on the local USB flash drive Because the terminal recording resources are limited remote recording and USB recording cann...

Page 52: ...ll be automatically opened to deliver the recorded content to the remote recording server The recording willbe automatically terminated after theconference without additional intervention Default Disa...

Page 53: ...x browsers It can also support downloading recorded files to a local computer and playing them through the player To use the USB recording and playback function you need to bring your own USB flash dr...

Page 54: ...Be careful not to directly pull out the USB flash drive without turning off the USB recording and playback so as to avoid recording file corruption and Damage to the USB flash drive 8 9 Subtitles In...

Page 55: ...e Default Disable Set time Set the time to take effect when disable Automatic date time Default Disable NTP Server Set the NTP time server Default Enable Select time zone Select the time zone of your...

Page 56: ...ion information Step 9 End You can choose Back to return to modify the configuration or you can choose Exit to abandon the setup wizard 8 10 3 Reset You can choose whether to reset the terminal to fac...

Page 57: ...Select Settings Other Upgrade check Enable upgrade Step 3 Select Upgrade from USB storage in the Select upgrade mode and then select Save Step 4 Place the upgrade file in the root directory of the US...

Page 58: ...nal power select whether the conference terminal automatically stands by the caller automatically wakes up the timer is turned on and off and it runs automatically after power on 8 11 3 Logging In the...

Page 59: ...0P60 output system Solution 1 Turn on the display device 2 Tighten the video output cable that connects terminal to the displaydevice 3 Select Settings Video Video Output and switch the video outputfo...

Page 60: ...crophone or line in input 2 Select Diagnostic Local audio loopback and enable Local Audio loopback test to test if the local audio device is normal 3 Select Settings Audio Audio Input Line in digital...

Page 61: ...echo cancellation on microphone or enable echo cancellation on line in Problem 7 After the terminal is on there is no sound in the local amplification Possible Reason The audio output does not contai...

Page 62: ...and foot pads Net Weight 6 4kg 10 2 Performance Specification Parameter Specification Call Bandwidth 64kbps 8Mbps Active Image Resolution 1080p Minimum bandwidth 1024Kpbs 720p Minimum bandwidth 512Kb...

Page 63: ...r SDI HD input USB Interface 2 x USB2 0 USB device for connect mouse or USB flash drive USB audio input and output Video Output Interface 2 x HDMI OUT HDMI OUT 1 is the main output interface including...

Page 64: ...l ITU T H 323 IETF SIP Dual Stream Protocol ITU T H 239 BFCP Network Transmission Protocol TCP IP DHCP SSH HTTP HTTPS with SSL TLS RTP RTCP RFC3261 RFC3264 RFC2190 RFC3407 RFC2833 RFC4585 RTP AVPF SNT...

Page 65: ...Copyright 2021 Laia www laiatech com 61 All rights reserved 11 Remote Control...

Page 66: ...tandard adopted by the US federal government that replaces DES The advanced encryption standard is intended to perform an unclassified publicly available symmetric encryption algorithm The cipher bloc...

Page 67: ...to complete the DNS is the server for domain name resolution DVI Digital Visual Interface When a device in the network is overloaded or cannot receive data again at a specified time data packet disca...

Page 68: ...ee the RFC2616 protocol for details HTTPS Hypertext Transfer Protocol Secure The HTTP protocol running on the TLS Transport Layer Security or SSL Secure Sockets Layer protocol Used to establish an inf...

Page 69: ...Ns are typically built on switched Ethernet or Wi Fi technology running at 1000 Mb s ie 1Gb s N NAT Network Address Translation A standard for the Internet Engineering Task Force It allows an organiza...

Page 70: ...channels to be established between local and remote computers When users log in remotely through a network environment that cannot guarantee security the SSH feature can provide secure information pr...

Page 71: ...ly begin with http such as http www microsoft com and can include details such as the name of a hypertext page the extension is usually html or htm USB Universal Serial Bus Standard for serial buses w...

Reviews: