background image

Limited Warranty


New machines and accessories sold by Laguna Tools carry a one-year warranty 
effective from the date of shipping. Machines sold through dealers must be registered 
with Laguna Tools within 30 days of purchase to be covered by this warranty. Laguna 
Tools guarantees all new machines and accessories sold to be free of manufacturers’ 
defective workmanship, parts and materials. We will repair or replace, without charge, 
any parts determined by Laguna Tools, Inc. to be a manufacturer’s defect. We require 
that the defective item/part be returned to Laguna Tools with the complaint. Any 
machines returned to Laguna Tools must be returned with packaging in the same 
manner in which it was received. If a part or blade is being returned it must have 
adequate packaging to ensure no damage is received during shipping. In the event the 
item/part is determined to be damaged due to lack of maintenance, cleaning or 
misuse/abuse, the customer will be responsible for the cost to replace the item/part, 
plus all related shipping charges. This limited warranty does not apply to natural 
disasters, acts of terrorism, normal wear and tear, product failure due to lack of 
maintenance or cleaning, damage caused by accident, neglect, lack of or inadequate 
dust collection, misuse/abuse or damage caused where repair or alterations have been 
made or attempted by others.

Laguna Tools, Inc. is not responsible for additional tools or modifications sold or
performed (other than from/by Laguna Tools, Inc.) on any Laguna Tools, Inc. 
machine. Warranty maybe voided upon the addition of such described tools and/or 
modifications, determined on a case-by-case basis.

Software purchased through Laguna Tools Inc. is not covered under this warranty 
and all technical support must be managed through the software provider. Software is 
non-refundable.

Normal user alignment, adjustment, tuning and machine settings are not covered by
this warranty. It is the responsibility of the user to understand basic machinery 
operation, settings and procedures and to properly maintain the equipment in 
accordance with the standards provided by the manufacturer.

Parts, under warranty, are shipped at Laguna Tools, Inc.’s cost either by common
carrier, FEDEX ground service or a similar method. Technical support to install 
replacement parts is primarily provided by phone, fax, e-mail or Laguna Tools 
Customer Support Website. The labor required to install replacement parts is the 
responsibility of the user.

Laguna Tools is not responsible for damage or loss caused by a freight company or
other circumstances not in our control. All claims for loss or damaged goods must be
notified to Laguna Tools within twenty-four hours of delivery. Please contact our 
Customer Service Department for more information.

Only 

new

 machines sold to the original owner are covered by this warranty.

For warranty repair information, 

call 1-800-332-4094

.

Summary of Contents for Platinum 18/47 Series

Page 1: ...LAGUNA TOOLS 2072 Alton Parkway Irvine California 92606 Ph 800 234 1976 www lagunatools com Model Numbers L A175017 2018 Laguna Tools Inc LAGUNA and the LAGUNA Logo are the registered trademarks of La...

Page 2: ......

Page 3: ...Noise emission 6 Specification sheet 6 Receiving your machine 7 Introduction to your machine 7 Parts of the machine 7 Where to locate your machine 11 Unpacking your machine 11 Assembly and setup 13 Ma...

Page 4: ...r Read the following carefully before operating the machine 1 Keep the working area clean and be sure adequate lighting is available 2 Do not wear loose clothing gloves bracelets necklaces or ornament...

Page 5: ...empted by others Laguna Tools Inc is not responsible for additional tools or modifications sold or performed other than from by Laguna Tools Inc on any Laguna Tools Inc machine Warranty maybe voided u...

Page 6: ...xample adjacent machines in other words the level of ambient noise It is possible that exposure level limits will vary from country to country Specification sheet Motor 2 HP TFEC Voltage 220V Swing ov...

Page 7: ...u will find sawdust within your machine This is because the machine has been tested prior to shipment from the factory and or Laguna Tools Laguna Tools endeavors to test machines prior to shipping to...

Page 8: ...8 Lathe bed The bed is a machined heavy casting...

Page 9: ...rol and motor The speed can be adjusted between 0 1200 low 0 3200 high The spindle has an indexing pin that allows it to be locked in 16 positions Tail stock Tool rest Tail stock The tail stock is a c...

Page 10: ...ed to suite the job in hand Electrical System The electrical control system is housed inside the head stock and a power cord with a 3 pin plug is provided What you will receive with your lathe Boxed l...

Page 11: ...for adjustments and maintenance to be conducted 3 Adequate lighting The better the lighting the more accurately and safely you will be able to work 4 Solid floor You should select a solid flat floor p...

Page 12: ...unting bolts that secure the machine to the base of the box 4 It is recommended that the bed of the machine be removed from the packaging by lifting it with a hoist or forklift using a SLING Remove th...

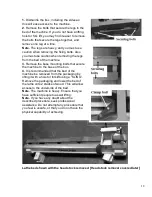
Page 13: ...bly easier Lift the legs to the vertical position and lower the bed onto them Secure with the fixing screws provided Note Each leg must be supported to ensure that it will not fall when positioning th...

Page 14: ...The locking handle is located at the back of the headstock Adjust the position of the head stock so that the casting is level with the back edge of the bed This will allow the maximum amount of the be...

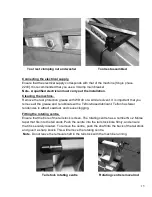
Page 15: ...se and re lubricate with a Teflon based lubricant Teflon has fewer tendencies to attract sawdust and cause clogging Fitting the rotating centre Ensure that the bore of the tail stock is clean The rota...

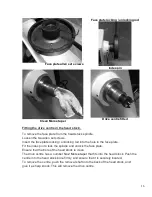
Page 16: ...cking unlocking rod into the hole in the face plate Fit the index pin to lock the spindle and unlock the face plate Ensure that the bore of the head stock is clean The drive centre has a number No 2 M...

Page 17: ...s recommended that the end of the headstock is inline with the end of the bed as this will allow the maximum amount of lathe bed to be used for turning Spindle speed control The lathe has two sets of...

Page 18: ...positions Forward stop reverse When changing spindle direction it is very important that the switch is left in the stop 0 position until the spindle has come to a complete stop If the switch is moved...

Page 19: ...e failure 7 To STOP your lathe ONLY use the forward R off O reverse R switch Never use the speed controller to stop the lathe DO NOT use the speed controller to zero for stopping as this will strain t...

Page 20: ...ons Tapped holes Index pin Untapped hole By utilizing different tapped holes and the spindle holes 16 fixed indexing positions can be achieved Tailstock Fit the handle as shown The tail stock can be m...

Page 21: ...a Teflon based lubricant Troubleshooting The lathe will not start 1 Check that the rotation switch is not in the 0 position 2 Check that the electrical power cord is plugged into the power outlet 3 Ch...

Page 22: ...y motor cooling fins clogged over feeding the job and excessive ambient temperature Squeaking noise 1 Check the bearings 2 Check the drive belt Spindle slows down during a cut 1 Dull cutting tools Rep...

Page 23: ...23...

Page 24: ...24...

Page 25: ...25...

Page 26: ...70 SCREW M4x8 2 21 HANDLE 1 71 BRACKET 4 22 HANDLE WHEEL 1 72 DIGITAL READER 1 23 TAILSTOCK 1 73 HEX NUT M18 1 24 PIN 5X50 1 74 CLAMP 1 C RING C 19 2 75 CLAMP BOLT 1 26 CLAMP BOLT 2 76 BUSHING 2 27 B...

Page 27: ...27 48 WASHER 4 6 98 49 INVERTER COVER 1 WASHER 5 2...

Page 28: ...ations subject to change Machines may be shown with optional accessories 2018 Laguna Tools Inc LAGUNA and the LAGUNA Logo are the registered trademarks of Laguna Tools Inc All rights reserved 2072 Alt...

Reviews: