background image

5. MAINTENANCE 

30 

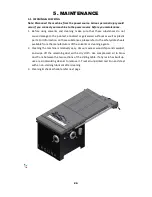
II. REPLACING THE BELT OF SCORING MOTOR 

1. Disconnect the saw from the power source. 

Note: Serious personal injury could occur if you connect your machine to the 

power. 

2.

Make the whole motor unit 45° tilted and to the lowest position by turning the 

adjusting wheels (Fig. 4-2.1&2)..


3.

Lift the small motor to make belt slack.


4. Carefully check the

 placing position

 of the belt before take it out. 

5. Take the belt out..   

6. Replace it with the new flat belt.   

7. Move the motor units back to the original position and close rear door to finish. 


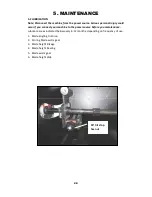
Figure 5-3.2a 

Figure 5-3.2 

BELT 

Summary of Contents for MTST5S-0135

Page 1: ...17101 Murphy Avenue Irvine California 92614 www lagunatools com 800 234 1976 MTST5S 0135 OPERATING MANUAL T5S TABLESAW...

Page 2: ...ing test run P20 4 OPERATION 4 1 Control panel and hand wheel P22 4 2 Scoring blade tilting and lifting P23 4 3 Rip fence cutting P24 4 4 Miter gauge cutting P25 5 MAINTENANCE 5 1 Cleaning and checkin...

Page 3: ......

Page 4: ...ould be kept at a safe distance from work area 6 Store idle tools cutting spindle When not in use tools should be store in a dry high or locked up place out of reach of children 7 Wear proper apparel...

Page 5: ...se risk of injury to persons If ancillary equipment is removed the original guards or safety devices shall be replaced OAV and our authorized agency are responsible for a future connection of the mach...

Page 6: ...safe procedures for cleaning maintenance and remove chips and dust regularly to avoid the risk of fire 34 Follow manufacturers instructions for use adjustment and repair of saw blades 35 Ensure that a...

Page 7: ...damage please replace new one that specification according below drawing 40 Do not operate this machine while tired or under the influence of drugs alcohol or any medication 41 THE DUST GENERATED BY C...

Page 8: ...blade at 45 64mm Main motor power 1ph 5HP 3 75 Kw Main blade speed 4000rpm Scoring blade motor 3 4HP 0 56KW Scoring blade speed 8000RPM Cuting width 1300mm Cuting width adjustment Manual Main saw bla...

Page 9: ...2 MACHINE INFORMATION 7 2 2 MAIN FEATURE A RIP FENCE B MAIN SWITCH C BLADE UP AND DOWN HAND WHEEL D BLADE TILTING HAND WHEEL E EXTENSION TABLE F STANDARD GUARD G MITER GAUGE A B E F C D G...

Page 10: ...de adequate space and surrounding for work area with non glare overhead lighting Keep the floor around the machine clean and free of scrap material oil and grease 4 This model is a heavy duty machine...

Page 11: ...they are intact the operators can start to inventory and assemble the machine parts Packing List 1 Machine frame unit x1 wooden 2 Assembly parts for miter gauge tools rip fence unit x1 3 Assembly par...

Page 12: ...ure it with the screws If necessary correct the alignment to cast iron table and use the adjustment screws B Fig 3 3 1b under the extension table 2 Check the flatness of the table by placing the fence...

Page 13: ...d extension table Fasten the 3 sets of screws washers H Fig 3 4 1b on fence scale ruler 3 Slide rip fence seat D Fig 3 4 1 into round bar through metal locker then 90 counter clockwise Note Move handl...

Page 14: ...e scale alignment Before operation the 0 mark on the rip fence scale must be aligned with the right side of the blade to ensure that the rip fence measurements will be accurate To align the fence scal...

Page 15: ...tallation or replacing of saw blades 1 Disconnect the power source NOTE Serious personal injury could occur if you connect your machine to the power source before you change blade 2 Move the blade til...

Page 16: ...wrench to loose the nut and washer then fit the saw blade Fig 3 5 4 6 Tighten the washer and screw back to fix the saw blade Fig 3 5 4 and cover the red cover R Fig 3 5 2a back 7 Reassemble the inser...

Page 17: ...rt plate Fig 3 5 1 3 5 2 4 Open the red cover R Fig 3 5 2a Note the red cover is used as a guard for protecting operators from injured by the blades 5 Insert the T wrench to hole A Fig 3 5 3 to fix th...

Page 18: ...screw B Note Make sure the riving knife is installed and aligned with the blade To set the riving knife correctly is very important 2 For smooth operation the distance of riving knife to the tooth of...

Page 19: ...Open the red cover R Fig 3 5 2a by pulling it 4 Insert the wrench to fix the spindle of scoring blade Fig 3 6 3 5 Loosen the screw A and washer B Fig 3 6 3 then take the scoring blade out 6 Replace it...

Page 20: ...3 ASSEMBLY SETUP 18 3 7 SAW BLADE GUARD 1 Install the standard saw blade guard by tightening the screw A Fig 3 6 1 on the riving knife Figure 3 7 1 A...

Page 21: ...3 ASSEMBLY SETUP 19 3 8 ACCESSORIES 1 Miter gauge Allows precise oblique cuts between 45 and 45 on the cast iron table...

Page 22: ...ker trips and the circuit are of the correct load capacity have the circuit inspected by qualified electrician Never use a larger circuit breaker than stated below or you will increase the risk of fir...

Page 23: ...in serious personal injury or even death 2 If any problems occur press the emergency STOP button Fig3 8 1 Investigate and correct the problem before operating the machine further If you need help ref...

Page 24: ...on Start the scoring blade Note The main saw blade must be ON for the scoring blade to start C The hand wheel for adjust the blade up or down Fig 4 1 1 Note The saw blade height must exceeds the piece...

Page 25: ...RING BLADE TILTING AND LIFTING I Scoring blade tilting Insert the T wrench as Fig 4 2 1 and turn it with 2 hands II Scoring blade lifting Insert the T wrench as Fig 4 2 2 and turn it with 2 hands Figu...

Page 26: ...esired size by checking the scale on table edge 4 Push down the lever B Fig 4 3 1 after adjusting and then perform the cutting operation Micro adjust rip fence 1 Turn knob C Fig 4 3 1 to lock rip fenc...

Page 27: ...to do oblique cuts from 45 to 45 2 Slide the miter gauge onto the table groove Fig 4 4 1 3 Position the gauge at the desired angle and clamp handle to lock the fence in place 4 Position the blade guar...

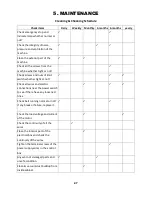
Page 28: ...ts For information on these substances please refer to the safety data sheets available from the manufacturers of the solvents or cleaning agents 2 Cleaning the machine is relatively easy Vacuum exces...

Page 29: ...ther tight or not y y y Check all wires and electric connections near the power switch to see if there have any loosened lines y y y Check belt running normal or not If any break or failure replace it...

Page 30: ...occur if you connect your machine to the power source before you maintenance Lubricate areas indicated below every 6 12 months depending on frequency of use 1 Blade angling trunnion 2 Scoring blade wo...

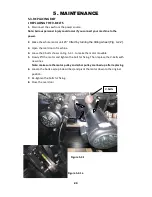
Page 31: ...oor of machine 4 Loose the 3 bolts shows on Fig 5 3 1 to make the motor movable 5 Slowly lift the motor and tighten the bolt for fixing Then replace the V belts with new ones Note make sure the motor...

Page 32: ...e the whole motor unit 45 tilted and to the lowest position by turning the adjusting wheels Fig 4 2 1 2 3 Lift the small motor to make belt slack 4 Carefully check the placing position of the belt bef...

Page 33: ...6 TOOLS 31 6 1 TOOLS INVENTORY Tool box Push Stick Hose Support Plate Hexagonal Key 4mm Scoring Arbor Wrench T wrench Riving Knife 350...

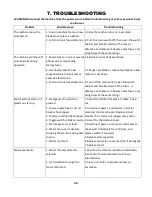
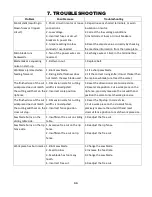
Page 34: ...cabinet and identify which of the fuses is defective and remove it Replace new fuses only using fuses of the same rating Motor will not start or it growls on start up 1 Emergency stop button is presse...

Page 35: ...ut workpiece does not match the cutting width set on the rip fence 1 Dimension scale for cutting widths is misadjusted 2 Incorrect scale position 1 Reset the dimension scale to correct size 2 Reset sc...

Page 36: ......

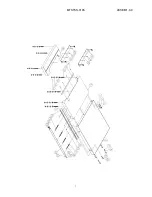
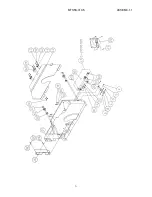
Page 37: ...MTST5S 0135 ASSEM1 1 5 1...

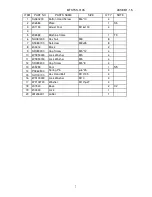
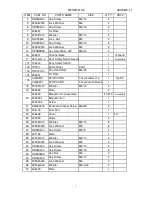
Page 38: ...062500 15 SH100700 16 WS100000 17 WF102730 18 207540 X2 19 203430 20 LM206301 Label 1 Base 2 Lock 1 Lock Washer M10 4 Washer M10 27 4 Spring Pin 6 25 4 Hex Head Bolt M10 35 4 Cap Screw M5 8 4 Door 1 L...

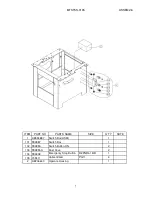
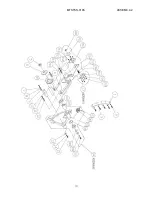
Page 39: ...MTST5S 0135 ASSEM1 3 3 3...

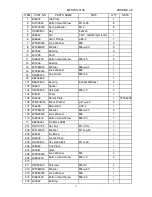
Page 40: ...343 S5 33 SS089200 34 SI060400 35 206639 For Dado Lock Washer M6 1 Hex Nut M6 1 PARTS NAME SIZE Q TY Set Screw M10 20 3 Hex Nut M10 3 Ruler Metric System 1 Ruler Metric Imperial System 1 Cap Screw M10...

Page 41: ...E 1 AB994887 101 994887 102 994855 103 994855A 104 994808 105 709411 2 AB206640 Cable Gland PG11 4 Dust Cove 2 Emergency Stop Button R2PNR4 1B R 1 1 Switch Button ON 2 Operate Housing 1 PARTS NAME SIZ...

Page 42: ...MTS5S 0135 ASSEM3 1 1 6...

Page 43: ...06479 Lock Washer M5 6 Cap Screw M5 8 4 PARTS NAME SIZE Q TY Cap Screw M6 12 2 Lock Washer M6 2 Cap Screw M5 16 2 Fix Plate 1 Washer M5 10 4 Lock Nut M5 2 Cap Screw M5 12 2 Lock Washer M5 2 Hex Head B...

Page 44: ...MTST5S 0135 ASSEM3 3 8...

Page 45: ...H204006 M20H 11 WF081818 12 WS080000 13 SJ080400 14 SR120600 M12 30 3 Cap Screw Lock Washer M8 4 Hex Head Bolt M8 20 4 Main Motor 5HP 220V 440V 1 Washer M8 18 4 Hex Head Bolt M12 30 3 Key 8x7x45 1 Was...

Page 46: ...MTST5S 0135 ASSEM3 4 2 10...

Page 47: ...400 215 200964 Bushing 1 Lock Washer Button Head Screw M8 1 M8 20 1 Arbor Flange Bushing Washer Lock Washer Lock Washer Washer Bushing Button Head Screw Spring Washer Key Nut PARTS NAME SIZE Q TY Gip...

Page 48: ...MTST5S 0135 ASSEM 4 1 12...

Page 49: ...1 Standard Set Screw Set Nut Screw Shaft Lock Washer Cap Screw Lock Washer Spring Pin Hand Wheel Shaft Assembly Hand Wheel Shaft Thrust Bearing Set Screw Free Joint 1 T8 1 T5 Washer Washer Washer han...

Page 50: ...MTST5S 0135 ASSEM5 2 14...

Page 51: ...WF101608 28 WS060000 29 SR060200 10 20 1 M10 30 1 Without Handle Plastic 1 Cast Iron With handle 1 1 1 1 M6 6 3 1 1 M8 60 2 M6 30 1 M6 2 2 1 M6 13 1 M8 M6 1 M6 12 1 5 5 20 1 M6 16 1 M6 10 1 M10 35 1...

Page 52: ...MTST5S 0135 ASSEM6 2 16...

Page 53: ...SR069400 9 206366 10 206369 Set Screw Washer Wave Washer Int Retaining Ring Shaft Q TY Pulley ASM 1 Lock Nut Spring PARTS NAME SIZE Hex Head Bolt Flange Shaft Ball Bearing Int Retaining Ring Pulley B...

Page 54: ...MTST5S 0135 ASSEM6 4 18...

Page 55: ...101000 16 NH101700 17 WF063030 18 WS060000 19 SR069400 20 WF143530 1 M12 1 1 140J7 1 150J7 1 1 M8 20 4 M8 4 0 75P M20P 1 M10 1 1 M14 1 1 1 M10 50 1 M10 20 M10 1 M6 30 1 M14 35 1 M6 1 M6 16 1 Cap Screw...

Page 56: ...MTST5S 0135 ASSEM10 1 20...

Page 57: ...03191 X7 Option 3 200884 4 200884 5 206432 2 M8 2 M6 16 2 1 1 M6 16 2 2 1 1 1 M10 10 1 20 36 1 8 1 1 M8 1 6202ZZ 1 S20 M8 1 1 S15 1 1 M8 30 4 Handle 1 M10 1 1 2M 1 1 1 Handle Handle 1 Fence Plate 1 M6...

Page 58: ...4 200535 5 SR100500 6 WS100000 7 200965 8 WF102025 9 NL101700 10 200536 11 205067 Shaft Lock Nut Cap Screw Q TY Hood Assembly 1 M10 1 M10 25 Plate PARTS NAME SIZE Hood Screw Screw Hood Screw Lock Wash...

Page 59: ...200086 STEEL PIN 5 130376 GUIDE PIECE 6 200156 GUIDE PIECE 7 SN069200 COUNTERSUNKS HEAD BOLT M6x8 8 200158 LOCATING PIECE 9 PS030600 SPRING PIN 10 200160 POINTER 11 SS050100 SET SCREW 12 612150 HANDL...

Reviews: