


LAGOON 380
9
RIGGING
& SAILS
89
•
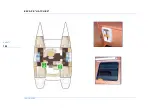
FURLING GENOA
Before getting under way take advantage of a windless period of
time and hoist the genoa.
Hand pre-roll the drum to set the furling line on it.
Pay attention to the drum winding direction: The sacrificial strip of
the genoa shall be wrapped outside.
- Secure the head and halyard to the swivel. Secure the tack to the
drum and sheets.
- Insert the bolt rope into the hole and hoist it and take care that you
do not tear it.
- Have the halyard taut enough but hoist less taut than a sail on a
normal stay.
Hoist it until the horizontal creases disappear (Adjust the tension of
the luff after a few sea trips).
- Before you furl the genoa, remove the ring that is used to guide the
bolt rope. Keep this ring in a safe place and put it back before any
handling (lowering etc.).
- Pull on the line from the cockpit to furl the genoa.
Never force it in case it seizes when you furl or unfurl the head sails.
Make sure a halyard is not jammed in the furler. Verify that the sail is
not too much tarque.
•
MAINTENANCE
- Regularly rinse the drum and swivel.
- Lubricate the bearings if recommended by the manufacturer.
- Unrig the sails if your boat is not to be used for long.
•
MAINSAIL (CLASSIC)
To hoist the mainsail:
- Head into the wind.
- Slacken the mainsail sheet.
- Hoist the sail taking care that the battens do not catch up on the
lazy-jacks.
•
GENNAKER (OPTIONAL)
Before getting under way take advantage of a windless period of
time and hoist the genoa.
- Fix the chain swivel to the gennaker head.
- Fix the halyard to the head chain swivel.
- Put the take-up drum on to the spar with a snap shackle.
- Fix the halyard to the head chain swivel.
- Hoist the gennaker.
Use the take-up drum stopper to furl or unfurl the gennaker.
•
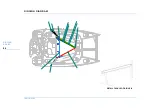
SHEETS
- Fix the sheets to the gennaker clews.
- Thread the sheets around the outside of the stay and of the
shrouds and over the jack-lines.
- Fasten the sheet return blocks to the bolts.
- Lead the sheets back to the Genoa sheet winches.
S a i l s e t t i n g
WARNING
De-rig the gennaker when not in use (danger of damage
through UV rays and accidental unfurling).
R I G G I N G & S A I L S
Summary of Contents for 380
Page 1: ...www cata lagoon com LAGOON 380 Owner s Manual...
Page 4: ......
Page 6: ......
Page 10: ...LAGOON 380 NAVIGATION 8 FUEL SUPPLY VALVE located directly on the tanks FUEL SUPPLY VALVE...
Page 16: ...LAGOON 380 NAVIGATION 14...
Page 22: ...LAGOON 380 NAVIGATION 20 DAVIT DAVIT BLOCKERS ATTACH DAVIT LINES DAVIT...
Page 24: ......
Page 25: ...23 LAYING UP 25 PROTECTION AND MAINTENANCE 25 Winter Storage 2...
Page 26: ...LAGOON 380 WINTER STORAGE 24 BLOCKING THE BOAT ASHORE...
Page 28: ......
Page 29: ...27 RECOMMENDATIONS 29 STEPPING THE MAST 31 Launching 3...
Page 30: ...LAGOON 380 LAUNCHING 28 1 Centre of gravity POSITIONING OF HOISTING STRAPS...
Page 34: ...LAGOON 380 LAUNCHING 32 MAST JUNCTION BOX...
Page 36: ......
Page 38: ...LAGOON 380 HULL DECK 36 Wetted area including appendices 44 m CARREENING...
Page 42: ......
Page 44: ...LAGOON 380 INTERIOR 42 3 cabin version 4 cabin version INTERIOR...
Page 50: ......
Page 60: ......
Page 70: ......
Page 76: ...LAGOON 380 ENGINE 74 ENGINE WATER VALVE STUFFING BOX ENGINE WATER VALVE...
Page 80: ......
Page 81: ...79 STANDING RIGGING 83 RUNNING RIGGING 87 WINCHES 87 SAIL SETTING 89 SAILS 91 Rigging Sails 9...
Page 82: ...LAGOON 380 RIGGING SAILS 80 STANDING RIGGING...
Page 84: ...LAGOON 380 RIGGING SAILS 82...
Page 92: ...LAGOON 380 RIGGING SAILS 90...
Page 94: ......
Page 96: ...LAGOON 380 SAFETY 94 DIMENSIONS OF LIFE RAFT LOCKER IN MM POSITION OF THE LIFERAFT...
Page 98: ...LAGOON 380 SAFETY 96 GAS VALVES cupboard under the oven GAS VALVES...
Page 104: ...LAGOON 380 SAFETY 102 ESCAPE HATCHES...
Page 106: ......
Page 107: ...105 DESIGN CATEGORY 106 GENERAL SPECIFICATIONS 107 General specifica tions 11...
Page 112: ......
Page 113: ......