background image

LAGOON 380

8

ENGINE

77

FUEL

Refill before the fuel tanks have almost run dry (the fuel system may 
be stopped for lack of fuel).
Make sure you have enough fuel before sailing.

MAINTENANCE

Refer to the manufacturer's manual given with your boat.
Be careful with any possible risk of oil and fuel spillage.
Check the exhaust gas colour. In the case of excessive white or 
black smoke,consult an engine specialist.

The instrument panel has all the testing functions of the engine and 
it does not require any special precaution (refer to engine leaflet).

The propellers fitted as standard to your boat result from trials 
carried out in collaboration with the engine manufacturer.

Remove the foldaway propellers (optional extra) at the end of each 
season,dismantle them and clean them carefully.
Grease the thrust bearing surfaces and teeth. Check that the 
propeller blades move easily.
If necessary,install new anodes (on hulls and base plates).

Replace anodes before they are 50% corroded.

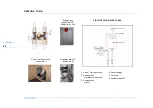
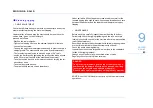
I n s t r u m e n t   p a n e l

P r o p e l l e r s   a n d   a n o d e s

RECOMMENDATION

Do not change the propeller without specialist's advice.

RECOMMENDATION

Ensure that the base plate anodes have good metal contact 
with the transmissions.
Never paint the anodes.
Assemble the propellers before re-launching the boat.

E N G I N E

Summary of Contents for 380

Page 1: ...www cata lagoon com LAGOON 380 Owner s Manual...

Page 2: ...you are not used to get some training in boat control and sailing to ensure your safety and comfort Your dealer your international sailing association or your yacht club will be very happy to recommen...

Page 3: ...w must be trained properly The boat shall not be loaded more with than the maximum load re commended by the builder in particular the total weight of the food supplies of the different equipment that...

Page 4: ......

Page 5: ...ifications of your particular boat The guide covers all the versions and main options of these models Chapter Page Using your boat Construction and equipment 1 Navigation 5 2 Winter Storage 23 3 Launc...

Page 6: ......

Page 7: ...5 GETTING UNDER WAY 7 VISIBILITY IN NAVIGATION 7 NAVIGATION UNDER MOTOR 9 NAVIGATION UNDER SAIL 11 MOORING 17 TOWING 17 ANCHORING 17 DAVIT OPTIONAL 21 ENVIRONMENT 21 Navigation 1...

Page 8: ...2 Port engine 3 Common negative BATTERY SWITCH STARBOARD AFT CABIN 4 Battery coupling 5 Starboard engine 6 Common negative 1 Switch Overhead light saloon 2 Switch Overhead light galley 3 Switch Spot l...

Page 9: ...y safety equipment and instruct the crew concerning its location and operation The international regulations to prevent collision at sea COLREG and the course regulations make mandatory a permanent an...

Page 10: ...LAGOON 380 NAVIGATION 8 FUEL SUPPLY VALVE located directly on the tanks FUEL SUPPLY VALVE...

Page 11: ...fter starting the engine check for cooling water running out of the exhaust and observe the color of exhaust gases BATTERY COUPLING OPTIONAL In the case of low engine battery power use the battery cou...

Page 12: ...E HULL Weight of vessel 10 tons RMmax Weight of vessel x d RMmax Righting moment Maximum RMmax Single hull 10 tons x 0 5 metres 5 tons metres RMmax Catamaran 10 tons x 3 metres 30 tons metres RIGHTING...

Page 13: ...cannot be held responsible in the event of an accident CLOSE HAULED TRIMMING between 75 and 50 to true wind Given wind force in apparent wind From 0 to 16 knots full sail mainsail traveler 30 cm to wi...

Page 14: ...GOON 380 NAVIGATION 12 SAILS SAILS SURFACE Mainsail high 47 m2 Mainsail classic 1 Reef 32 43 m2 Mainsail classic 2 Reef 20 21 m2 Furling genoa 31 m2 Landmark 1 24 m2 Landmark 2 18 m2 Landmark 3 13 50...

Page 15: ...to chafe at the shroud at the fastest speeds The Genoa jib is slackened so that its average attack angle is head on to the apparent wind From 23 to 28 knots 1 Reef full Genoa The adjustments are iden...

Page 16: ...LAGOON 380 NAVIGATION 14...

Page 17: ...lift and take in the mainsail sheet Refer to the running rigging diagram chapter on RIGGING AND SAILS for identification of ropes NAVIGATION WIND ASTERN Do not fall off more than 150 to the apparent...

Page 18: ...LAGOON 380 NAVIGATION 16 1 Swimming ladder 3 Midship cleat for towing 2 Mooring cleats and Anchoring of lifelines 4 Anchor bridle fastening DECK LAYOUT...

Page 19: ...The stability may be reduced when you tow a boat TOWED BOAT Keep steering your boat and see to it that you stay in the wake of the towing boat As a rule set the anchor in at least 3 times the depth o...

Page 20: ...THE BOW ROLLER SHACKLE THE BRIDLE TO THE CHAIN 1 Windlass 12V 2 Handle The handle is used to disen gage the chain rim brake and to haul in the anchor manually in the case of electrical breakdown 3 Ha...

Page 21: ...r gets into contact with the davit Secure the anchor or anchor chain to the cleat Release the anchor clutch In the case of electrical failure use the winch handle on the windlass to lift anchor MAINTE...

Page 22: ...LAGOON 380 NAVIGATION 20 DAVIT DAVIT BLOCKERS ATTACH DAVIT LINES DAVIT...

Page 23: ...scharge oil into the sea Take every precaution to prevent hydro fuel overflow when filling the engine tank When in port only use the onboard toilets if they are equipped with organic waste reservoirs...

Page 24: ......

Page 25: ...23 LAYING UP 25 PROTECTION AND MAINTENANCE 25 Winter Storage 2...

Page 26: ...LAGOON 380 WINTER STORAGE 24 BLOCKING THE BOAT ASHORE...

Page 27: ...sensors Seal air inlets as much as you can Install an atmosphere dehumidifier in the saloon and leave the ca bin and storage unit doors open lockers ice boxes Leave the cushions outside for long befor...

Page 28: ......

Page 29: ...27 RECOMMENDATIONS 29 STEPPING THE MAST 31 Launching 3...

Page 30: ...LAGOON 380 LAUNCHING 28 1 Centre of gravity POSITIONING OF HOISTING STRAPS...

Page 31: ...he water intake strain box for cleanliness All the optional accessories shall be sealed with paste Retract the speedometer into its housing it may be damaged by the handling belts Turn off all the wat...

Page 32: ...ECIFICATIONS CHAPTER Reference Designation Size m A Width between hull centers 4 50 B Air draught without mast or appendices 2 85 C Waterline height under nacelle 0 72 D Vessel height on its keels wit...

Page 33: ...he spreader end fittings and the roller furler drum Put a rope of about 1 50 with an eye and thimble at both ends and covered with rags round the mast Place the rope under the se cond tier of spreader...

Page 34: ...LAGOON 380 LAUNCHING 32 MAST JUNCTION BOX...

Page 35: ...gooseneck located at the front of the mast see ELECTRICITY chapter Carefully check the tightness of the turnbuckle cotter pins and pro tect with adhesive tape Put the boom back Refit all ropes UNSTEP...

Page 36: ......

Page 37: ...35 CONSTRUCTION 37 MAINTENANCE 37 CARREENING 37 GEL COAT REPAIR 39 STEERING GEAR 39 Hull Deck 4...

Page 38: ...LAGOON 380 HULL DECK 36 Wetted area including appendices 44 m CARREENING...

Page 39: ...be cleaned and polished with a chrome and steel renovator SOLID WOOD ON EXTERIOR WOODEN PANELLING Regularly clean the woodworks with fresh water using a sponge if need be add some gentle soap PLEXIGLA...

Page 40: ...LAGOON 380 HULL DECK 38 CABLE TENSION SYSTEM 1 Steering rack 2 Ropes 3 Sheaves box 4 Connecting rod 5 Autopilot ram optional STEERING GEAR...

Page 41: ...hen polish STORAGE To keep them properly store the gel coat components in a cool dry and dark place Keep the components 6 months maximum Polyester products are flammable take the usual precautions CLE...

Page 42: ......

Page 43: ...41 INTERIOR MAINTENANCE 43 FABRICS 43 COCKPIT TABLE SERVING HATCH COOL BOX 45 PORTHOLES AND DECK HATCHES 45 WATER COOLED REFRIGERATION UNIT OPTIONS 47 HEATING OPTIONAL 47 Interior 5...

Page 44: ...LAGOON 380 INTERIOR 42 3 cabin version 4 cabin version INTERIOR...

Page 45: ...fabric against the grain Use the vacuum cleaner when the fabric is dry PVC OR COATED FABRICS Use a sponge and water and soap household soap type Dab away resistant stains with a rag soaked with white...

Page 46: ...LAGOON 380 INTERIOR 44 SERVING HATCH COOL BOX REMOVABLE LOCKING DECK HATCH Button handles in open position SERVING HATCH COOL BOX DECK HATCH...

Page 47: ...ockpit are interchangeable Open and fasten the sliding sash using the inside latch before unfolding the serving hatch shelf A removable igloo icebox is located in the forward cockpit locker The portho...

Page 48: ...LAGOON 380 INTERIOR 46 FRIDGE HEATING 1 Drainage Refrigeration unit Boiler Diesel Heater exhaust outlet Control REFRIGERATION UNIT HEATING...

Page 49: ...s of 3 boilers located under the forward bench seat of the saloon and in the locker under each aft berth The port hull and saloon boilers are supplied with diesel from the port tank The starboard hull...

Page 50: ......

Page 51: ...49 BATTERIES BATTERY SWITCH 51 USE OF 12 V CIRCUIT 53 110 V 220 V SYSTEM 55 TECHNICAL ROOM 55 BATTERY CHARGER 55 SHORE POWER SOCKET 57 MAST HARNESS 57 ELECTRONIC 57 Electricity 6...

Page 52: ...V 220 V breaker 3 Battery switch engine House 4 Windlass circuit breaker 5 Battery stock engine 12 V 6 Battery stock house 12 V 7 Battery charger 8 Water heater 9 Shore house power 10 Shore power sup...

Page 53: ...tart navigating with batteries loaded properly and enjoy the holidays to use the dock or charger choose a selection mode that allows the operation of the generator A battery monitor DC meter meter on...

Page 54: ...220 V AC 3 Sockets 220 V AC 4 Interior lighting 5 Socket 12 V DC 6 Fridge 7 Comfort Waste water pump 8 Water unit 9 Bilge pump 10 Navigation station 11 Deck light 12 Mooring light 13A Navigation ligh...

Page 55: ...onnected to the battery and protected by a circuit breaker WARNING Never work on a live electric fitting RECOMMENDATION Never modify an electric fitting and relevant diagrams yourself Call in a techni...

Page 56: ...LAGOON 380 ELECTRICITY 54 220 V BREAKER in the cupboard to the rear of the port gangway 1 Charge divider 2 Battery charger 220 V 12 V 220 V BREAKER CHARGER JUNCTION...

Page 57: ...the fuses are located is situated behind the electrical panel To access this area lift up the plate above the electrical panel in order to unclip it 2 clips then pull it towards you to remove the plat...

Page 58: ...LAGOON 380 ELECTRICITY 56 The positions are the same for the other layout version 220 V SOCKET Landmark 1 220 V BREAKER Landmark 2 SHORE POWER SUPPLY CIRCUIT BREAKER...

Page 59: ...d of the boat shore supply cable hang in the water The result may be an electric field liable to hurt or kill the swimmers nearby RECOMMENDATION In order to reduce the risks of electic shock and fire...

Page 60: ......

Page 61: ...59 WATER TANKS 61 FRESH WATER SYSTEM 61 GAS SYSTEM 63 DRAINAGE SYSTEM 63 SANITARY EQUIPMENT 65 Plumbing 7...

Page 62: ...nal 4 Water unit Accumulator tank 5 Water heater 6 Shore power socket Fresh water optional 7 Forward starboard tank 8 Foot pump Sea water optional 9 Foot pump Fresh water optional 10 Gas valve 11 Seaw...

Page 63: ...source to be switched from the starboard tank to the port tank optional For optimisation of use of fresh water completely use up one tank s supply before switching over to the other SHORE POWER SOCKET...

Page 64: ...ve WC 3 Pump Shower draining 4 Valve Washbasin draining 5 Electric bilge pump 6 Drainage valve for forward watertight compartment 7 Drainage valve for aft water tight compartment 8 Sump 9 WC evacuatio...

Page 65: ...the hose MAINTENANCE Regularly check the valves and thru hull fittings for proper opera tion and watertightness Turn off the valves when the water system is not in use Visually check the water pump f...

Page 66: ...LAGOON 380 PLUMBING 64 1 Stuffing box 2 Non return valve 3 Electric bilge pumps with automatic start mechanism 4 Manual bilge pump Cockpit 5 Sump 6 Drainage outlet SCHEMATIC DIAGRAM DRAINAGE SYSTEM...

Page 67: ...the heads check that the water intake valve and draining valve are open To empty the bowl Set the control lever of the pump slantwise FLUSH Operate the pump To dry the bowl Set the lever back vertica...

Page 68: ...e to sea Landmark 1 Sewage tank Landmark 2 3 Capacity 83 liter Seawater inlet WC Landmark 6 CIRCUIT BLACK WATER TANKS 1 Valve Drainage to sea 2 Sewage tank To starboard optional 3 Sewage tank To port...

Page 69: ...deck filler then start the suction The filler caps are opened and closed with an appropriate key When the tank is empty check the cap seal for condition then close the filler To rinse out the system F...

Page 70: ......

Page 71: ...69 FUEL TANKS 71 FUEL FILTER 73 ENGINES 75 INSTRUMENT PANEL 77 PROPELLERS AND ANODES 77 Engine 8...

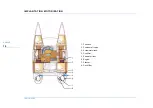
Page 72: ...LAGOON 380 ENGINE 70 1 Fuel tank 2 Fuel shut off valve 3 Accumulator tank 4 Fuel filter 5 Sea water filter 6 Engine 7 Silencer 8 Deck filler IMPLANTATION MOTORIZATION...

Page 73: ...ring of the filler for good condition in order to prevent water entries Do not turn off the fuel tap after each use except in case the boat is unattended for long Keep the fuel tank as full as possib...

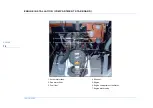
Page 74: ...LAGOON 380 ENGINE 72 1 Accumulator tank 2 Sea water filter 3 Fuel filter 4 Silencer 5 Engine 6 Engine compartment ventilator 7 Engine water valve ENGINE INSTALLATION COMPARTMENT STARBOARD...

Page 75: ...ilters The first filter is on the pipe that joins the tank to the engine it has the functions of a water decanter and pre filter A second filter is an integral part of the engine its role is to filter...

Page 76: ...LAGOON 380 ENGINE 74 ENGINE WATER VALVE STUFFING BOX ENGINE WATER VALVE...

Page 77: ...checking immediately after starting the engine if water is expelled with the exhaust gases If water does not flow out Stop the engine immediately Check that the valve is open Close the water inlet val...

Page 78: ...LAGOON 380 ENGINE 76 FUEL VALVE ANODE on the housing ANODE On hull under water line FUEL VALVE ANODES...

Page 79: ...ine leaflet The propellers fitted as standard to your boat result from trials carried out in collaboration with the engine manufacturer Remove the foldaway propellers optional extra at the end of each...

Page 80: ......

Page 81: ...79 STANDING RIGGING 83 RUNNING RIGGING 87 WINCHES 87 SAIL SETTING 89 SAILS 91 Rigging Sails 9...

Page 82: ...LAGOON 380 RIGGING SAILS 80 STANDING RIGGING...

Page 83: ...LAGOON 380 9 RIGGING SAILS 81 SHORT MAST Reference Rigging Length mm Diameter mm 1 Forestay 14 113 12 2 Martingale 9 876 10 3 Upper shroud 13 458 12 4 Diamonds 11 226 10 RIGGING SAILS...

Page 84: ...LAGOON 380 RIGGING SAILS 82...

Page 85: ...cross wind it is normal for the leeward rigging to be slightly slack if necessary thread a shock cord between the backstay and the lower shroud leeward to stop any flapping MAINTENANCE Before each tri...

Page 86: ...LAGOON 380 RIGGING SAILS 84 DETAIL TACKLE OF BIG VEIL 12 6 8 7 5 4 9 10 3 11 1 2 RIGGING DIAGRAM...

Page 87: ...e 12 8 3 Genoa sheet To port 13 12 4 Main sheet 54 14 5 Main halyard With pulley block 50 14 6 Kicking strap 7 Reef 1 8 Reef 2 9 Genoa halyard 31 12 10 Genoa sheet To starboard 13 12 11 Spinnaker shee...

Page 88: ...8 3 Genoa sheet To port 13 12 4 Main sheet 54 14 5 Mainsail safety block stopper 50 14 6 Mainsail foot 7 Main halyard 8 Kicking strap 9 Genoa halyard 31 12 10 Genoa sheet To starboard 13 12 11 Spinna...

Page 89: ...rotate freely they need overhaul as soon as it slightly seizes MAINTENANCE Carry out the complete maintenance of the winches regularly before and during the sailing season Remove the drums and clean t...

Page 90: ...LAGOON 380 RIGGING SAILS 88 FIXING OF THE GENNAKER HA LYARD ONTO THE HEAD CHAIN SWIVEL TAKE UP DRUM RETURN BLOCK FOR GENNAKER SHEET PASSAGE OF GENNAKER SHEET GENNAKER...

Page 91: ...halyard is not jammed in the furler Verify that the sail is not too much tarque MAINTENANCE Regularly rinse the drum and swivel Lubricate the bearings if recommended by the manufacturer Unrig the sai...

Page 92: ...LAGOON 380 RIGGING SAILS 90...

Page 93: ...out the emergency repairs waiting for the sailmaker s assistance CLEANING AND MAINTENANCE Rinse the sails with fresh water from time to time and dry quickly in order to avoid mildew Avoid drying the...

Page 94: ......

Page 95: ...93 SAFETY EQUIPMENT 95 GAS SYSTEM SAFETY INSTRUCTIONS 97 FIGHT AGAINST FIRE 99 ASS CHEMENT 101 EMERGENCY TILLER 101 CAPSIZING 103 ENGINE 103 GENERAL POINTS 103 Safety 10...

Page 96: ...LAGOON 380 SAFETY 94 DIMENSIONS OF LIFE RAFT LOCKER IN MM POSITION OF THE LIFERAFT...

Page 97: ...ever exceed the maxi mum load recommended by the manufacturer LIFERAFT The life raft was located in the rear beam At the bottom of the raft locker is a hammer In the case of capsizing break the glass...

Page 98: ...LAGOON 380 SAFETY 96 GAS VALVES cupboard under the oven GAS VALVES...

Page 99: ...tect a leak close the valve of the cylinder and repair before you use it again The appliances use the oxygen of the cabin and release combustible gases Ventilate your boat when using appliances Don t...

Page 100: ...er shall be less than 1 m from the steering station All extinguishers should be easily accessible and should be able to be reached rapidly for use maintenance or repair without having to use tools or...

Page 101: ...e if the ones in place are out of date or have been used Make sure the extinguishers can be reached easily when people are on board And also inform the crew of where the extinguishers are and how they...

Page 102: ...LAGOON 380 SAFETY 100 FUEL SUPPLY VALVE LAY OUT OF ACCESS HOLE TO RUDDER STOCK FUEL VALVE EMERGENCY TILLER...

Page 103: ...of Washroom Capacity 2 x 15 liter minute MANUALS BILGE PUMPS The manual bilge pumps are located along the sides of the aft cock pit bench Capacity 2 x 31 5 liter minute The liferaft should be placed...

Page 104: ...LAGOON 380 SAFETY 102 ESCAPE HATCHES...

Page 105: ...around the boat The propeller blades are sharp and can cause major damage when rotating Never attempt to release a fishing net or line caught in the propel ler when it is rotating Before setting sail...

Page 106: ......

Page 107: ...105 DESIGN CATEGORY 106 GENERAL SPECIFICATIONS 107 General specifica tions 11...

Page 108: ...ral hundreds of nautical miles You may also meet with these conditions on an inland sea with a size sufficient to generate the wave height in question This boat is designed for sailing in winds that m...

Page 109: ...the scope for load Freshwater capacity 300 l 79 US gal Freshwater capacity additional 300 l 79 US gal Sewage water capacity 85 l in each bathroom Fuel oil tank capacity 2 x 100 l 2 x 26 US gal Refrige...

Page 110: ...HE BOAT VERSION DELIVERY DATE REGISTRATION NUMBER DOOR KEY NUMBER HULL NUMBER MAKE OF ENGINE ENGINE KEY NUMBER ENGINE SERIAL NUMBER TO STARBOARD TRANSMISSION SERIAL NUMBER TO STARBOARD ENGINE SERIAL N...

Page 111: ...Dealer stamp The present document is not contractual and since we constantly desire to improve our models we reserve the right to modify them without notice PERSONAL NOTES...

Page 112: ......

Page 113: ......

Page 114: ...www cata lagoon com 162 quai de Brazza 33100 Bordeaux France z T l 33 0 557 80 92 80 z Fax 33 0 557 80 92 81 z E mail info cata lagoon com...

Reviews: