After this however, the internal battery must be charged again before being put back into
operation. To do this, the sensor must be exposed to strong light for several days without the
activation magnet in order to charge the battery via the solar cell.
3. Operation
After the installation of the wireless sensors and the subsequent commissioning of the base unit,
the transmitted and converted data appears in the appropriate fields of the display. If the displays
do not appear you will find information on fixing faults in section 5 (faults).
Please note that the only data that can be displayed is that for which the appropriate
sensors have been installed. There can be no display of rainfall without a rain sensor, for
example.
As all relevant data appears on the screen concurrently, operation is essentially restricted
to the simple selection of further sensors or weather data by gently touching the
appropriate display field.
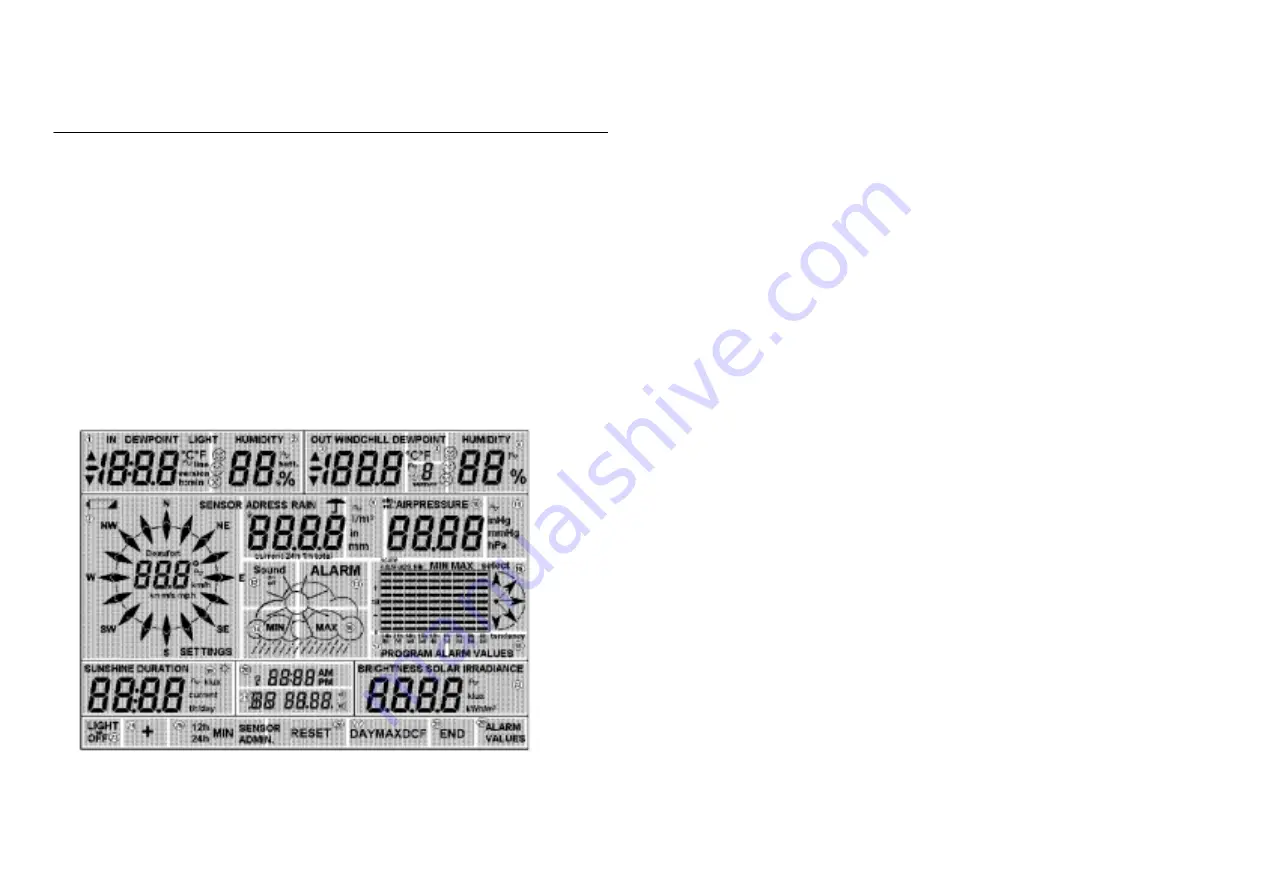
Overview of the weather station touch screen fields.
The display is subdivided into 29 touch screen fields, which are not all active at the same time.
The touch screen fields provided in the bottom line of controls are only active when their text
appears. The appearance of the remaining touch screen fields is dependent upon the operating
mode of the station.
Every time a currently valid (active) touch screen field is pressed, a short beep will be heard. If
required, this can be switched off in the configuration mode.
3.1.
Basic settings, Configuration
The weather station is delivered in a condition that allows you to use its basic functions
immediately after commissioning without further adjustment. It can be adapted to suit individual
requirements by means of further settings and configuration.
3.1.1. General
settings
Illumination settings
To switch on the illumination, press any touch screen field on the display. The illumination will
now remain switched on for the programmed time (after the last key press).
As standard, the illumination is active for 10s with battery operation and continuously on when
using the AC power adaptor.
To switch off the illumination manually, press the “LIGHT OFF” key (bottom left, field 23).
The times for the illumination can be set up in configuration mode.
Cleaning mode
As the display becomes dirty in use, it must be cleaned from time to time with a dry linen cloth (a
cloth for cleaning eye glasses is most suitable, do not use cleaning fluids as the display could be
damaged). In order that the set-up of the station is not altered when wiping the display, there is a
cleaning mode where all touch screen fields are blocked for 30s.
To activate the cleaning mode, press the top right hand touch screen field “HUMIDITY” (field 6)
for approximately 4 seconds.
The display will then go off and only the time will be displayed. The display can now be cleaned.
The normal display is resumed after 30s.
Sensor reception
HF sensor synchronization takes place each morning at 7:30am for 6 minutes. During this phase,
new sensors or lost sensors are automatically recorded in the reception administration.
If a signal from a sensor is not received for approximately 12 hours (240 reception failures), then “
– – – ” will be displayed instead of the value. No further attempts will be made to receive the
signal from the sensor.
However, if the sensor should be detected again at any time, it will be re-recorded in the weather
station’s sensor administration at 7:30am (synchronization phase).
3.1.2. Configuration
Many of the weather station ’s parameters can be set up manually and individually in
configuration mode:
- Illumination time for AC adaptor operation
- Illumination time for battery operation
- Rainfall per rocker stroke
- Air pressure correction
- Temperature display unit
- Rainfall display unit
- Air pressure display units
- Key confirmation tone
- Form of presentation for the history display
- Threshold value for registering sunshine
- Setting of date and time
- Sensor administration


