background image


Manual SmartPicker AOM Rev. A ENG 

LaCoSys Nov 2017  

-12-


4


Use of the device 

4.1


Unpacking and installation 

Please  verify  the  packaging  if  it  is  damaged.  Any  damage  must  be  announced  to  the  carrier  and  the 
manufacturer after receipt. Please verify if the package is complete: 


4.2


First steps 

Connect the mains cable with the delivered power supply and connect the DC-Pug to the device. 


Only use the delivered power supply! 


Connect a USB A-B 

 cable with the device and your PC.  


You  may  need  administrator  rights  to  install  the  necessary  software  drivers  depending  on  the 
operating system.  


The  software  driver  installation  proceeds  automatically  if  Microsoft  Windows  7  or  higher  is  used.  For  more 
information please read chapter 4.3. 


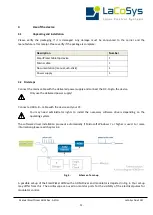
Fig. 4: 

Scheme of a set-up 


A possible set-up of the SmartPicker AOM with a AOM-Driver and modulator is depicted in Fig. 4. Your set-up 
may differ from this. The oscilloscope  can used on monitor ports for the visibility of the electrical pulses for 
modulator control. 


Description 

Number 

SmartPicker tabletop device 

Mains cable 

Documentation (manual, usb-stick) 

Power supply  

Summary of Contents for SMART PICKER SERIES

Page 1: ...SMART PICKER SERIES AOM acusto optical modulators Manual...

Page 2: ...the details represented here cannot be regarded as final and binding Dissemination and copying of this manual are allowed on special request only All rights reserved for the case of patent or register...

Page 3: ...Manual SmartPicker AOM Rev A ENG LaCoSys Nov 2017 3...

Page 4: ...M MONITOR OUTPUT 9 3 4 GATE INPUT 10 3 5 PHOTODIODE INPUT TRIGGER IN 10 3 6 PHOTODIODE MONITOR OUTPUT 10 3 7 Mains 11 3 8 USB Connection 11 3 9 AOM INTERFACE 11 4 Use of the device 12 4 1 Unpacking an...

Page 5: ...evice complies with the European Directive 2004 108 EG Electromagnetic compatibility The device is labelled with the sign The device will be disposed according the guideline WEEE 2002 96 EG Warning no...

Page 6: ...must be used as delivered Every modification voids warranty or liability All cables must be electrically insulated The customer service or authorized staff is allowed to open the device only The IP c...

Page 7: ...bol 2 4 Intended use The device is intended for driving of a RF Driver with acusto optical modulators AOM The RF Driver must be provided with inputs for the TTL Signal input low impedance 50 or up to...

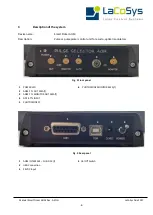
Page 8: ...ion Pulse or pulse picker control unit for acusto optical modulators Fig 2 Front panel 1 POWER LED 6 PHOTODIODE MONITOR SMA f 2 AOM TTL OUT SMA f 3 AOM TTL MONITOR OUT SMA f 4 GATE TTL INPUT 5 PHOTODI...

Page 9: ...position Please protect it against shifting 3 2 AOM output SMA Output Connector SMA f Voltage TTL square wave Current 100 mA TRise TFall 1 5 ns A driver for acusto optical modulator AOM needs typical...

Page 10: ...The GATE INPUT provide a logical AND Function for the AOM OUTPUT Truth table Input HIGH AOM OUTPUT DIVIDED PULSES LOW AOM OUTPUT BLOCKED 3 5 PHOTODIODE INPUT TRIGGER IN Input optical Connector FC f I...

Page 11: ...he supplied mains cable with an IEC 60320 C13 connector or an identical one must be used It can be custom or country specific 3 8 USB Connection Please use a standard USB A B cable for connecting the...

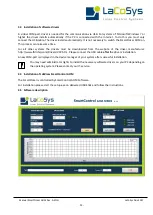
Page 12: ...e device and your PC You may need administrator rights to install the necessary software drivers depending on the operating system The software driver installation proceeds automatically if Microsoft...

Page 13: ...r systems the drivers must be downloaded from the website of the driver manufacturer http www ftdichip com Drivers VCP htm Please connect the USB cable after the drivers installation A new COM port is...

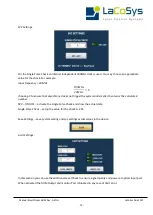
Page 14: ...pulses or pulse bursts from pulsed lasers This is determined by the repetition rate of the signal source and the division factor The AOM s operation principle and use are described in the AOM s manua...

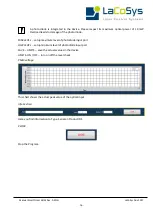
Page 15: ...trigger the system and smaller then twice the calculated number SPC ON OFF activate the Single Pulse Check and show the actual state Single Pulse Check setup the value for the check 0 255 Save Settin...

Page 16: ...hoto diode MAX LEVEL setup maximum level of photodiode input port LOW LEVEL setup minimum level of photodiode input port SAVE LIMITS save the actuals values in the device LIMITS ON OFF turn on off the...

Page 17: ...ssories of other manufacturers The warranty expires in this case LaCoSys declines any liability for damages which are due to disregard of the safety information 5 2 Maintenance Please switch off the d...

Page 18: ...evices lifetime or damage it Please use appropriate safety precautions against electrostatic discharge grounding antistatic wristband etc Only use packing or wrapping materials which are appropriate f...

Page 19: ...II Degree of protection IP 20 Radio interference suppression DIN EN 55011 class A Noise immunity EN 61000 6 2 industrial environment Environmental conditions Temperature range Operation Storage Relati...

Page 20: ...Manual SmartPicker AOM Rev A ENG LaCoSys Nov 2017 20 For your notices...

Reviews: