3. Installing Your LaCie Drive
page 12
LaCie DL DVD±RW Drive
User’s Manual
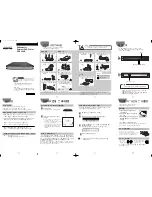
3) Once you have removed the cover, you will need to remove the CD-ROM assembly front bezel. The removal of the CD-
ROM front bezel assembly will vary, so please refer to your computer system’s manual for specific details.
4) Disconnect the IDE Interface, Power and Audio cables from your existing CD-ROM drive. Some Macs may not have an
Audio cable, please consult your computer system’s manual for specific details.
5) Remove the existing drive’s mounting screws, then remove the old drive and mount your LaCie DL DVD±RW Drive in its
place. Please refer to your computer system’s manual for specific details.
6) Next, set the LaCie DL DVD±RW Drive’s Device Configuration Jumper:
When using one IDE interface cable, place the Device Configuration Jumper on the Slave
setting, as shown here:
When using two IDE interface cables and there is only one DVD-R/RW drive, place the Device
Configuration Jumper on the Master setting, as shown here:
The LaCie DL DVD±RW Drive is pre-configured to the Master setting.
When using two IDE interface cables and there are two DVD-R/RW or another CD-
ROM/R/RW drive, place the Device Configuration Jumper on the Slave setting.
Important Info:
For a more detailed discussion of the Device Configuration Jumper, please see
5.6. Device
Configuration Jumper Settings
.
Slave Configuration
Master Configuration