background image

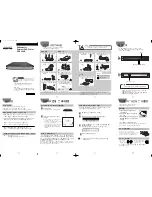
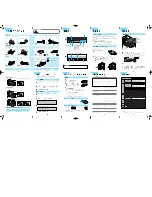
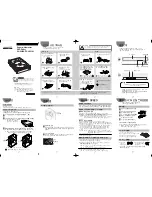
DVR/NVR DVD-RW Drive Installation Guide 


Hikvision USA Inc., 908 Canada Court, City of Industry, CA  91748, USA 
Hikvision Canada, 4485 Dobrin, St-Laurent, Quebec, Canada, H4R 2L8 
Tel: +1-909-895-0400 • Toll Free in USA: +1-866-200-6690 • E-Mail: [email protected] • www.hikvision.com 


© 2016 Hikvision USA Inc. • All Rights Reserved • Specifications subject to change without notice.  

021716NA 


DVR/NVR DVD-RW  

Installation Guide 

(Model HK-DVDRW)  


For the Following Hikvision NVR/DVR Models:  

DS-9616NI-ST, DS-9632NI-ST, DS-9664NI-ST,  

DS-9632NI-I8, DS-9664NI-I8,  

DS9008HWI-ST, DS-9016HWI-ST 


Summary of Contents for HK-DVDRW

Page 1: ...09 895 0400 Toll Free in USA 1 866 200 6690 E Mail sales usa hikvision com www hikvision com 2016 Hikvision USA Inc All Rights Reserved Specifications subject to change without notice 021716NA DVR NVR...

Page 2: ...sales usa hikvision com www hikvision com 2016 Hikvision USA Inc All Rights Reserved Specifications subject to change without notice 021716NA Contents Installing a Hikvision HK DVDRW DVD RW Drive into...

Page 3: ...D RW drive to read and write data The DVD RW drive installs in two specific empty hard drive bays Remove DVR NVR Top Cover 1 Remove power from the DVR NVR 2 Remove and retain the two 2 screws on the b...

Page 4: ...ted only in the space created by the two left most drive bays 1 Flip the DVR NVR over to reach the bottom screws 2 Remove and retain the four 4 screws from the bottom of the DVR NVR 3 Remove and disre...

Page 5: ...e Installation Guide 5 021716NA Remove Left Bracket continued Figure 6 Left Drive Bracket Screws on Inside Top Frame Figure 7 Left Drive Bracket 5 Remove and discard the left bracket Figure 8 Left Dri...

Page 6: ...mount the internal printed circuit board PCB as follows 1 Remove and retain the two 2 screws from the internal 8 bay PCB Figure 10 Removing Screws from the 8 Bay PCB 2 Looking at the PCB from behind t...

Page 7: ...position the DVD RW drive into the space created by removing the left drive bracket The DVR NVR front panel swing down door should allow direct access to the DVD RW drive extendable disk tray Figure...

Page 8: ...the front panel 3 Re attach the top cover to the DVR NVR Affix the three left panel screws Affix the three right panel screws Affix the two back panel screws Figure 15 Reassembled DVR NVR 4 Apply powe...

Page 9: ...sing two screws on each side use only the two bottom rear screw holes 3 Screw the two brackets now holding the DVD RW drive back onto the top panel Ensure the DVD RW drive door faces the front of the...

Reviews: