background image

LaCie LaCinema Rugged 

Reformatting the LaCinema Rugged 

User Manual 

page 29

6. Reformatting the LaCie LaCinema Rugged

Windows Users

6.1. 

ImpOrTANT INfO:

 The drive should not be reformatted to 

a file system other than FAT32 or NTFS.  If the drive is format-
ted in a different format (such as HFS+), files will NOT appear 
on  your  television  screen.  For  details,  see 

1.4.  Views  of  the 

LaCinema Rugged

.

The process of formatting a drive on a computer running Win-
dows 2000, Windows XP or Windows Vista consists of two steps: 
(1)  installing  a  signature  on  the  drive,  and  (2)  formatting  the 
drive. These steps will erase anything that is on the disk.

CAUTION:

  Following  these  steps  will  erase  everything  from 

the LaCinema Rugged. If you have information that you want 
to protect or continue to use, back up this information before 
performing these steps.

Connect the drive to the computer via the interface port.

1. 

Right-click 

2. 

My Computer

 and select 

Manage

.

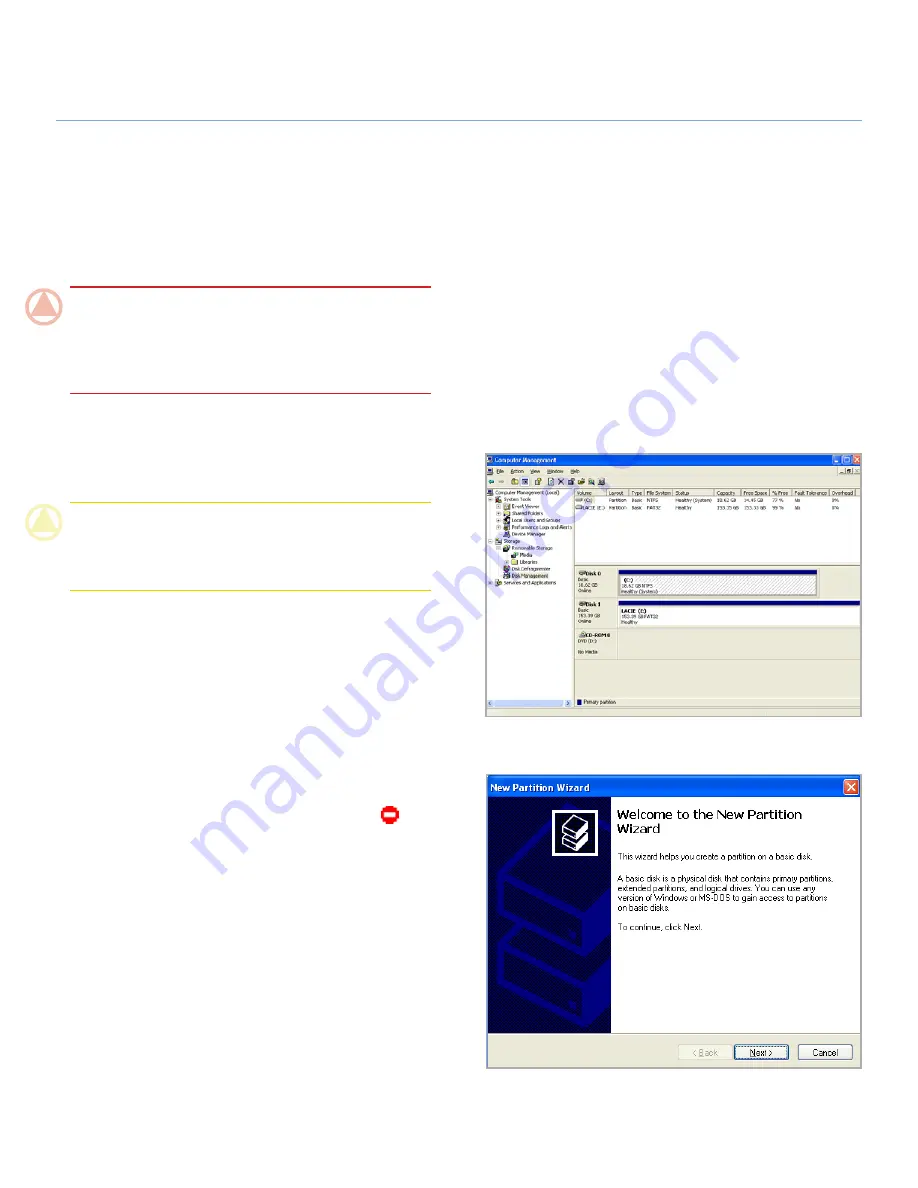
From  the  “Computer  Management”  window,  select 

3. 

Disk 

Management

 (located below the 

Storage

 group). See Fig. 

6.1-A.

If the “Initialize and Convert Disk Wizard” window appears, 

4. 

click 

Cancel

.

Windows  will  list  the  Hard  Disks  that  are  installed  on  the 

5. 

system. Locate the drive that is represented by the 

 icon.   

Right-click the icon and select 

Initialize

.

In the box to the right that says 

6. 

Unallocated

, right-click and 

select 

New Partition…

On the first page of the “New Partition Wizard,” click 

7. 

Next. 

See Fig. 6.1-A.

continued on next page...]

Fig. 6.1-A

Fig. 6.1-B

Summary of Contents for 301459KUA - LaCinema Rugged - Digital AV Player

Page 1: ...rage 12 2 3 Disconnecting Your LaCie LaCinema Rugged 13 3 Connecting the LaCinema Rugged to Your TV 14 3 1 Power Connection 14 3 2 Audio Video Connection 14 3 2 1 Composite Video Stereo Audio Cable 14...

Page 2: ...mpatibility 32 7 2 Optimizing Data Transfers 32 8 Troubleshooting 33 8 1 Troubleshooting Mac Users 33 8 2 Troubleshooting Windows Users 34 8 3 Troubleshooting TV Stereo Connection 35 9 Contacting Cust...

Page 3: ...ence that may cause undesired operation NOTE This equipment has been tested and found to comply with the limits for a Class B digital device pursuant to Part 15 of the FCC Rules These limits are desig...

Page 4: ...ie LaCinema Rugged near a source of heat or exposing it to sunlight even through a window Inversely placing your LaCie LaCinema Rugged in an environment that is too cold or humid may damage the unit...

Page 5: ...tant Info Any loss corruption or destruction of data while using a LaCie drive is the sole responsibility of the user and under no circumstances will LaCie be held liable for the recovery or restorati...

Page 6: ...LaCinema Rugged Then simply connect the LaCie LaCinema Rugged to your TV and use the included remote to easily navigate through the menus to listen to music view photos or watch movies The LaCie LaCin...

Page 7: ...udio Outputs Dual Stereo analog audio left and right Optical SPDIF Mac OS DVD Video function is supported via VOB IFO Video_TS folder DVD ISO file size cannot exceed more than 4GB FAT32 MS DOS file sy...

Page 8: ...ternal power supply 7 Quick Install Guide 8 LaCie Utilities CD ROM 9 with detailed User Manual and software Important Info Please save your packaging In the event that the drive should need to be repa...

Page 9: ...tus LED Flickering light indicates disk activity 1 Infrared receiver Receives the infrared signal from the re 2 mote control Make sure the receiver is not obstructed Rear View 1 4 2 Power supply conne...

Page 10: ...peripheral devices to a computer or to each other Hi Speed USB 2 0 is the latest implementation of this standard and it provides the neces sary bandwidth and data transfer rates to support high speed...

Page 11: ...h power 2 you may need to connect the power supply which turns on the LaCinema Rugged The LaCinema Rugged icon will appear on your computer 3 on the desktop for Mac users and in the My Computer folder...

Page 12: ...Trash or the Recycle Bin After transferring files make sure to safely disconnect the LaCin ema Rugged and its power supply For details see 2 3 Discon necting Your LaCie LaCinema Rugged Important Info...

Page 13: ...the lower right hand 1 side of your screen click the Eject icon a small green arrow over a hardware image A message will appear listing the devices the Eject 2 icon controls it should say Safely remo...

Page 14: ...external power supply to the LaCinema Rugged and to a grounded electrical outlet Fig 3 1 Audio Video Connection 3 2 3 2 1 Composite Video Stereo Audio Cable To connect the LaCinema Rugged to TV via a...

Page 15: ...gram below Once connected press the gear button and select the Video menu in order to adjust if necessary the video output resolution of the product to match your TV s resolution from 720p to 1080p Te...

Page 16: ...nnect the LaCinema Classic to a Digi tal Audio amplifier Power on LaCinema Rugged as described in section 3 1 Power Connection and follow the diagram below Important Info Make sure that you have enabl...

Page 17: ...e remote control uses two AAA batteries The batteries are not pre installed so you will need to install them before you can use the remote control To install the batteries Remove the battery compartme...

Page 18: ...ious 3 Back to previous track Volume down 4 Adjust volume down Volume up 5 Adjust volume up Stop 6 Stop the current file playback Play Select 7 Play selected file confirm selection Direction 8 Right a...

Page 19: ...s of the LaCie LaCinema Rugged while it is connected to your TV When you first power on the LaCie LaCinema Rugged the Main Menu appears after a few seconds From this menu you can choose from four diff...

Page 20: ...all file types select the Browser menu You can scroll through the list of movie files and folders using the Up and Down buttons Right button to open a folder and Left to move to upper folder level To...

Page 21: ...ual Property rights Each LaCie LaCinema Rugged user may only use their LaCie LaCinema Rugged in conjunction with materials legally owned or licensed by such user and only to the extent that such owner...

Page 22: ...layed Movies and photo files will not be displayed To view all file types select the Browser menu You can scroll through the list of music tracks and folders using the Up and Down buttons Right button...

Page 23: ...ng the Up and Down buttons Right button to open a folder and Left to move to upper folder level To confirm your choice press the Play button To change the settings of the Photos Menu please go to the...

Page 24: ...en the setup menu is shown the playback will be automati cally paused Press the Up and Down buttons to select the desired setup then press the Play button to confirm Press the Left and Right but tons...

Page 25: ...DTV 1080i This is for HDTV that supports this connec tion TV Type 5 5 3 4 3 Letterbox Select this option when using a standard 4 3 TV When you play a widescreen letterbox movie there will be margins o...

Page 26: ...d next picture is fades in Off No transition effect between pictures Subtitle Color Set color of subtitles to white yellow or green Subtitle Font Size and Subtitles Off Large Subtitle size is set as l...

Page 27: ...ys the selected song only File Repeat Plays back the selected song repeatedly Folder Plays back all files in the selected folder in se quence Shuffle Plays back all files in the selected folder ran do...

Page 28: ...he main menu 3 Select the Update folder and press the OK button 4 to open it Select 5 lacieLaCinema Ruggedfw bin file and press the OK button The firmware update will begin When the firmware update is...

Page 29: ...llowing these steps will erase everything from the LaCinema Rugged If you have information that you want to protect or continue to use back up this information before performing these steps Connect th...

Page 30: ...nfo The drive should not be reformatted to a file system other than FAT 32 If the drive is formatted in a non FAT32 format such as HFS files will NOT appear on your television screen Click 13 Finish t...

Page 31: ...he Utilities folder double click 3 Disk Utility The Disk Utility window will open Select the volume labeled 4 LaCie Hard Disk from the list of available hard disks on the left side of the window Selec...

Page 32: ...e equipped with a Hi Speed USB 2 0 host bus adapter card either sold separately or integrated by your com puter s manufacturer and the appropriate drivers These host bus adapter cards which include on...

Page 33: ...recognized by the computer Does an icon for the drive appear on the desktop There should be an icon for the LaCie drive on the desktop If the drive does not appear follow the rest of the Troubleshooti...

Page 34: ...connected to a Hi Speed USB 2 0 port on your computer Check to see that the Hi Speed USB 2 0 drivers for both your host bus adapter and device have been installed correctly If in doubt un install the...

Page 35: ...eed USB 2 0 performance levels when it is connected directly to a Hi Speed USB 2 0 port Otherwise the Hi Speed USB 2 0 device will operate at the slower USB transfer rates For more information please...

Page 36: ...s From there you can select the correct settings For more information please see section 4 2 1 Functions of the Basic Buttons Optimizing video connections What connectivity method will produce the bes...

Page 37: ...ave the following information on hand Information Where to Find Information 1 LaCie hard drive serial number Located on a sticker at the back of drive or on the original packaging 3 Macintosh PC model...

Page 38: ...acie com fr contact LaCie Germany Contact us at http www lacie com de contact LaCie Italy Contact us at http www lacie com it contact LaCie Japan Contact us at http www lacie com jp contact LaCie Neth...

Page 39: ...for any loss of data during the use of this device or for any of the problems caused as a result LaCie will not under any circumstances be liable for direct spe cial or consequential damages such as b...

Page 40: ...ata programmed directly into the circuitry of a programmable read only memory or an electronically erasable programmable read only memory chip Used for controlling the operation of the computer or tap...

Reviews: