Instruction manual for CoolSafe
01012016QA01
Item No. 700637
CopyRight © 2016
Page
5
of
30
3
Installation
3.1
Installation of CoolSafe
Make sure that the mains supply is according to the specifications on the type label placed
on the rear panel.
It is important that free air circulation is available at the air inlet and outlet grills. If the
CoolSafe is positioned against a wall, there must be at least 100 mm free space at the rear
of the unit.
The CoolSafe 100-9 Touch Superior XS and the CoolSafe 95-15 Touch Superior XL are
both floor standing units fitted with castors, the front pair being lockable. Before operating
the system insure that the castors are in the locked position.
3.2
Installation of vacuum pump
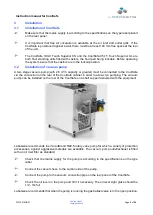
A two stage vacuum pump (with 2-5 m
3
/h capacity or greater) must be connected to the CoolSafe
via the connection on the rear of the CoolSafe cabinet in order to allow cryo pumping. The vacuum
pump can be installed on the rear of the CoolSafe on a shelf support delivered with the equipment.
LaboGene recommends the VacuuBrand RZ2.5 rotary vane pump for which a variety of protection
accessories, against aggressive materials are available. The vacuum pump outlet/exhaust is fitted
with an oil mist filter as standard.
Check that the mains supply for the pump is according to the specifications on the type
label.
Connect the vacuum hose to the suction side of the pump.
Connect the pump to the vacuum connection pipe on the rear panel of the CoolSafe.
Check the oil level on the pump and fill it if necessary. The oil level sight glass should be
1/2 - 3/4 full.
LaboGene recommends that when the pump is running the gas ballast valve is in the open position.


