


Labconco Glassware Washer Service/Technical Manual
51
**Completely drain and disconnect electrical power to the unit before
proceeding with any of these instructions.
1.
Remove the seating screw from the sump/sump screen.
2.
Pull the screen towards you to remove the screen.
3.
When replacing the new or cleaned screen, make sure the screen goes
back in its notch around the water distribution hub.
4.
Replace the seating screw.
5.
Run Diagnostics test.
Replacing the Sump Heating Element
The Heating Element is responsible for heating the water in the sump
to preset levels and for producing steam if required. It does this by
drawing current. If the heater is not operational, follow the
directions below to replace it.
**Completely drain and disconnect electrical power to the unit before
proceeding with any of these instructions.
1.
Remove the cosmetic Right Panel or the right service access panel.
2.
Locate the wiring connectors and pins of the Sump Heating Element.
n
3.
Disconnect the wire connectors.
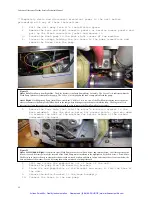
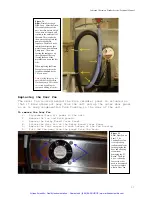
Figure 25
Left:
Sump Screen (before the Water
Distribution Channel has been
connected).
The
Red Arrow
shows the single screw
that holds the sump screen down to the
sump below. This must be pulled out to
remove the Sump Screen.
The
Green Arrow
points to the 1/8”
hole drilled in the sump screen that is
designed to break hard water’s surface
tension without allowing large shards of
glass, debris, or rogue labware from
getting into the sump.
The
Blue Circle
indicates the Water
Distribution Channel’s supply fitting.
This is where the connection tubes and
clamps will combine the Wash Pump
(via the sump) to Water Distribution
Channel and to the Wash Arms.
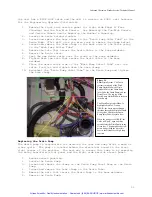
Figure 26
Left:
Sump Heater Electric pins and
Securing Nuts. The Electrical
connections to the red and white
wires pull off. The
Yellow Arrows
show the nuts that are to be removed
to remove the sump heater.
Right:
Sump Heater. The Sump
Heater is indicated by the
Blue
Arrow.
The
Green Arrow
shows the
tank side of the element bulkhead.
The element is secured by several
clamps, indicated by the
Red Arrow.
Artisan Scientific - Quality Instrumentation ... Guaranteed | (888) 88-SOURCE | www.artisan-scientific.com


