Labconco Glassware Washer Service/Technical Manual
48
**Completely drain and disconnect electrical power to the unit before
proceeding with any of these instructions.
1.
Pull the unit away from it’s installation space.
2.
Remove the back and right cosmetic panels or service access panels and
pull up the black insulation jacket and secure it.
3.
Locate the Wash pump in the back right corner of the machine.
4.
Loosen the clamps holding the two hoses to the pump connections and
remove the hoses from the pump.
5.
Remove the four nuts that hold the motor’s mounting bracket to the
base weldment. Use the photos below for access points.
(you may need
to elevate the back of the machine for better access at the screws
underneath the base)
6.
Lift and rotate the pump/motor out of base of the unit.
7.
Remove the pump from the mounting bracket.
8.
Place the new pump/motor on the bracket and mount it into the base of
the unit.
9.
Secure the motor/bracket to the base assembly.
10.
Connect the hoses to the new pump.
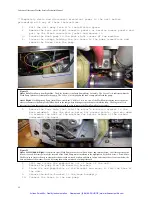
Figure 21
Above Left:
Wash Pump from Right Side. The
Blue Bracket
is the Drain Pump/Motor Assembly. The
Green Circle
indicates where the
Wash Pump Inlet hose is clamped to the pump. The
Yellow Circle
highlights the tank’s sump which feeds the pump.
Above Right:
Wash Pump and Pump Outlet Elbow from Rear. The
Blue Circle
is a view of the Wash Pump from the rear at the point
where it connects to the Pump Outlet Elbow back to the sump where it then goes into the water circulation loop. The
Magenta Circle
indicates the clamp that needs to be loosened and removed in order to remove the Wash Pump/Motor Assembly.
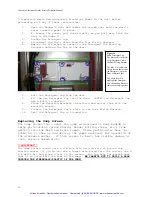
Figure 22
Above Left, Middle, & Right:
(From left to right) Wash Pump Corner Screw, Back Screw, and Internal Screw. In all three pictures, the
Blue Arrows and Brackets
point out the location of the Wash Pump motor in relation to the highlighted, by the
Red Arrows
, Screws/Nuts.
The best way to remove them is to clamp onto the nuts with a wrench or pliers and then to loosen and remove the screws from below the
base weldment of the washer. Do this by laying the washer on its back or tilting it forward.
Artisan Scientific - Quality Instrumentation ... Guaranteed | (888) 88-SOURCE | www.artisan-scientific.com


