


Labconco Glassware Washer Service/Technical Manual
30
close to the water distribution tower as possible. Be careful not to drill
through the plastic sump underneath the screen. The drilled hole is a short-
term solution.
If this must be done, contact Product Services at 1(800)821-5525 to get a
replacement screen from the manufacturer.
**
IF the unit does not have a window to watch the water filling the tank, the
switch can be tricked by pushing in on the switch located inside the
rectangular hole on the inside of the door (Fig 1A). You can run all
diagnostic tests this way with the door open.
(Running the wash pump with
the door open is not recommended)
Diagnostic Check Overfill:
1)
open the door latch
2)
push and hold the
▲
button
3)
While holding the
▲
button, simultaneously close the latch, and hold
the button until the machine beeps.
4)
Scroll down to Tap Fill and push
◄
or
►
until the screen says "yes"
next to Tap Fill.
•
This will allow the machine to fill with Tap water. It should
take less than 3.5 minutes for it to stop.
5)
Push and hold the “Run” button.
•
This causes the machine to override the initial fill contacts and
continue to fill manually.
•
Hold until the machine stops filling.
6)
Open the door and check the water level.
•
The water should cover the sump heater element but not be
overflowing the door.
- IF the water level isn’t covering the heater element or looks to overflow
the door then stop diagnostics and adjust the pressure switch as appropriate.
Adjusting the Pressure Switch:
To adjust the pressure switch as necessary, follow the directions on page 29
of this manual.
Overflow Alarm
This displays if the overflow sensor is wet, indicating free standing
or residual water in the base of the unit. If the sensor becomes wet
the machine will display the alarm “Overflow” and will Drain/Cancel.
Once it is finished draining the unit is inoperable until the sensor
is dry. The Alarm can be canceled by cleaning out the water in the
base and drying off the sensor and its contacts.
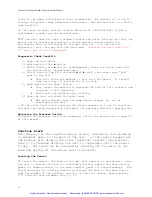
Locating the Sensor
To locate the sensor, the back of the unit will need to be accessible. Once
the unit is pulled out from its installed position, remove the back service
panel (if under-counter) or the back cosmetic panel (if free-standing). The
Overflow sensor is found by looking in through the back of the base and is
near the middle of the machine, and left of the fill valves, approximately
1.5” from the rear weldment (Fig 3 & 4).
Artisan Scientific - Quality Instrumentation ... Guaranteed | (888) 88-SOURCE | www.artisan-scientific.com


