background image

42 
 

Appendix E

: Manufacturer’s Extended Parts W

arranty 

(T

HIS IS YOUR 

W

ARRANTY IF YOU HAVE PURCHASED THE 

E

XTENDED 

P

ARTS 

W

ARRANTY AS SHOWN ON OUR INVOICE TO YOU OR IF YOU 

PURCHASE THE 

E

XTENDED 

P

ARTS 

W

ARRANTY ANYTIME DURING THE FIRST 

12

 MONTHS AFTER THE DATE OF OUR INVOICE

All La Marche Manufacturing Co. equipment has been thoroughly tested and found to be in proper operating condition upon 

shipment from the factory. Any part or parts of the equipment (except protective devices, DC connectors and other wear-
related items) that prove defective within a one (1) year period from the date of our invoice to you shall be replaced without 

charge providing such defect, in our opinion, is due to faulty material or workmanship and not caused by tampering, abuse, 
misapplication or improper installation. Labor and parts are covered during this one (1) year period.   

For the next four (4) years after the expiration of the one-year warranty, on a parts replacement only basis, 

any part or parts of the equipment (except protective devices, DC connectors and other wear-related items) 
that prove defective within the additional four (4) year period shall be replaced providing such defect, in our 

opinion,  is  due  to  faulty  material  or  workmanship  and  not  caused  by  tampering,  abuse,  misapplication  or 
improper installation. During this four (4) year period, the warranty covers parts replacement only, no labor 

or other services are provided by La Marche, nor is La Marche obligated to reimburse the owner or any other 
person for work performed.  If you return the equipment to our factory (freight prepaid), we will repair and 
cover parts and labor. 

Should a piece of equipment require major component replacement or repair during the extended warranty period, these 
can be handled in one of three ways: 

1.


If  the  Purchaser  elects  to  take  the  responsibility  of  repairing  the  equipment  and  requests  replacement  part(s), 
Purchaser  or  Sales  Representative  must  contact  Factory  for  return  authorization  and  a  purchase  order  must  be 
issued.  Replacement  part(s)  will  be  promptly  shipped  and  invoiced.  After  the  defective  part(s)  are  returned  and 
inspected at the Factory, if the defect(s) were due to faulty material or workmanship, credit will be issued. 

2.


The equipment can be returned to the La Marche factory to have the inspections, parts replacements and testing 

performed by factory personnel. Should it be necessary to return a piece of equipment or parts to the factory, the 
customer or sales representative must obtain authorization from the factory. If upon inspection at the factory, the 

defect was due to faulty material or workmanship, all repairs will be made at no cost to the customer under the 
Extended Warranty. Transportation charges or duties shall be borne by Purchaser. 

3.


If the purchaser elects not to return the equipment to the factory and wishes a factory service representative to 

make  adjustments  and/or  repairs  at  the  equipment  location,  La  Marche's  field  service  labor  rates  will  apply.  A 
purchase  order  to  cover  the  labor  and  transportation  cost  is  required  prior  to  the  deployment  of  the  service 
representative. 

In  accepting  delivery  of  the  equipment,  the  purchaser  assumes  full  responsibility  for  proper  installation,  installation 
adjustments  and  service  arrangements.  Should  minor  adjustments  be  required,  the  local  La  Marche  sales  representative 
should be contacted to provide this service only. 

All sales are final.  Only standard La Marche units will be considered for return. A 25% restocking fee is charged when return 
is factory authorized. Special units are not returnable. 

In no event shall La Marche Manufacturing Co. have any liability for consequential damages, or loss, damage or expense 

directly or indirectly arising from the use of the products, or any inability to use them either separately or in combination 
with  other  equipment  or  materials,  or  from  any  other  cause.  In  addition,  any  alterations  of  equipment  made  by  anyone 
other than La Marche Manufacturing Co. renders this warranty null and void. 

La  Marche  Manufacturing  Co.  reserves  the  right  to  make  revisions  in  current  production  of  equipment,  and  assumes  no 
obligation to incorporate these revisions in earlier models. 

The  failure  of  La  Marche  Manufacturing  Co.  to  object  to  provisions  contained  in  customers'  purchase  orders  or  other 
communications shall not be deemed a waiver of the terms or conditions hereof, nor acceptance of such provisions. 

THE  ABOVE  WARRANTY  IS  EXCLUSIVE,  SUPERSEDES  AND  IS  IN  LIEU  OF  ALL  OTHER  WARRANTIES, 

EXPRESSED  OR  IMPLIED,  INCLUDING  ANY  IMPLIED  WARRANTY  OF  MERCHANTABILITY  OR  FITNESS.  NO 
PERSON,  AGENT  OR  DEALER  IS  AUTHORIZED  TO  GIVE  ANY  WARRANTIES  ON  BEHALF  OF  THE 

MANUFACTURER, OR TO  ASSUME FOR THE MANUFACTURER  ANY OTHER LIABILITY IN  CONNECTION  WITH 
ANY OF ITS PRODUCTS UNLESS MADE IN WRITING AND SIGNED BY AN OFFICIAL OF THE MANUFACTURER. 

Summary of Contents for 7.5K-A1-BD3-125V100A

Page 1: ...com AUPS A Series UPS Uninterruptible Power Supply System Installation and Operation Manual 106 Bradrock Dr Des Plaines 60018 1967 Tel 847 299 1188 Fax 847 299 3061 CPN 137679 Instruction Drawing Number P25 LAUPS 1 Revision A00 Rev Date 01 18 ECN 21597 ...

Page 2: ...late Do not use this unit for any purpose not described in the operation manual Mechanical Safety This unit or parts of the unit may get very hot during normal operation use care when working nearby Do not expose equipment to rain or snow Always install in a clean dry location Do not operate equipment if it has received a sharp blow been dropped or otherwise damaged in any way Do not disassemble t...

Page 3: ...rly file a claim for shipping damages or provide a copy of the claim to La Marche may void warranty service for any physical damages reported for repair Returns for Service Save the original shipping container If the product needs to be returned for service it should be packaged in its original shipping container If the original container is damaged unavailable make sure the product is packed with...

Page 4: ...nsformer Taps Rectifier AC Input 4 2 2 1 Changing Transformer Taps Procedure Rectifier AC Input 4 2 3 Making the AC Connections 5 2 3 1 Rectifier AC Input Connection Procedure 6 2 3 2 AC Bypass Connection Procedure 6 2 3 3 AC Load Connection Procedure 6 2 4 Making the DC Input Battery Connections 7 2 4 1 DC Input Battery Connection Procedure 7 2 5 Alarm Connections 8 2 5 1 Alarm Connection Procedu...

Page 5: ... Parameters Inverter Section 28 3 8 1 Customer Calibration Mode 28 4 Service 30 4 1 Performing Routine Maintenance 30 4 2 Troubleshooting Procedure Rectifier Section 31 4 3 Troubleshooting Chart Rectifier Section 32 4 3 1 Ground and Short Circuit Test 33 4 3 2 Troubleshooting the TRIAC 33 4 3 3 Troubleshooting and Replacing Power Silicon Diodes Modules 34 4 3 4 Checking Capacitors 34 4 4 Troublesh...

Page 6: ... Connections Customer Provided Equipment 10 Figure 10 Temperature Compensation Connection External and Internal 11 Figure 11 Digital Rectifier Control Board S2A 341S Back View 12 Figure 12 DNP 3 0 Modbus Communication Board 13 Figure 13 Rectifier Front Panel 18 Figure 14 Inverter Front Panel 27 Table 1 Case Type and Weight 2 Table 2 Available Mounting Methods 3 Table 3 Input Terminal Connections 4...

Page 7: ...adjustable voltage settings for float and equalize It provides high efficiency high power factor short circuit protection and an integral alarm package Understanding the Model Number The AUPS model number is coded to describe the options that are included Find the model number on the nomenclature nameplate of the system Then follow the chart to determine the configuration of your system Optional A...

Page 8: ... to the limited shelf life of the DC filter capacitors when they are not in service 1 2 Moving the AUPS After careful inspection and upon verification that the AUPS is undamaged identify the enclosure style and weight of the AUPS unit Refer to Table 1 below Input Voltage kVA Rating 2 kVA 3 kVA 5 kVA 7 5 kVA 10 kVA 15 kVA 24 VDC 28 Case 28 Case 450 lbs 600 lbs 204 kg 272 kg 48 VDC 28 Case 30 Case 3...

Page 9: ...he system in order to allow for operation and maintenance The bolts or screws used to secure the AUPS should be sufficient length to assure a vibration free mounting The preferred fastener is a machine bolt backed with a flat washer lock washer and nut All hardware should be corrosion resistant Case Number Cable Entry gland plates provided Mounting DC Input Battery AC Input AC Output 28 Bottom Top...

Page 10: ...energize any external wiring to the alarm relay contacts Verify that all voltages within the enclosure are de energized and locked out Change the connections to the input terminals as shown in the table and figure below For 120 VAC Input Voltage 1 Connect jumper across TS 3 terminals 1 2 2 Connect jumper across TS 4 terminals D 3 3 Connect jumper across TS 4 terminals E 1 Note that AC input 1 conn...

Page 11: ... 208V Rectifier AC input 120 VAC input arrangement has breaker poles wired in parallel o Example ACB 40 amp Input protection 80 amps 240 208 VAC input arrangement has breaker poles wired in series o Example ACB 40 amp Input protection 40 amps Breaker Size Fuse Size Amps AWG Minimum Wire Size Requirement for Customer Connection AWG Minimum Wire Size for Equipment Grounding 3 14 14 5 14 14 10 14 14 ...

Page 12: ...erminal marked ground Then connect the AC bypass line phase hot to the AC BYPASS Ø terminal and the AC bypass line neutral to the AC BYPASS N terminal NOTE AC bypass input voltage and frequency must match with the AUPS output ratings 2 3 3 AC Load Connection Procedure First select wire size using the Table 4 Connect an adequate earth ground lead use table on previous page for sizing to the termina...

Page 13: ...1 1 for commercial TW copper wire KS5482 01 17 4 for aluminum KS20189 Calculating Wire Size Requirements AVD K LF A CMA Calculating Current Carrying Capacity of Wire K LF AVD CMA MaxAmp 2 4 1 DC Input Battery Connection Procedure Run the battery wiring to terminals marked positive and negative on the terminal block TB4 inside the system CAUTION The AUPS has a Reverse Polarity LED indicator and wil...

Page 14: ... on Preferred Source and Load on Alternate Source Each alarm status indicator relay includes two sets of form C contacts enabling the user to connect multiple remote annunciators Refer to Figure 5 and 6 for contact connections Alarm LEDs are provided on the rectifier section for the following alarms AC Fail Low DC Voltage End of Discharge High DC Voltage High Voltage Shutdown Low DC Current Overlo...

Page 15: ...d refer to Table 7 for alarm contact specifications Figure 8 S2A 240 Display Board S2A 198 Relay Information Relay Function Logic AC Power Fail De Energize On Fail Summary De Energize On Fail High DC Voltage Shutdown Energize On Fail Low DC Current De Energize On Fail High DC Voltage Energize On Fail Low DC Voltage De Energize On Fail End of Discharge De Energize On Fail Positive Ground Energize O...

Page 16: ...on Preferred Source and Load on Alternate Source If it is desired that the annunciator be active until the alarm triggers connect the annunciator leads to the Normally Open and Common contacts of the desired alarm located on the relay alarm contacts on S2A 198 board If it is desired that the annunciator be activated after the alarm triggers connect the annunciator leads to the Normally Closed and ...

Page 17: ... the battery Option 11W includes the compensation circuit and a 24 foot long temperature probe Option 11Y includes the compensation circuit and a 100 foot long temperature probe With either option approximately two feet of the probe is taken inside the AUPS enclosure External Probe Connection Procedure Before making any connections to the AUPS ensure that the AC power is off at the main breaker bo...

Page 18: ...tion enabled by default It is recommended that Ground Detection be disabled if the battery or loads are either positively or negatively grounded Additionally the AUPS will show a ground fault at all times if the system is known to be grounded and the Ground Detection is enabled If an external Ground Detection system is used the AUPS Ground Detection must be disabled Ground Detection Procedure Befo...

Page 19: ...olarity carefully 2 10 DNP 3 0 Modbus SCADA Interface Option 21P 21Q The optional DNP 3 0 Modbus SCADA Interface Communication Board allows the user to remotely connect to the AUPS The board is equipped with four methods of communication DNP 3 0 Modbus ASCII Modbus RTU and Modbus TCP There are three different ports for connection to the communication board The three port types for connection are R...

Page 20: ...tifier AC breaker to the ON position At this point the rectifier will slowly ramp up and go through startup sequence DC voltage and current should be displayed on the front panel of the rectifier section Full ramp up sequence must be completed before moving forward 4 Turn the Battery breaker to the ON position 5 Push and hold the Pre Charge button until the green READY LED illuminates The green RE...

Page 21: ...e Reset 5 of the Low DC Voltage threshold Low DC Current 1 of shunt size 5 Low DC Current Reset Dependent on output current rating Overload Dependent on output current rating 5 Overload Reset 5 of the Overload threshold Current Limit 110 of nominal output current 5 High DC Voltage 2 45 V C 1 61 V C 5 High DC Voltage Reset 5 of the High DC Voltage threshold High Voltage Shutdown 2 50 V C 1 65 V C 2...

Page 22: ...utput voltage settings If the High DC Voltage Shutdown alarm activates the DC output of the rectifier shuts off the rectifier by opening the Rectifier AC breaker to prevent irreversible damage to the battery In this condition the inverter will run off the batteries until either the HVSD alarm is reset resetting the Rectifier AC breaker or the batteries deplete The inverter will transfer to the alt...

Page 23: ...usually caused by the inverter section being off and a fully charged battery This could also be the result of maladjustments of the output voltage settings This alarm can be disabled if considered a nuisance alarm PHASE LOCKED LED will turn on and the relay contacts will trigger if the inverter and utility AC Bypass sources are synchronized within the phase window UTILITY AVAILABLE LED will turn o...

Page 24: ...th the rectifier DC voltage and current Pressing either the UP or the DOWN arrow on the membrane will change the parameter that is displayed The parameters viewable on the idle display are as follows System DC Outputs Temperature at Probe internal external based on connection Temperature Compensation Status Equalize Timer Status and Length Time until next automatic Equalize cycle Selected Equalize...

Page 25: ...t Mode Equalize Mode will not start again until it is manually activated by the user Mode 1 7 Day Auto EQ Mode 1 is an automatic Equalize cycle that activates every 7 days The length of the Equalize cycle is determined by the timer setting After the timer cycles to zero the rectifier will automatically return to Float Mode Equalize Mode will restart again after 7 days Mode 2 14 Day Auto EQ Mode 2 ...

Page 26: ...ings Float Voltage Setting The Float voltage adjustment is set at the factory at 2 17 V C LA 2 25 V C VRLA or 1 4 V C NC The Float voltage can be adjusted by 0 1V increments Select Float Voltage Setting and press the ENTER button Press the UP and or DOWN buttons until the required voltage level is displayed Press ENTER to store the setting or BACK to cancel The approximate adjustable range is as f...

Page 27: ... not included in the basic Settings Menu The Advanced Settings Menu is divided into 6 submenus Equalize Timer Settings Advanced Alarm Settings Temperature Compensation Communication Settings LCD Settings and Return to Defaults Equalize Timer Settings The Equalize Timer Settings submenu provides access to the change the Equalize Timer Mode and Equalize Timer Hours Equalize Timer Mode The Equalize t...

Page 28: ...age Alarm If any alarm contacts are set to latch the alarm will not clear until the ALARM RESET button is pressed even if the alarm condition returns to normal By default no alarms are set as latching Except High Voltage Shutdown HVSD these alarms will clear after the condition returns to normal NOTE The HVSD alarm latches by default and cannot be changed Temperature Compensation Settings Temperat...

Page 29: ...ble to re test functionality of the alarm LEDs and relays The Test Menu allows the user to test both the LEDs on the display board as well as any alarm relay contacts 3 6 2 1 Test LEDs The Test LEDs menu allows the user to run a basic lamp test on the rectifier After selecting this menu press the ENTER button to light all of the LEDs on the display membrane To end the LED test press back NOTE Any ...

Page 30: ...24 3 6 3 Rectifier Customer Configuration Menu AUPS Rectifier Customer Configuration Menu ...

Page 31: ...25 ...

Page 32: ...26 ...

Page 33: ...when the utility source is deemed available LED will also flash ON and OFF when the Utility Frequency is not within preset limits 47 to 53Hz or 57 to 63Hz Inverter Available LED is ON when the inverter source is deemed available LED will also flash ON and OFF when the Inverter Frequency is not within preset limits 47 to 53Hz or 57 to 63Hz Load Voltage LED is ON when the operator has selected to vi...

Page 34: ...t is 20 The setting is adjustable in 1 increments The display will alternate between LVH and the actual upper limit setting Load Voltage Window Lower Limit The lower allowable limit for the Load Voltage signal may be set in terms of percent The maximum allowable lower setting is 30 and the minimum allowable lower setting is 10 The default is 20 The setting is adjustable in 1 increments The display...

Page 35: ...Voltage to be within tolerance The Inverter Sense Delay may be adjusted from 0 to 10 seconds in 1 second increments with 10 being the default The display will alternate between Id and the time delay setting Utility Sense Delay This setting is used to set the amount of time the Utility Voltage must be within the upper and lower limits described above The Utility Sense Delay may be adjusted from 0 t...

Page 36: ...forming Routine Maintenance Although minimal maintenance is required with the AUPS routine checks and adjustments are recommended to ensure optimum system performance Yearly 1 Confirm air vents are open Remove dust and debris from interior of unit 2 Verify all connections are tight 3 Perform a visual inspection on all internal components 4 Check front panel meters for accuracy and LED operation 7t...

Page 37: ...by defective batteries and customer loads make sure batteries and loads are free from defects NOTE If the problem is found to be located in the printed circuit boards the board should be replaced No attempt should be made to repair circuit boards in the field When calling in for a service inquiry or for troubleshooting assistance be sure to have all of the following information on hand 1 Equipment...

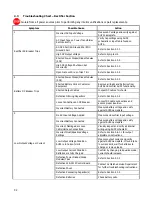
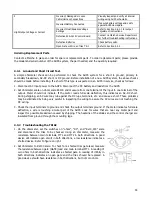
Page 38: ...to Section 4 3 4 Loose Connections on DC Breaker Inspect DC cable connections and assure proper insertion Incorrect Battery Connected Measure battery voltage and verify against AUPS nameplate 3 Low Output Voltage or Current No AC Input Voltage Applied Measure and confirm input voltage Incorrect Battery Connected Measure battery voltage and verify against AUPS nameplate Incorrect Damaged or Loose C...

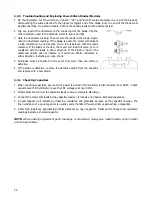
Page 39: ...one terminal of the input to one terminal of the output Meter should not indicate If the meter reads full scale deflection this indicates an AC DC short During shipping an AC wire may rub against the DC lugs terminals etc and cause a short These problems may be eliminated by being very careful in inspecting the wiring to assure the AC wires are not touching the DC wiring 3 Check the input terminal...

Page 40: ...e resistance in either direction indicating an open circuit 4 All diodes must be checked in the event that more than one diode is defective 5 If the diode is defective remove the defective diode from the heatsink and replace with a new diode 4 3 4 Checking Capacitors 1 When checking capacitors assure all AC power is turned off and battery is disconnected from AUPS Check capacitors with DC voltmete...

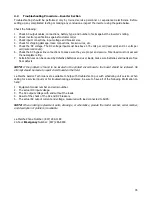
Page 41: ...late rating 7 Certain failures can be caused by defective batteries and user loads make sure batteries and loads are free from defects NOTE If the problem is found to be located in the printed circuit boards the board should be replaced No attempt should be made to repair circuit boards in the field La Marche Service Technicians are available to help with troubleshooting or with scheduling unit se...

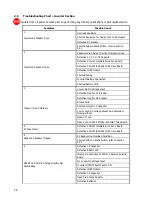
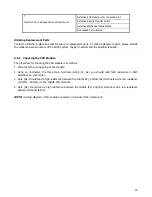
Page 42: ...attery Cells 3 Lockout No AC Output Low or No DC Voltage Input Defective Inverter AC Breaker Defective Inverter DC Breaker Broken Wire Shorted or Open C1 Capacitor Low or High DC Voltage Shutdown Activated or Improperly Set Open F2 Fuse Open Fuse on S2A 297 S2A 306 IGBT Drive Board 4 F2 Fuse Clears Defective S2A 167 Oscillator Line Sync Board Defective S2A 297 S2A 306 IGBT Drive Board 5 Bypass AC ...

Page 43: ...ty required 4 5 1 Checking the SCR Module The procedure for checking the SCR module is as follows 1 Disconnect the wiring going to the module 2 Using an ohmmeter the three main terminals A1K2 K1 A2 you should read high resistance in both directions on your meter 3 Gate G1 should read a high resistance between the top A1K2 bottom A2 terminals and a low resistance 10 Ohm 40 Ohm to the middle K1 term...

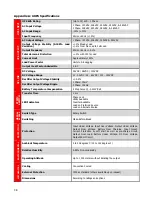
Page 44: ...tage Ripple 1 Phase 30mV 3 Phase 100mV Battery Temperature Compensation 5 Step Curve 0 001V Cell STATIC SWITCH Transfer Time 1 ms LED Indicators Phase Lock Utility Available Inverter Available Load on Preferred Source Load on Alternate Source MANUAL BYPASS Switch Type Rotary Switch Switching Make Before Break PROTECTION Protection Input Under Voltage Input Over Voltage Output Under Voltage Output ...

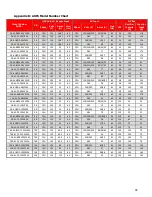
Page 45: ...H 120 42 60 1PH 480 26 60 48 150 132 5K A1 BD3 48V150A 5K 1PH 120 42 60 3PH 208 240 30 26 60 48 150 132 5K A1 C3 48V150A 5K 1PH 120 42 60 3PH 480 13 60 48 150 132 10K A1 BD3 48V300A 10K 1PH 120 84 60 3PH 208 240 60 52 60 48 300 278 10K A1 C3 48V300A 10K 1PH 120 84 60 3PH 480 26 60 48 300 278 3K A1 ABD1 125V35A 3K 1PH 120 25 60 1PH 120 208 240 59 34 30 60 125 35 32 3K A1 C1 125V35A 3K 1PH 120 25 60...

Page 46: ...the field Not all accessory kits will be installable in all enclosures 21P DNP3 Protocol Package 21Q Modbus Interface Package 11W External Temperature Package 22 Ft 11Y External Temperature Package 100 Ft The installation of each accessory varies between each of the AUPS enclosures The installation instructions for each accessory and each enclosure is included as part of the accessory kit ...

Page 47: ...er elects not to return the equipment to the factory and wishes a factory service representative to make adjustments and or repairs at the equipment location La Marche s field service labor rates will apply A purchase order to cover the labor and transportation cost is required prior to the deployment of the service representative In accepting delivery of the equipment the purchaser assumes full r...

Page 48: ...ts and testing performed by factory personnel Should it be necessary to return a piece of equipment or parts to the factory the customer or sales representative must obtain authorization from the factory If upon inspection at the factory the defect was due to faulty material or workmanship all repairs will be made at no cost to the customer under the Extended Warranty Transportation charges or dut...

Page 49: ...43 Appendix F Document Control and Revision History Part Number 137679 Instruction Number P25 LAUPS 1 Issue ECN 21597 21597 01 18 ...

Reviews: