background image

Adding & Connecting Your Station to Wi-Fi

LA CROSSE VIEW

05

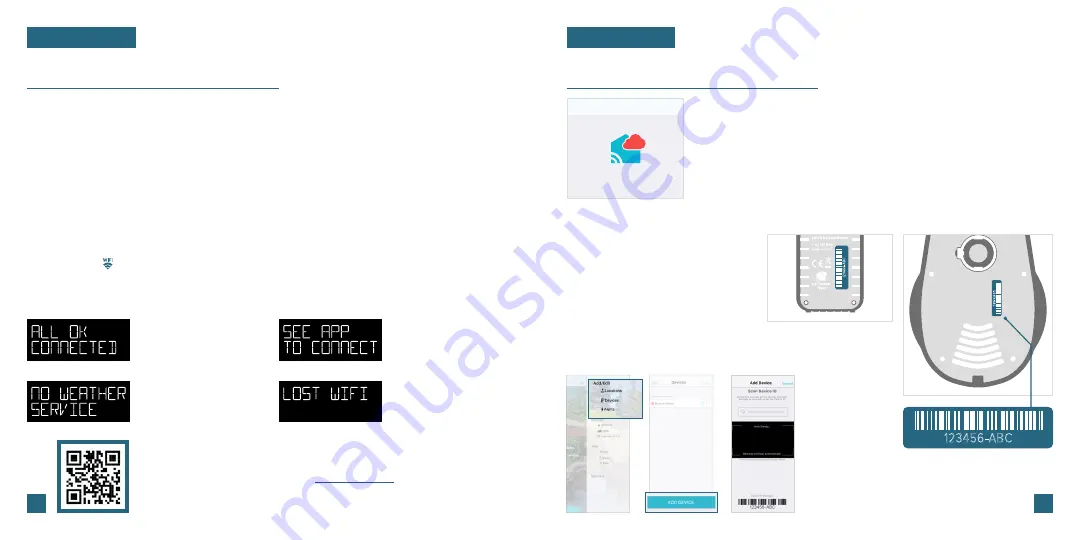
Checking Your Station’s Wi-Fi Status

Press the

 SET 

button on the top of the station to view your Wi-Fi Status.

Having Trouble Connecting to Wi-Fi?

The app should guide you through the best method for your Wi-Fi network and router. However, 

if you have trouble connecting, please go to:


bit.ly/wifi_questions


or scan the QR code. This will 

explain additional connectivity options, including connecting by WPS or contacting our technical 

support team for further assistance.

ALL OK CONNECTED

Your station is connected to your 

Wi-Fi network and its data should 

be available on the station and 

in the app.

SEE APP TO CONNECT

Check the app for notifications.

NO WEATHER SERVICE

Your Internet weather and time 

services are not connecting. 

These should resolve on their 

own, please be patient.

LOST WIFI

Check your router and network 

connections.

The La Crosse View app is required to connect the station to your Wi-Fi network. Download, install, 

and log into your La Crosse View account first.

New User Initial Setup:


When first setting up your 

station, the app will lead you through a series of 

instructions to help get your station added into your 

account and connected to your home Wi-Fi network.

Manually Add & Connect Display:


After the initial walkthrough, 

stations can be added and connected via the Devices tab in the 

app’s main menu. Simply tap the 

Add Device

 or 

+

 button at the 

bottom of the Devices page in the app. 

1.

Follow the initial app instructions or manually add the display into your account. 

2.

Next, the app will prompt you to use your phone to scan the device ID barcode located on the back of 

the station. Please note, adding a device to your account and connecting it to Wi-Fi are two different 

steps. You can complete either step separately if you have any trouble.
When connected, the station will beep, and time and forecast information should populate on the 

display. The      indicator will also become solid. 

3.

4.

This step is only required if you do not receive the Add Device 

notification within the app.

Prior to mounting/positioning your sensors, make sure your 
station is receiving sensor data.

Upon getting the station connected to your Wi-Fi network, the app will 

explain how your connected sensor should be brought in. Within the next 

15 minutes, you should receive an Add Device notification in your app. 

This is indicated by the Red Cloud and the numbers inside of it. Tap this 

icon to begin adding your sensor into the app.

1.

Manually Add Your Sensors to the App*

3.

4.

2.

Open your La Crosse View app. On the 

Main Menu, scroll to 

ADD/EDIT

 and select 

DEVICES

.  

Scan the Barcode on your Sensor or type 

in the Device ID manually.
Confirm the sensor image and Device 

ID and add a Device Name and Location 

Name. Select 

DONE

.

On the Devices page, select the 

ADD 

DEVICE 

or

 PLUS (

+

button.

100%

Add Device

Save

Cancel

12:34

2

Please wait up to 15 minutes 

for your additional devices

to connect to your account.

If you do not receive device

notifications, go to the Main Menu 

and select Add/Edit Devices to

add your devices separately.

Check the notification icon when 

your devices are ready to add.

Adding Your Sensors to the App

LA CROSSE VIEW

02

123456-ABC

123456-ABC

123456-ABC

▲  Back of Thermo-Hygro Sensor

Bottom of Cyclone Sensor  

06

Summary of Contents for V42

Page 1: ...SET UP GUIDE MODEL NUMBER V42 BP73736 Wi Fi PROFESSIONAL WEATHER STATION...

Page 2: ...al Setup Station Settings Buttons LCD Display Brightness Auto Dim Settings Time Calendar Display Viewing Wind Data Wind Speed Records Customizable Alerts Wind Cup Installation Placement Mounting Rain...

Page 3: ...Play Store to download the free La Crosse View app onto your mobile device Launch the App Connecting Your Station to the App Open the La Crosse View app Follow the on screen setup instructions to cre...

Page 4: ...r account 2 Next the app will prompt you to use your phone to scan the device ID barcode located on the back of the station Please note adding a device to your account and connecting it to Wi Fi are t...

Page 5: ...tings Menu 1 Use the buttons on the top of the station to adjust the values 2 Press the SET button to confirm your selection and move to the next setting 3 You may exit the Settings Menu at any time b...

Page 6: ...to adjust the stopping hour Press LIGHT to confirm and exit Time Calendar Display Data Stream Technology Data Streams allow you to see additional AccuWeather information in the time calendar section...

Page 7: ...ssure over the past 3 hours Viewing Extended Forecast Press and release the FORECAST button to toggle through your next 12 hours and next 7 days of forecast data 12 Rapid Increase Steady Pressure Slow...

Page 8: ...iling Wind Direction over the past hour 13 14 24 Hour Record Example 1 Month Record Example 1 Year Record Example Wind Speed Records When viewing the monthly record press and release the PLUS button t...

Page 9: ...The scale values automatically adjust when over 1 inch 25 4 mm of rain is measured Days Since Last Rain After 24 hours of no rainfall the station will start counting days without rain Rainfall readin...

Page 10: ...station to toggle through rainfall records with time and date stamps See rainfall records for the past hour 24 hours 7 days month year and total since start up Viewing Temperature Humidity Data TEMPER...

Page 11: ...Outdoor Low Humidity 7 Indoor High Temperature 8 Indoor Low Temperature 9 Indoor High Humidity 10 Indoor Low Humidity Records Viewing Order 1 Outdoor High Temperature 2 Outdoor Low Temperature 3 Outd...

Page 12: ...ensure the Cyclone Sensor especially the rain gauge is mounted level Ensure the Solar Panel is facing to the South This helps optimize battery life and transmit correct wind direction data Ideally the...

Page 13: ...installation options include tripods wall mounts chimney mounts and many others Any of these can be combined with U bolts for attachment onto a tall cylindrical conduit using our Adjustable Base Thes...

Page 14: ...endar THERMO HYGRO SENSOR LTV TH5i Outdoor Temperature Range 40 F to 140 F 40 C to 60 C Outdoor Humidity Range 10 to 99 RH Transmission Range 400 feet 121 meters open air Update Interval Every 51 Seco...

Page 15: ...s 1 This device may not cause harmful interference and 2 This device must accept any interference received including interference that may cause undesired operation Caution Any changes or modification...

Page 16: ...ons watch setup videos and provide feedback on our social media outlets Scan for Self Help Factory Reset If you are experiencing issues press and hold the ALERTS and RAIN buttons down together until t...

Reviews: