


Installation and use
2-17
24) In the first connection you must connect the USB port of the AMS-8061
to the PC (USB port) by USB(A)/USB(B) cable and configure the station
with NardaAMConfigurator software. It must be make in this way even if the
subsequent operations will be done via Ethernet or RS232 or 4G modem.
The Ethernet connection cannot be used to configure the AMS-8061
station with NardaAMConfigurator software.
RS232 Cable and USB-RS232 adapter are accessories supplied
separately (on charge)
When the Ethernet cable is connected to the AMS module, and it is
switched on, the RS232 port is not available.
Every time the Ethernet cable is plugged into the AMS module, the
connection will last 15 minutes regardless the scheduled time which
continues to work in separate way.
Local data download through RS232, USB or Ethernet will be regularly
required if no GSM signal is present in the installation place.
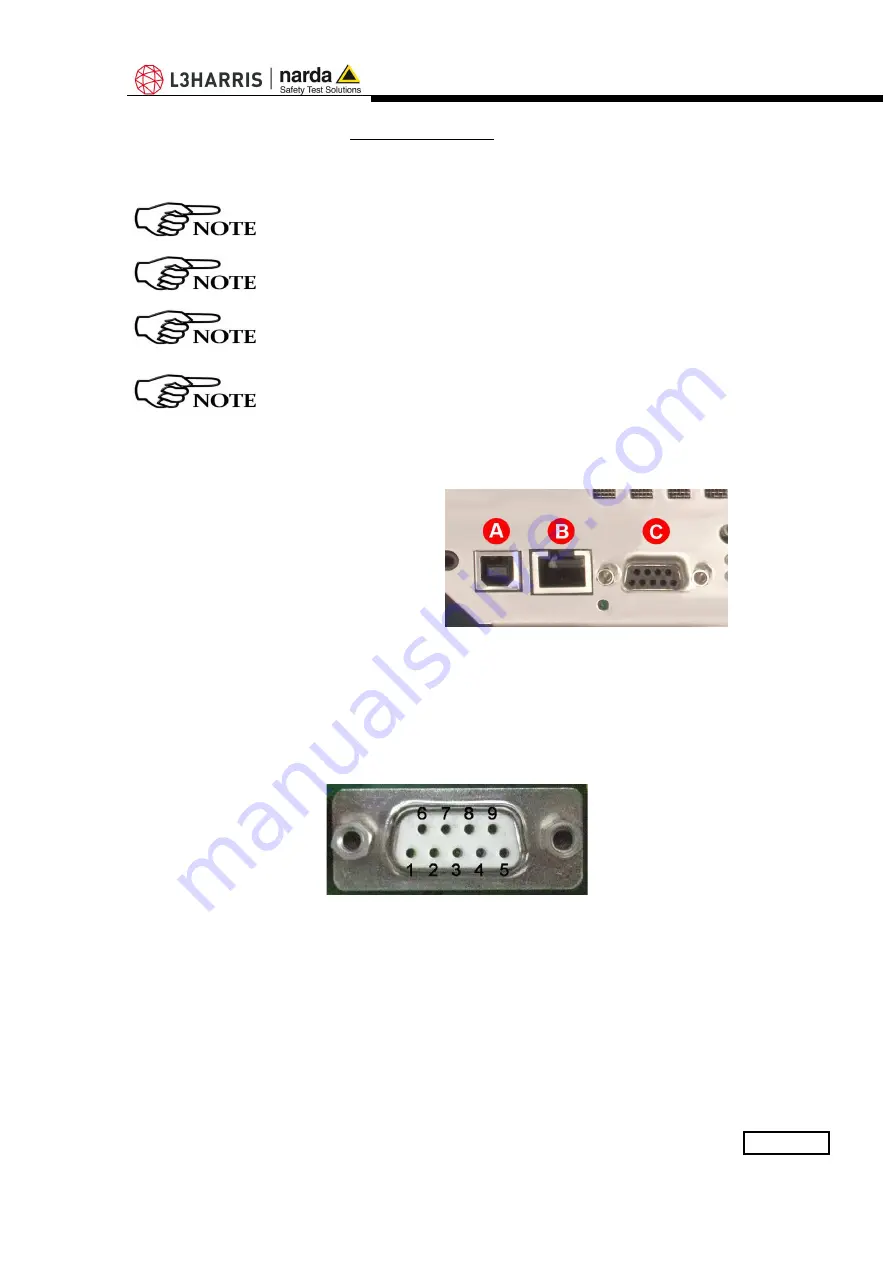
- USB-B connector
.
- ETHERNET connector
-
RS232 connector
Fig. 2-2
DB9 Female front side view
DB9 pin configuration:
Pin 2
RX [Received Data]
Pin 3
TX [Transmit Data]
Pin 5
GND [Signal Ground]
Pin 9
+3VD [Current limited]
Summary of Contents for NARDA AMS-8061
Page 10: ...X EC Conformity This page has been left blank intentionally ...
Page 18: ...1 8 General Information This page has been left blank intentionally ...
Page 50: ...2 32 Installation and use This page has been left blank intentionally ...
Page 124: ...3 74 8061SW 02 User s guide and Data Display This page has been left blank intentionally ...
Page 142: ...4 18 Point to Point and FTP Communication This page has been left blank intentionally ...
Page 214: ...5 46 SMS Messages and Commands This page has been left blank intentionally ...
Page 218: ...6 4 Action of the wind on the AMS 8061 This page has been left blank intentionally ...
Page 236: ...8 4 Packaging Instructions Box G contains radome Box H main box ...
Page 237: ...Packaging Instructions 8 5 Insert Box C in the Box H Insert Box D in the Box H ...
Page 238: ...8 6 Packaging Instructions Insert Box G in the Box H Insert Box A in the Box H ...
Page 239: ...Packaging Instructions 8 7 Box H Main Use pallet and straps for the final packing ...
Page 240: ...8 8 Packaging Instructions This page has been left blank intentionally ...
Page 242: ...Suggerimenti Commenti Note Suggestions Comments Note ...


