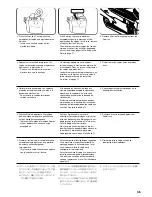

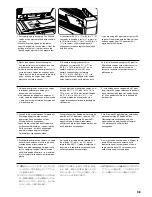
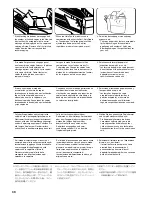


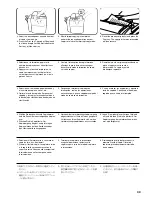

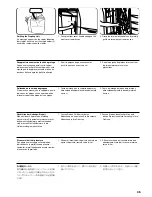


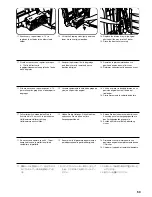

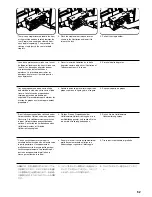


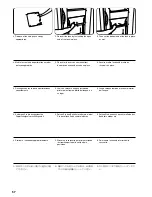
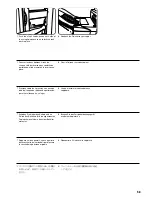


11. If necessary, repeat steps 4 - 10 to
replenish the staples in the other staple
holder.
12. Lift up the Stapling Unit slightly and then
lower it into its original position.
13. Replace the internal tray in its original
position all the way into the Finisher.
14. Close the front cover securely.
11. Si cela est nécessaire, répéter les étapes
4 - 10 afin d'effectuer le
réapprovisionnement en agrafes de l'autre
boîte d'agrafes.
12. Soulever légèrement l'unité d'agrafage
puis l'abaisser et la remettre dans sa
position d'origine.
13. Remettre le plateau interne dans sa
position d'origine dans le finisseur.
14. Refermer correctement le panneau avant.
11. Si fuera necesario, repita los pasos 4 - 10
para rellenar las grapas en el otro soporte
de grapas.
12. Levante ligeramente la unidad de grapado
y baje a su posición original.
13. Vuelva a colocar la bandeja interna en su
posición original hasta el fondo del
finalizador.
14. Cierre firmemente la cubierta delantera.
11. Falls erforderlich, wiederholen Sie die
Schritte 4 bis 10, um auch in der anderen
Heftklammern-Haltevorrichtung
Heftklammern nachzufüllen.
12. Heben Sie die Heftungs-Einheit leicht an,
und senken Sie sie dann auf ihre
Ausgangsposition ab.
13. Setzen Sie das Innenfach wieder bis zum
Anschlag an seiner Ausgangsposition in
das Fertigbearbeitungsgerät ein.
14. Schließen Sie die vordere Abdeckung
sicher.
11. Se necessario, ripetere i punti 4 - 10 per
riempire di nuovo le graffette nell'altro
contenitore di graffette.
12. Serrare l'unità di pinzatura leggermente e
poi abbassarlo nella posizione originale.
13. Rimettere il vassoio interno nella sua
posizione originale completamente dentro
il Finisher.
14. Chiudere il coperchio frontale saldamente.
11. 手順4〜10と同様にして、もう片方のス
テイプルホルダーにも針を補給してくだ
さい。
12. ステイプルユニットを一度少し上に上げ
た後、下におろして元通りセットしてく
ださい。
13. 内部トレイを元通り奥まで完全に押し込
んでください。
14. 前カバーを閉めてください。
50
Summary of Contents for KM-3530
Page 2: ......
Page 13: ...8 20 65 RH...
Page 19: ...14...
Page 20: ...15 Names of parts Nom des pi ces Nombre de las piezas 19 20...
Page 22: ...17 Bezeichnungen der Teile Nome delle parti 19 20...
Page 99: ...This machine has passed all quality controls and final inspection...
Page 100: ...2001 5 3C180010A...


