background image

3

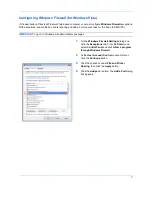
Configuring Windows Firewall (for Windows Vista)

If the destination of files is a Windows Vista-based computer, you must configure 

Windows Firewall

 exceptions.

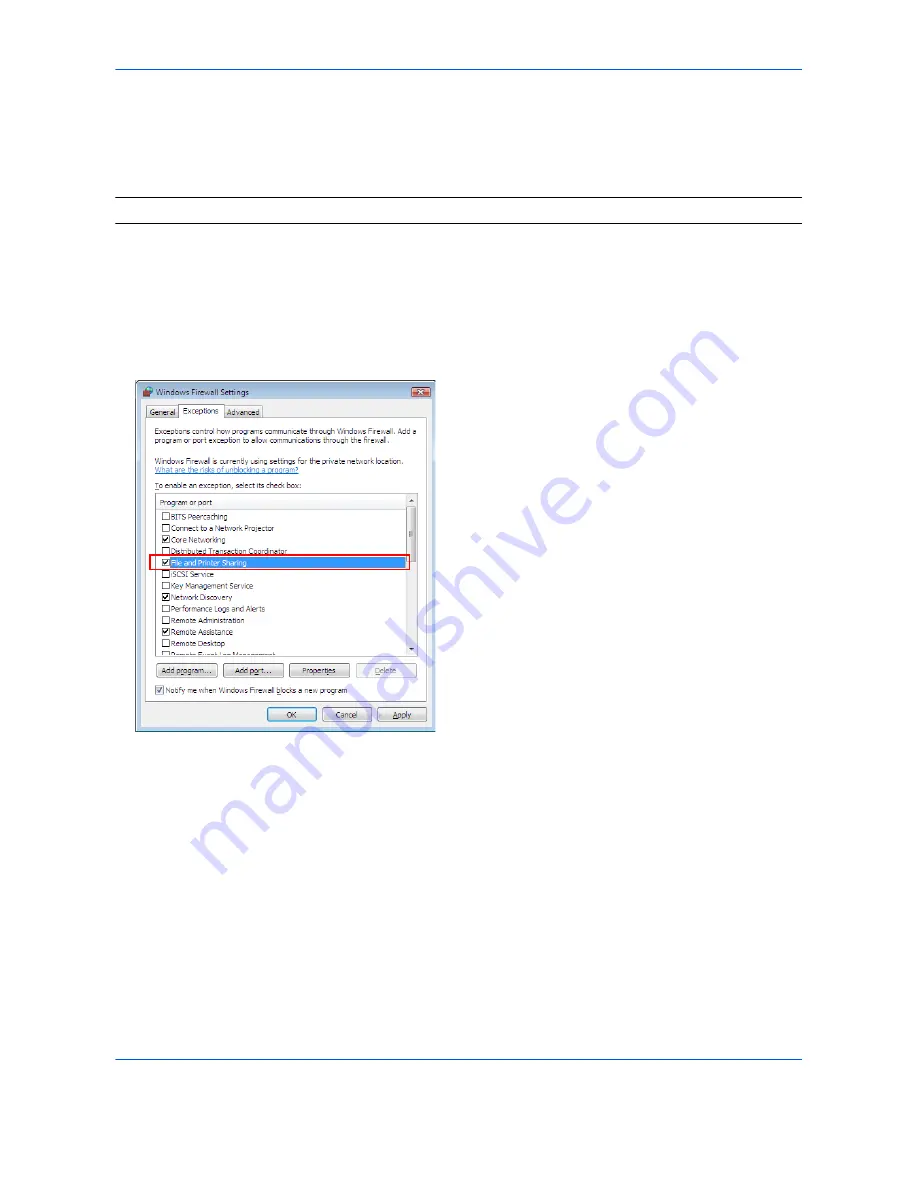
With exceptions, enable file and printer sharing and add a port you want use for the Scan to SMB (PC).

IMPORTANT: 

Log on to Windows with administrator privileges.

1

On the 

Windows Firewall Settings

 dialog box, 

click the 

Exceptions

 tab. From the 

Start

 menu, 

select 

Control Panel

 and click 

Allow a program 

through Windows Firewall

.

2

At the 

User Account Control

 consent prompt, 

click the 

Continue

 button.

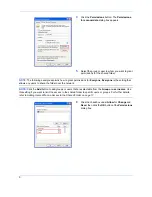
3

Click the checkbox under 

File and Printer 

Sharing

, then click the 

Apply

 button.

4

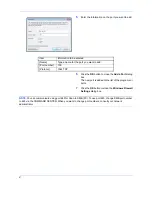
Click the 

Add port...

 button. The 

Add a Port

 dialog 

box appears.

Summary of Contents for KM-2540

Page 1: ...Scan to SMB PC Set up Guide ...

Page 2: ... Windows XP and Windows Vista are trademarks of Microsoft Corporation This machine contains the software having modules developed by Independent JPEG Group All other brands and product names are registered trademarks or trademarks of their respective companies The designations and will not be used in this Setup Guide ...

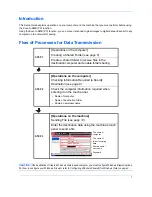
Page 3: ...eate a shared folder to receive files in the destination computer and enable folder sharing STEP 2 Operations on the computer Checking Information Required to Specify Destination see page 8 Check the computer information required when entering it on the touch panel Name of computer Name of destination folder Domain name user name STEP 3 Operations on the machine Sending File see page 12 Enter the ...

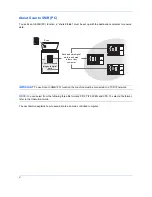
Page 4: ...tion the machine must be connected to a TCP IP network NOTE You can select from the following three file formats PDF TIFF JPEG and XPS To select a file format refer to the Operation Guide The next section explains how to send data to a domain controlled computer Scan Convert scanned images to digital data Send and store digital data in a shared folder of any computer ...

Page 5: ...an to SMB PC IMPORTANT Log on to Windows with administrator privileges 1 On the Windows Firewall Settings dialog box click the Exceptions tab From the Start menu select Control Panel and click Allow a program through Windows Firewall 2 At the User Account Control consent prompt click the Continue button 3 Click the checkbox under File and Printer Sharing then click the Apply button 4 Click the Add...

Page 6: ...k the OK button to close the Windows Firewall Settings dialog box NOTE You can communicate using port 445 for Scan to SMB PC To use port 445 change SMB port number to 445 via the COMMAND CENTER When you want to change port numbers consult your network administrator Item Information to be entered Name Type a name for the port you want to add Port number 139 Protocol Click TCP ...

Page 7: ...data on drive C NOTE The following description is one example of screenshots of Windows XP The details differ depending on the type of operating system IMPORTANT Log on to Windows with administrator privileges 1 Create a folder named scannerdata on drive C 2 Right click the scannerdata folder and select Sharing and Security The scannerdata Properties dialog box appears 3 Select Share this folder N...

Page 8: ...e setting that allows any users to share the folder over the network NOTE Click the Add button to add groups or users that are selectable from the Group or user names Use this setting if you want to limit the access to the shared folder to specific users or groups For further details refer to Adding Users Who can Access to the Shared Folder on page 17 6 Click the checkbox under Allow for Change an...

Page 9: ...s button Select the computer to which the shared folder was created Example PC4050 and then click the OK button 9 Enter the user name added as a local user into the text box and click the OK button 10 Select the added user click the checkbox under Allow for Modify and Read then click the OK button 11 Click the OK button to close the Properties dialog box ...

Page 10: ...Entry for Login User Name Checking the Entry for Host Name Check the name of the destination computer 1 Right click My Computer and select Properties The System Properties dialog box appears 2 Click the Computer Name tab to view the name of computer If the Computer Name tab contains Full computer name and Domain The characters to the left of the first dot in the Full computer name text box corresp...

Page 11: ...9 If the Computer Name tab contains Full computer name and Workgroup All characters in the Full computer name text box correspond to the entry for Host Name Example PC4050 ...

Page 12: ...age 8 and then click Search 4 Double click the name of computer pc4050 displayed on the search results 5 Double click the scannerdata folder and check the full path displayed in the Address Bar The characters to the right of the third backslash correspond to the entry for Path Example scannerdata NOTE Available characters for Path is ASCII only except NOTE You can specify a subfolder in the shared...

Page 13: ...mple window below ABCDNET james smith corresponds to domain name user name Example ABCDNET james smith NOTE Available characters for Login User Name is ASCII only NOTE You can also use the following steps to check the domain name and user name that must be entered in Login User Name 1 Open the Command Prompt window From the Start menu select All Programs Accessories and then Command Prompt 2 At th...

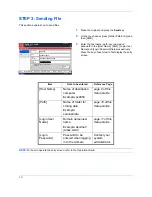
Page 14: ...nection Test Host Name Path Login User Name Login Password SMB FTP Folder Path Entry Place original Ready to send Destination 1 Cancel OK Next Dest Add to Addr Book Specify the folder on the destination computer pc4050 scannerdata abcdnet james smith Item Data to be entered Reference Page Host Name Name of destination computer Example pc4050 page 8 of this Setup Guide Path Name of folder for stori...

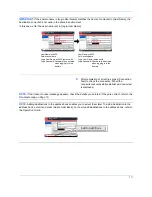
Page 15: ... FTP Folder Path Entry Place original Ready to send Destination 1 Cancel OK Next Dest Add to Addr Book Specify the folder on the destination computer pc4050 scannerdata pc4050 james smith Status 10 10 2008 10 10 Connection Test Host Name Path Login User Name Login Password SMB FTP Folder Path Entry Place original Ready to send Destination 1 Cancel OK Next Dest Add to Addr Book Specify the folder o...

Page 16: ...omputer you specified NOTE The file name containing scanned originals starts with doc followed by additional information by default a timestamp For example a file containing data sent on December 31 2008 02 30 40 pm will be doc20081231143040 You can also specify a name of file in File Name Entry before sending it For details refer to the Operation Guide ...

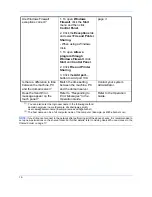
Page 17: ...de and COMMAND CENTER Operation Guide Is the information entered in Host Name correct 2 Check the host name of the destination computer page 8 of this Setup Guide Is the information entered in Path correct Check the name of shared folder page 10 of this Setup Guide Is the information entered in Login User Name correct 1 2 Check the domain name and domain user name page 11 of this Setup Guide Is th...

Page 18: ... 17 Are Windows Firewall exceptions correct 1 To open Windows Firewall click the Start menu and then click Control Panel 2 Click the Exceptions tab and select File and Printer Sharing When using a Windows Vista 1 To open Allow a program through Windows Firewall click Start and Control Panel 2 Click File and Printer Sharing 3 Click the Add port button to add port 139 page 3 Is there a difference in...

Page 19: ...ure to enter the user name and password you set in the above steps through the operation panel when sending the relevant file 4 Click the Create button and then click the Close button to close the New User dialog box The new user is added to the list of the local users 5 Click Close button to close the Manage window 6 Set permissions for the shared folder Right click the folder to be shared select...

Page 20: ...en click the OK button 10 Click the Security tab then click the Add button 11 Add the user name displayed in the Group or user names Click the Add button then click the Locations button Select the computer to which the shared folder was created Example PC4050 and then click the OK button 12 Enter the user name added as a local user into the text box and click the OK button ...

Page 21: ...ded user click the checkbox under Allow for Modify and Read then click the OK button 14 Click the OK button to close the Permissions dialog box 15 Send the file For further details refer to STEP 3 Sending File on page 12 ...

Page 22: ... of local user Example james smith page 17 of this Setup Guide Login Password Password of local user page 17 of this Setup Guide Status 10 10 2008 10 10 Connection Test Host Name Path Login User Name Login Password SMB FTP Folder Path Entry Place original Ready to send Destination 1 Cancel OK Next Dest Add to Addr Book Specify the folder on the destination computer pc4050 scannerdata abcdnet james...

Page 23: ...Rev 3 2008 11 ...
Reviews: